This is the full developer documentation for Templated API Documentation
# Get Account Information
> Learn how to retrieve your account information using the Templated API.
This endpoint allows you to retrieve information about your account, including your email, name, API usage statistics, and quota details.
Here’s a sample request to get your account information:
fetch ( 'https://api.templated.io/v1/account' , {
'Authorization' : `Bearer ${ API_KEY }`
The endpoint returns a JSON object with your account details.
"email" : "user@example.com" ,
email string
name string
apiUsage integer
apiQuota integer
usagePercentage integer
plan string
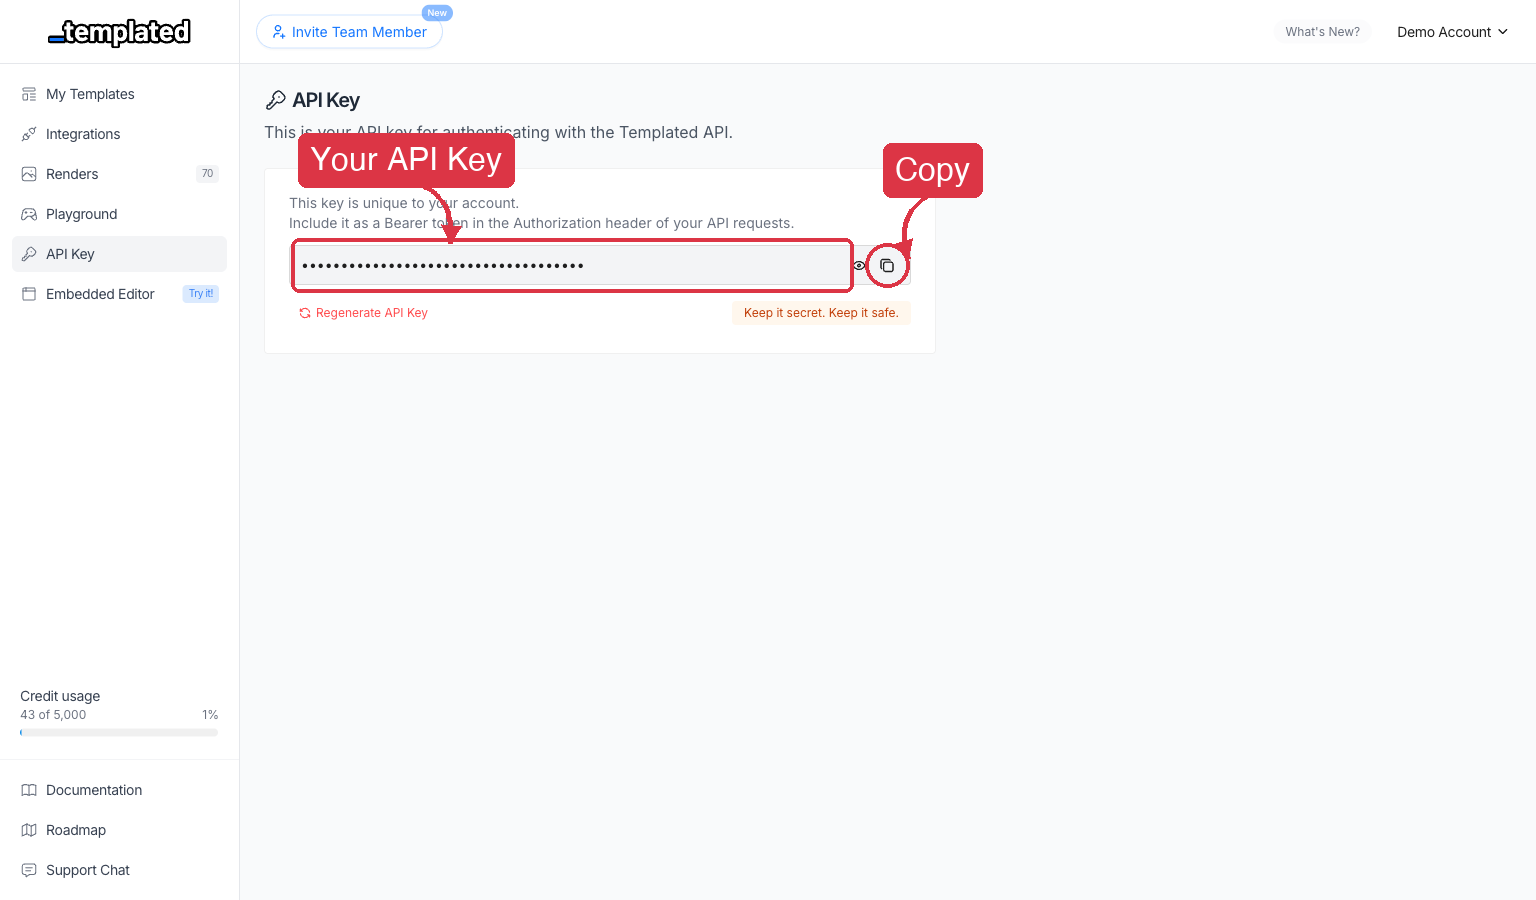
Templated uses API keys to allow access to the API. here . API Key tab of your dashboard.
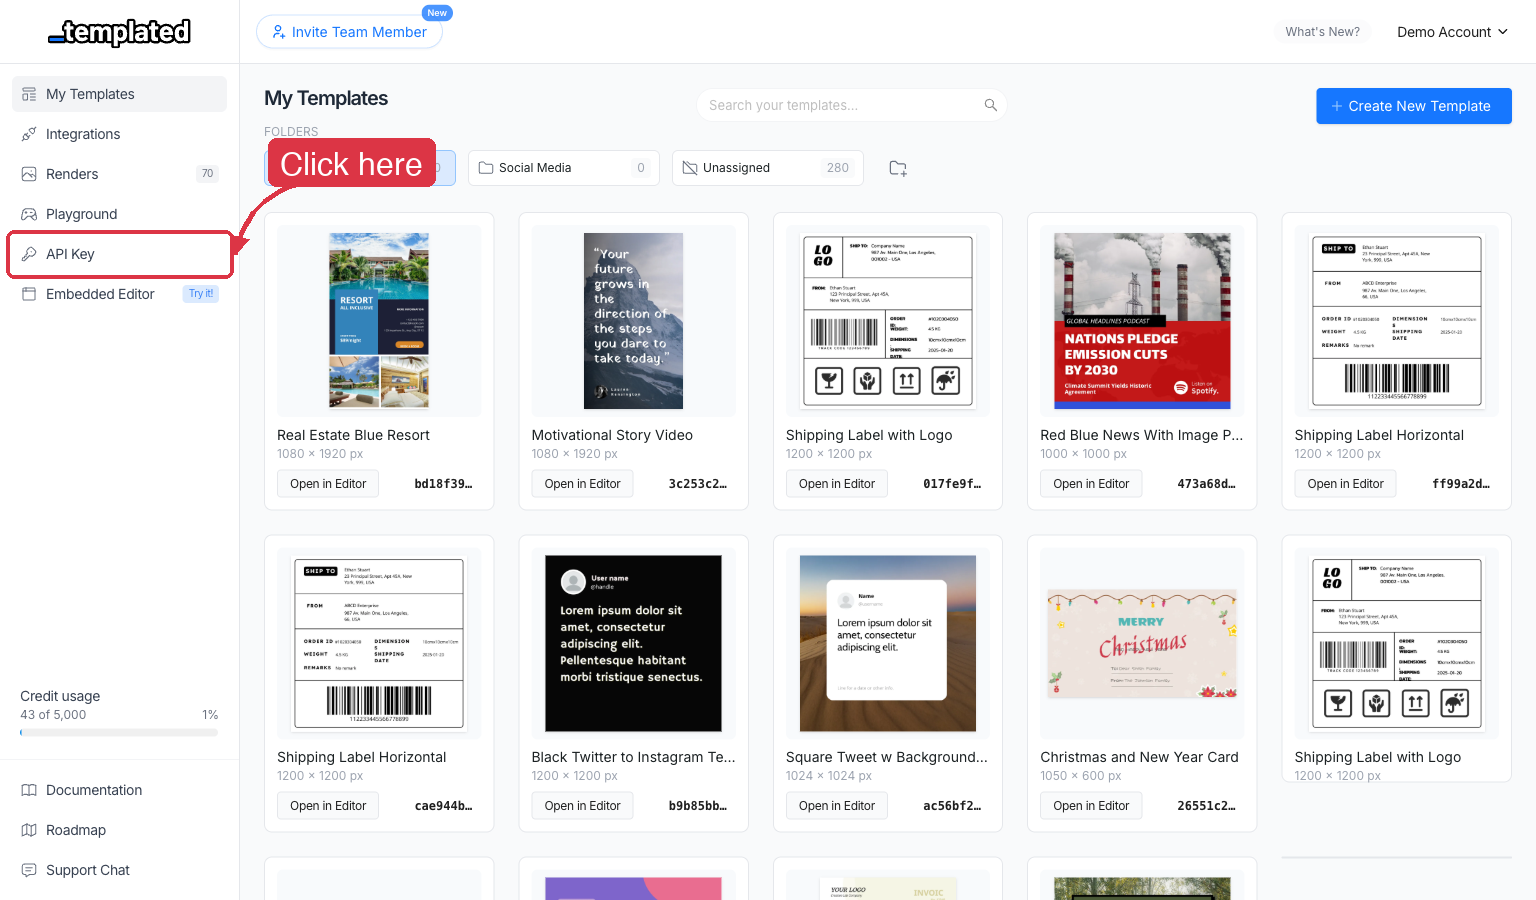
Follow these simple steps to locate your API key in the Templated dashboard:
Log in to your Templated account
Go to app.templated.io and sign in with your credentials.
Click on “API Key” in the sidebar
In the left sidebar navigation, look for the API Key menu item and click on it.
Copy your API Key
Your API key will be displayed on the page. Click the copy button to copy it to your clipboard.
The API expects the API key to be included in all requests in the Authorization header as a Bearer token:
Authorization : Bearer API_KEY
This is the base URL that all requests to the API should be made to:
In the next steps we will see sample code to create, retrieve and list renders and templates usign the API.
# Advanced Features
> Learn advanced techniques for customizing and enhancing your embedded editor integration.
Take your embedded editor integration to the next level with these advanced features and customization options.
The embedded editor supports numerous URL parameters to customize behavior and appearance. These parameters can be added to your embed URL to control the editor’s functionality.
embed string (required)
preview boolean
zoom number
clone boolean
copy boolean
allow-rename boolean
allow-save boolean
allow-download boolean
allow-resize boolean
allow-create-template boolean
allow-layer-move boolean
allow-layer-resize boolean
allow-layer-select boolean
allow-layer-unlock boolean
allow-layer-rename boolean
allow-text-edition boolean
hide-sidebar boolean
hide-header boolean
hide-layers-panel boolean
hide-language-toggle boolean
metadata string
layers string
folder string
image-url string
w number
h number
webhook-url string
external-id string
move-to-folder string
load-uploads boolean
launch-mode string
src = "https://app.templated.io/editor/TEMPLATE_ID?embed=CONFIG_ID
&metadata=ENCODED_METADATA
Pass custom data through the embed that will be sent to your webhooks, enabling you to track user context and trigger specific workflows.
Metadata must be base64-encoded JSON and passed as a URL parameter:
projectId: "project-456" ,
workflowType: "marketing_campaign" ,
campaignId: "campaign-001"
const encodedMetadata = btoa ( JSON . stringify (metadata));
// Create embed URL with metadata
const embedUrl = `https://app.templated.io/editor?embed=${ configId }&metadata=${ encodedMetadata }` ;
document. getElementById ( 'editor-embed' ).src = embedUrl;
"projectId" : "project-456" ,
"clientId" : "client-789" ,
"workflowType" : "marketing_campaign" ,
"campaignId" : "campaign-001"
encoded_metadata = base64.b64encode(
json.dumps(metadata).encode( 'utf-8' )
embed_url = f "https://app.templated.io/editor?embed= { config_id } &metadata= { encoded_metadata } "
'projectId' => 'project-456' ,
'clientId' => 'client-789' ,
'workflowType' => 'marketing_campaign' ,
'campaignId' => 'campaign-001'
$encodedMetadata = base64_encode ( json_encode ($metadata));
$embedUrl = "https://app.templated.io/editor?embed={ $configId }&metadata={ $encodedMetadata }" ;
import React, { useState, useEffect } from 'react' ;
function TemplateEmbed ({ configId , user , project }) {
const [ embedUrl , setEmbedUrl ] = useState ( '' );
workflowType: "marketing_campaign" ,
campaignId: project.campaignId,
timestamp: new Date (). toISOString ()
const encodedMetadata = btoa ( JSON . stringify (metadata));
// Create embed URL with metadata
const url = `https://app.templated.io/editor?embed=${ configId }&metadata=${ encodedMetadata }` ;
}, [configId, user, project]);
export default TemplateEmbed;
Generate metadata dynamically based on user context:
function generateEmbedWithMetadata ( user , project ) {
projectName: project.name,
timestamp: new Date (). toISOString (),
source: 'project_dashboard' ,
permissions: user.permissions,
subscription: user.subscription.plan
const encodedMetadata = btoa ( JSON . stringify (metadata));
// Use external ID to maintain session continuity
const externalId = `user-${ user . id }-project-${ project . id }` ;
return `https://app.templated.io/editor?embed=${ EMBED_CONFIG_ID }&metadata=${ encodedMetadata }&external-id=${ externalId }` ;
const embedUrl = generateEmbedWithMetadata (currentUser, currentProject);
document. getElementById ( 'template-editor' ).src = embedUrl;
Launch the editor with custom layer data to pre-populate templates with user-specific content.
text: "Custom text content" ,
image_url: "https://example.com/user-photo.jpg"
const encodedLayers = btoa ( JSON . stringify (layerData));
src = "https://app.templated.io/editor/TEMPLATE_ID?embed=CONFIG_ID&layers=ENCODED_LAYER_DATA"
function createUserProfileTemplate ( user ) {
image_url: user.profilePicture
image_url: user.company.logo
fill: user.company.brandColor
const encodedLayers = btoa ( JSON . stringify (layers));
return `https://app.templated.io/editor/${ USER_PROFILE_TEMPLATE_ID }?embed=${ EMBED_CONFIG_ID }&layers=${ encodedLayers }` ;
function createCampaignTemplate ( campaign ) {
color: campaign.theme.primaryColor
"campaign-description" : {
text: campaign.description,
image_url: campaign.heroImage
background: campaign.theme.buttonColor
image_url: campaign.brand.logo
const encodedLayers = btoa ( JSON . stringify (layers));
return `https://app.templated.io/editor/${ CAMPAIGN_TEMPLATE_ID }?embed=${ EMBED_CONFIG_ID }&layers=${ encodedLayers }` ;
import React, { useState, useEffect, useMemo } from 'react' ;
function DynamicTemplateEditor ({
const [ embedUrl , setEmbedUrl ] = useState ( '' );
// Generate layers based on template type
const layerData = useMemo (() => {
image_url: userData.profilePicture
image_url: userData.company?.logo
fill: userData.company?.brandColor || "#f0f0f0"
case 'marketing-campaign' :
text: campaignData.title,
color: campaignData.theme?.primaryColor || "#000000"
"campaign-description" : {
text: campaignData.description,
image_url: campaignData.heroImage
text: campaignData.ctaText,
background: campaignData.theme?.buttonColor || "#007bff"
image_url: campaignData.brand?.logo
}, [templateType, userData, campaignData]);
if (Object. keys (layerData). length > 0 ) {
const encodedLayers = btoa ( JSON . stringify (layerData));
const url = `https://app.templated.io/editor/${ templateId }?embed=${ configId }&layers=${ encodedLayers }` ;
}, [templateId, configId, layerData]);
< div className = "template-editor-container" >
title = "Dynamic Template Editor"
< div >Loading template...</ div >
export default DynamicTemplateEditor;
Allow users to edit existing renders, automatically creating template clones for safe editing.
src = "https://app.templated.io/editor?embed=CONFIG_ID&render=RENDER_ID"
function editRender ( renderId , userId ) {
originalRenderId: renderId,
const encodedMetadata = btoa ( JSON . stringify (metadata));
const embedUrl = `https://app.templated.io/editor?embed=${ EMBED_CONFIG_ID }&render=${ renderId }&metadata=${ encodedMetadata }` ;
// Open in modal or new window
openEditorModal (embedUrl);
document. querySelectorAll ( '.edit-render-btn' ). forEach ( btn => {
btn. addEventListener ( 'click' , ( e ) => {
const renderId = e.target.dataset.renderId;
editRender (renderId, currentUser.id);
import React, { useState, useCallback } from 'react' ;
function RenderEditModal ({ embedConfigId , onClose }) {
const [ embedUrl , setEmbedUrl ] = useState ( '' );
const [ isModalOpen , setIsModalOpen ] = useState ( false );
const editRender = useCallback (( renderId , userId ) => {
originalRenderId: renderId,
timestamp: new Date (). toISOString ()
const encodedMetadata = btoa ( JSON . stringify (metadata));
const url = `https://app.templated.io/editor?embed=${ embedConfigId }&render=${ renderId }&metadata=${ encodedMetadata }` ;
const closeModal = () => {
< div className = "modal-overlay" onClick = {closeModal}>
< div className = "modal-content" onClick = {( e ) => e. stopPropagation ()}>
< div className = "modal-header" >
< button onClick = {closeModal} className = "close-btn" >×</ button >
< div className = "modal-body" >
function RenderListItem ({ render , currentUser , embedConfigId }) {
const [ modal , setModal ] = useState ( null );
const handleEditClick = () => {
embedConfigId = {embedConfigId}
onClose = {() => setModal ( null )}
// Trigger the edit function
const editModal = React. createRef ();
editModal.current. editRender (render.id, currentUser.id);
< div className = "render-item" >
< img src = {render.thumbnail} alt = {render.name} />
onClick = {handleEditClick}
className = "edit-render-btn"
export { RenderEditModal, RenderListItem };
Limit template selection to specific folders:
<!-- Show only templates from specific folder -->
src = "https://app.templated.io/editor?embed=CONFIG_ID&folder=FOLDER_ID"
constructor ( embedElement ) {
this .embed = embedElement;
this . setupEventListeners ();
this .embed. addEventListener ( 'load' , () => {
console. log ( 'Editor loaded successfully' );
this . trackEvent ( 'editor_loaded' );
this .embed. addEventListener ( 'error' , ( e ) => {
console. error ( 'Editor failed to load:' , e);
this . trackEvent ( 'editor_error' , { error: e.message });
trackEvent ( eventName , data = {}) {
// Send to your analytics
analytics. track (eventName, {
timestamp: new Date (). toISOString (),
embedConfigId: this . getConfigId ()
// Show fallback UI when editor fails to load
const fallback = document. createElement ( 'div' );
fallback.className = 'editor-fallback' ;
<div class="fallback-message">
<h3>Editor temporarily unavailable</h3>
<p>Please try refreshing the page or contact support.</p>
<button onclick="location.reload()">Refresh Page</button>
this .embed.parentNode. replaceChild (fallback, this .embed);
const url = new URL ( this .embed.src);
return url.searchParams. get ( 'embed' );
const editorEmbed = document. getElementById ( 'template-editor' );
const monitor = new EditorMonitor (editorEmbed);
Best Practices for Advanced Features
Security:
Always validate metadata on your server
Sanitize user inputs before encoding
Use HTTPS for all embed URLs
Performance:
Implement lazy loading for multiple editors
Preload resources when appropriate
Monitor and optimize embed load times
User Experience:
Provide loading states and error fallbacks
Implement responsive design
Test across different devices and browsers
# Embed Configuration
> Learn how to configure your embed settings for the Templated Editor.
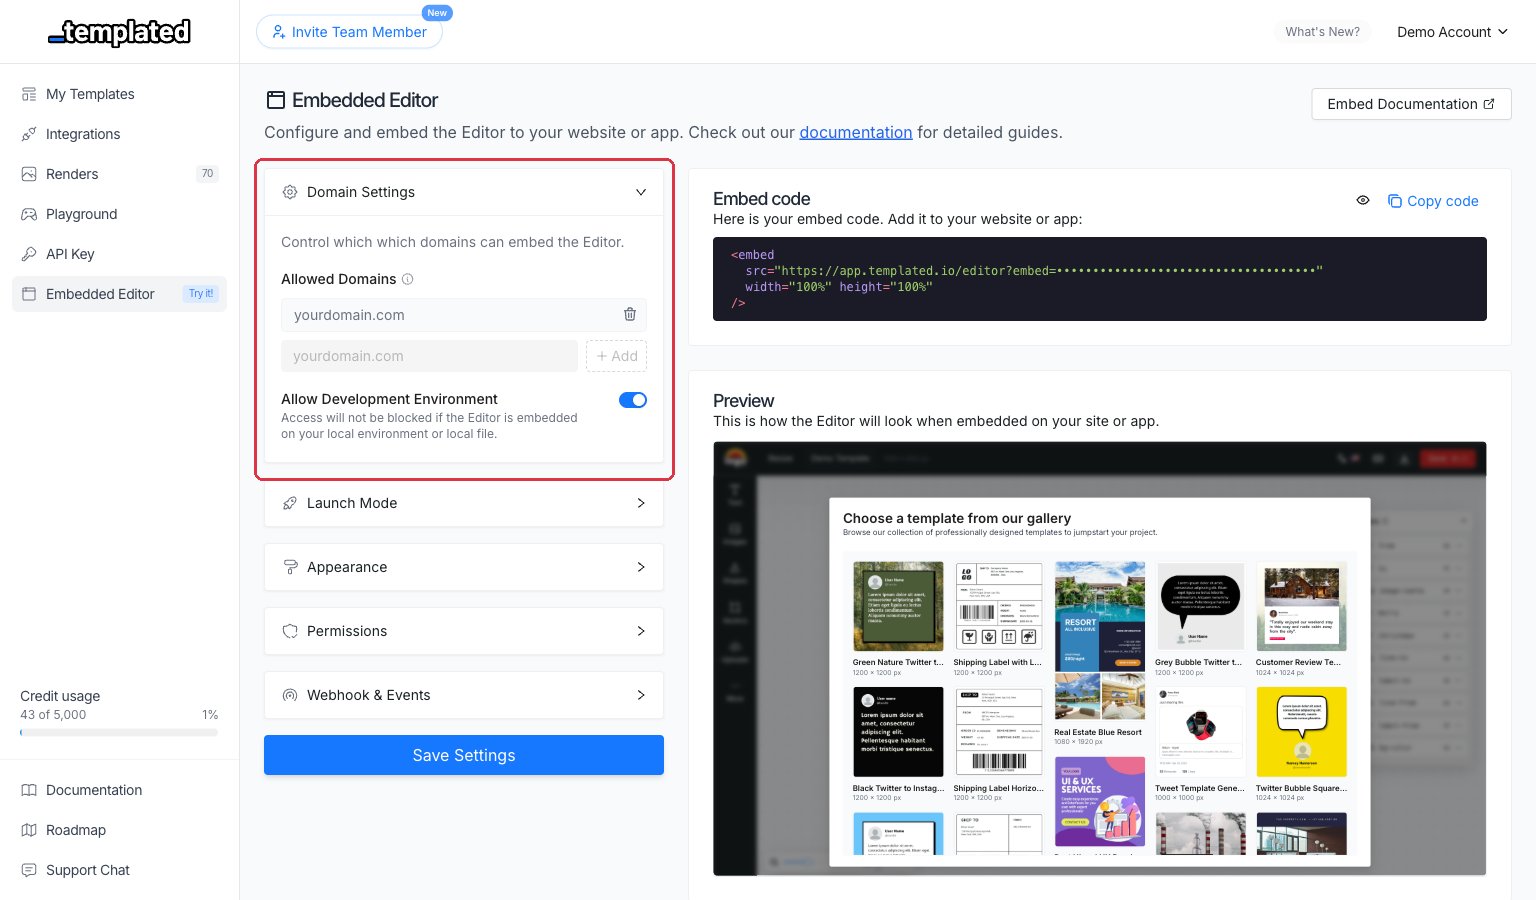
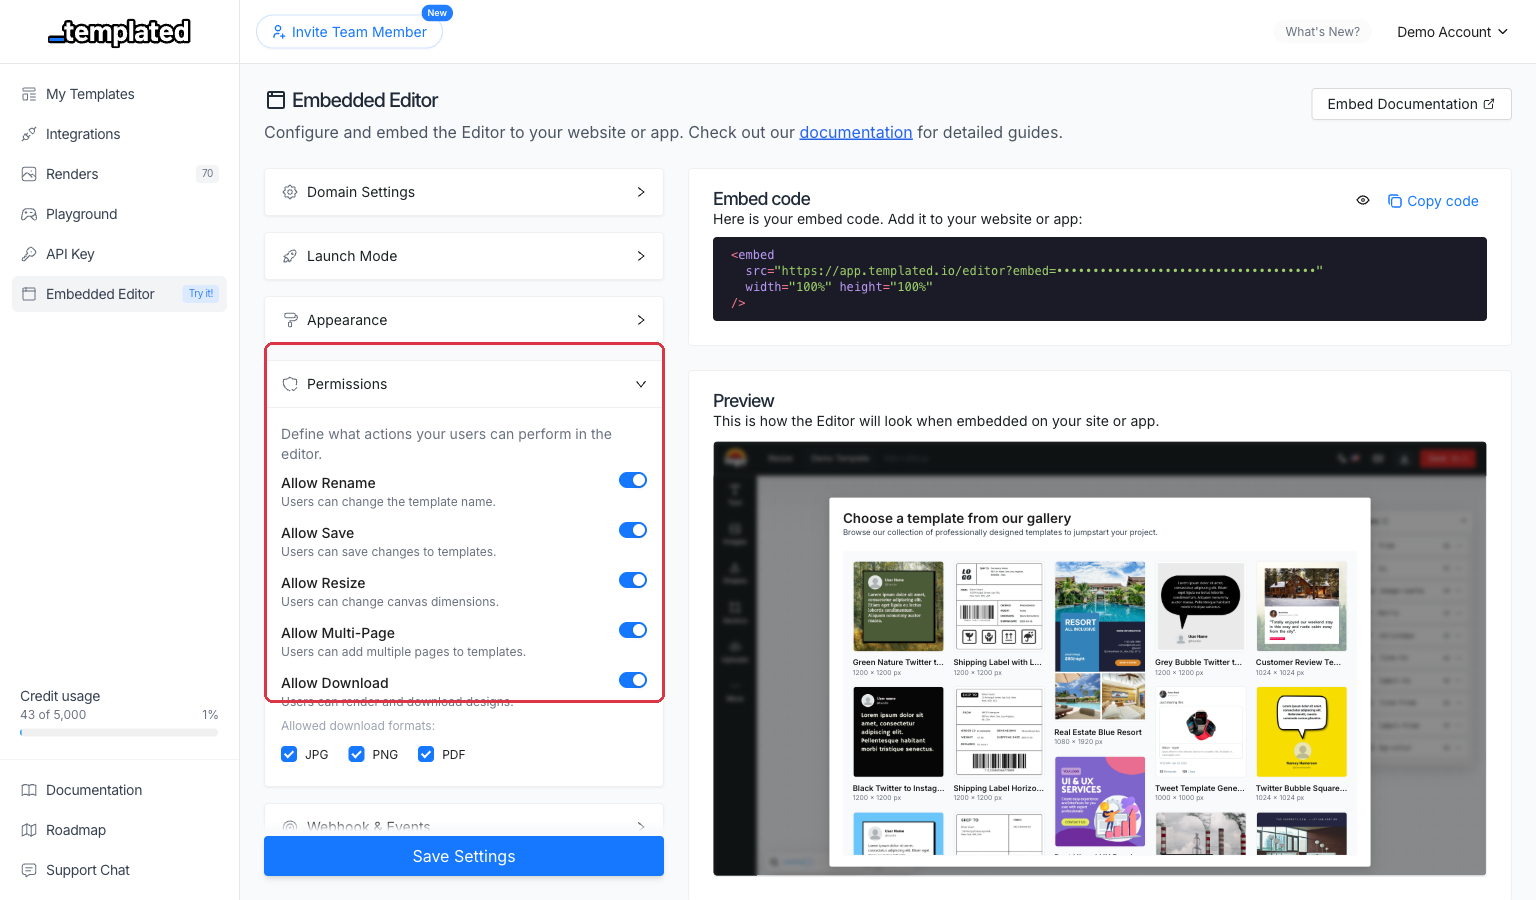
Configure your embedded editor settings to match your brand and control user permissions. Access these settings in your Templated dashboard under Embed Setup .
Control which domains are allowed to embed the editor.
Domain
Allow Development Environment boolean
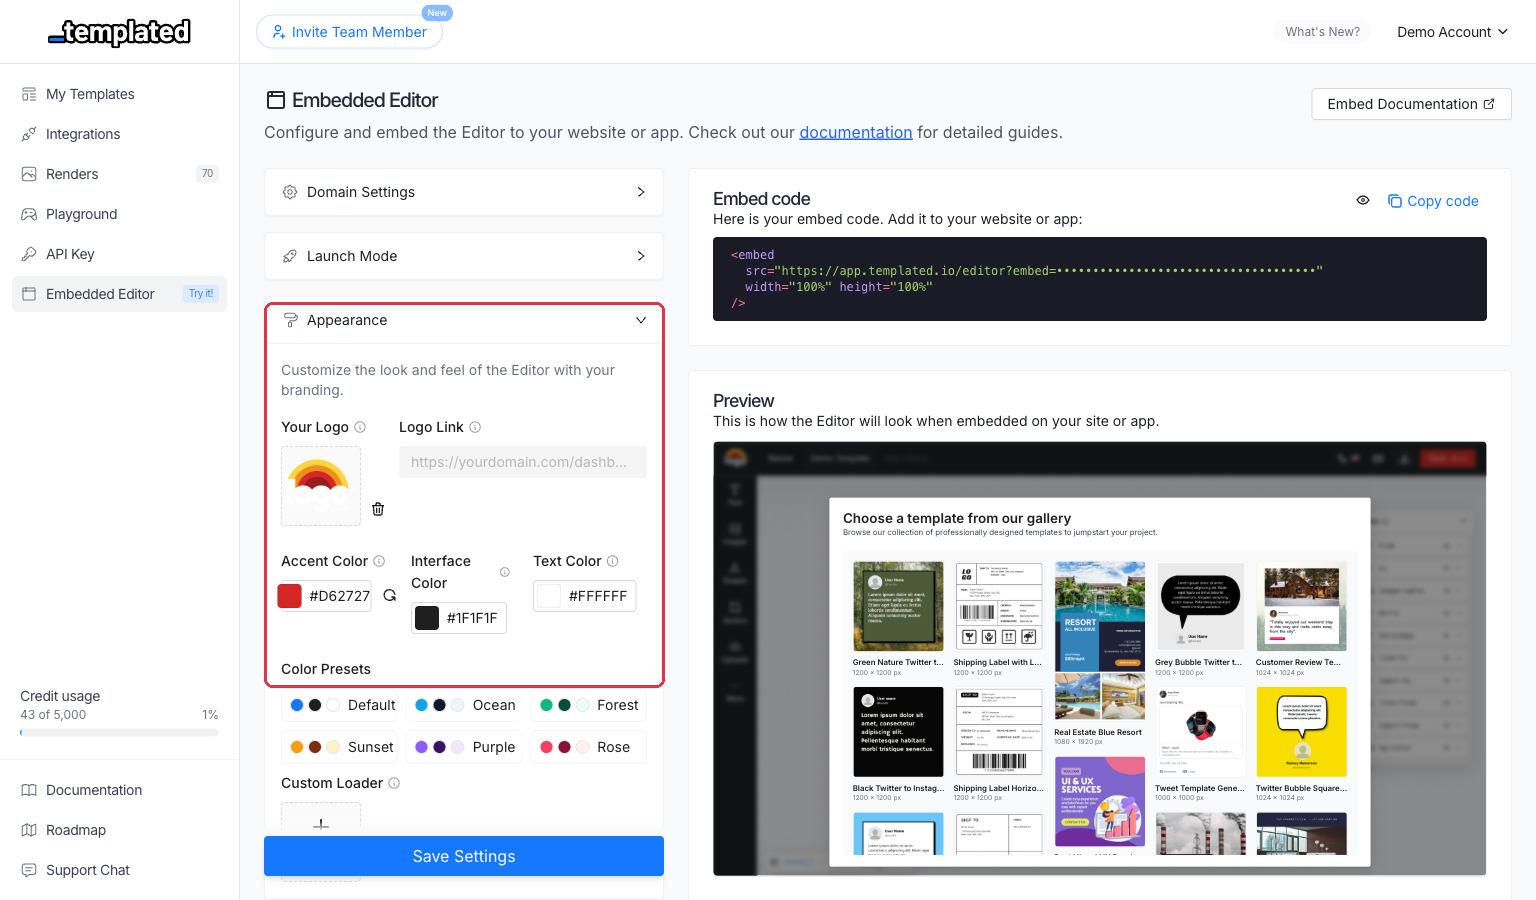
Customize the look and feel of the editor with your branding.
Logo URL
Logo Link
Accent Color
Custom Loader
Logo URL: https://yourdomain.com/logo.png
Logo Link: https://yourdomain.com/dashboard
Control what actions users can perform in the embedded editor.
Allow Rename
Allow Save
Allow Resize
Allow Download
Download Formats
Allow Layer Move
Allow Layer Resize
Allow Layer Select
Allow Layer Unlock
Allow Layer Rename
Allow Text Edition
Allow Create Template
Launch Modes Learn how to choose how the editor initializes for your users.
Enable development mode to test on localhost
Copy your embed code from the dashboard
Test all permissions you’ve configured
Verify webhook delivery if configured
Check branding appearance matches your design
# Implementation Examples
> Practical examples for integrating the Templated Editor.
Here you can find some examples of the most common use cases for integrating the Templated Editor in your application.
function openTemplateEditor ( userId ) {
timestamp: new Date (). toISOString ()
const encodedMetadata = btoa ( JSON . stringify (metadata));
const embedUrl = `https://app.templated.io/editor?embed=YOUR_CONFIG_ID&metadata=${ encodedMetadata }` ;
const modal = document. createElement ( 'div' );
<embed src="${ embedUrl }" width="100%" height="700px" />
<button onclick="this.parentElement.remove()">Close</button>
document.body. appendChild (modal);
import React, { useState } from 'react' ;
function TemplateEditorModal ({ userId , configId , onClose }) {
const [ isOpen , setIsOpen ] = useState ( false );
const embedUrl = React. useMemo (() => {
timestamp: new Date (). toISOString ()
const encodedMetadata = btoa ( JSON . stringify (metadata));
return `https://app.templated.io/editor?embed=${ configId }&metadata=${ encodedMetadata }` ;
const handleClose = () => {
if ( ! isOpen) return null ;
< div className = "modal-overlay" onClick = {handleClose}>
< div className = "modal" onClick = {( e ) => e. stopPropagation ()}>
< button onClick = {handleClose} className = "close-button" >
function EditorLauncher ({ userId , configId }) {
const [ showModal , setShowModal ] = useState ( false );
< button onClick = {() => setShowModal ( true )}>
onClose = {() => setShowModal ( false )}
export { TemplateEditorModal, EditorLauncher };
app. post ( '/webhook' , ( req , res ) => {
const { event , template , metadata } = req.body;
console. log ( `Template ${ template . id } saved by user ${ metadata . userId }` );
res. status ( 200 ). json ({ received: true });
// pages/api/webhook.js or app/api/webhook/route.js
export default async function handler ( req , res ) {
if (req.method !== 'POST' ) {
return res. status ( 405 ). json ({ error: 'Method not allowed' });
const { event , template , metadata } = req.body;
await handleTemplateSave (template, metadata);
await handleTemplateRender (template, metadata);
await handleTemplateDelete (template, metadata);
console. log ( `Unknown event: ${ event }` );
res. status ( 200 ). json ({ received: true });
console. error ( 'Webhook error:' , error);
res. status ( 500 ). json ({ error: 'Internal server error' });
async function handleTemplateSave ( template , metadata ) {
console. log ( `Template ${ template . id } saved by user ${ metadata . userId }` );
// Example: Save to database
// await db.templates.update({
// userId: metadata.userId,
// lastModified: new Date()
// Example: Send notification
// await sendNotification(metadata.userId, 'Template saved successfully');
async function handleTemplateRender ( template , metadata ) {
console. log ( `Template ${ template . id } rendered by user ${ metadata . userId }` );
// Example: Track usage analytics
// await analytics.track('template_rendered', {
// templateId: template.id,
// userId: metadata.userId,
async function handleTemplateDelete ( template , metadata ) {
console. log ( `Template ${ template . id } deleted by user ${ metadata . userId }` );
// Example: Clean up resources
// await cleanupTemplateResources(template.id);
Pre-populate template layers with custom data when the editor loads.
function openEditorWithCustomData ( templateId , userData ) {
image_url: userData.profileImage
fill: userData.brandColor || "#0066CC"
const encodedLayers = btoa ( JSON . stringify (layerData));
const embedUrl = `https://app.templated.io/editor/${ templateId }?embed=YOUR_CONFIG_ID&layers=${ encodedLayers }` ;
window. open (embedUrl, '_blank' );
profileImage: 'https://example.com/profile.jpg' ,
openEditorWithCustomData ( 'template_abc123' , userData);
import React, { useState, useCallback } from 'react' ;
function CustomTemplateEditor ({ templateId , configId , userData }) {
const [ isEditorOpen , setIsEditorOpen ] = useState ( false );
const generateEmbedUrl = useCallback (() => {
image_url: userData.profileImage
fill: userData.brandColor || "#0066CC"
const encodedLayers = btoa ( JSON . stringify (layerData));
return `https://app.templated.io/editor/${ templateId }?embed=${ configId }&layers=${ encodedLayers }` ;
}, [templateId, configId, userData]);
const openEditor = () => {
const embedUrl = generateEmbedUrl ();
window. open (embedUrl, '_blank' , 'width=1200,height=800' );
const openInModal = () => {
< div className = "template-editor-launcher" >
< div className = "user-preview" >
< img src = {userData.profileImage} alt = {userData.name} />
< p >{userData.company}</ p >
< div className = "action-buttons" >
< button onClick = {openEditor} className = "btn-primary" >
< button onClick = {openInModal} className = "btn-secondary" >
{ /* Modal Implementation */ }
< div className = "modal-overlay" onClick = {() => setIsEditorOpen ( false )}>
< div className = "modal-content" onClick = {( e ) => e. stopPropagation ()}>
< div className = "modal-header" >
< h3 >Customize Template</ h3 >
onClick = {() => setIsEditorOpen ( false )}
function UserDashboard ({ user }) {
templateId: 'template_abc123' ,
configId: process.env. REACT_APP_EMBED_CONFIG_ID
< div className = "dashboard" >
< h2 >Welcome, {user.name}</ h2 >
export { CustomTemplateEditor, UserDashboard };
Edit an existing render by loading it into the editor.
function editExistingRender ( renderId , userId ) {
const encodedMetadata = btoa ( JSON . stringify (metadata));
const embedUrl = `https://app.templated.io/editor?embed=YOUR_CONFIG_ID&metadata=${ encodedMetadata }` ;
const modal = document. createElement ( 'div' );
modal.className = 'render-editor-modal' ;
<div class="modal-backdrop">
<div class="modal-content">
<div class="modal-header">
<button class="close-btn" onclick="this.closest('.render-editor-modal').remove()">×</button>
<iframe src="${ embedUrl }" width="100%" height="800px" frameborder="0"></iframe>
document.body. appendChild (modal);
// Alternative: Edit render with custom callback
function editRenderWithCallback ( renderId , onSave ) {
onSave: onSave. toString () // Pass callback function
const encodedMetadata = btoa ( JSON . stringify (metadata));
const embedUrl = `https://app.templated.io/editor?embed=YOUR_CONFIG_ID&metadata=${ encodedMetadata }` ;
import React, { useState, useCallback } from 'react' ;
function RenderEditor ({ renderId , userId , configId , onSave , onClose }) {
const [ isLoading , setIsLoading ] = useState ( true );
const [ error , setError ] = useState ( null );
const embedUrl = React. useMemo (() => {
timestamp: new Date (). toISOString ()
const encodedMetadata = btoa ( JSON . stringify (metadata));
return `https://app.templated.io/editor?embed=${ configId }&metadata=${ encodedMetadata }` ;
}, [renderId, userId, configId]);
const handleIframeLoad = () => {
const handleIframeError = () => {
setError ( 'Failed to load editor' );
< div className = "render-editor-modal" >
< div className = "modal-backdrop" onClick = {onClose}>
< div className = "modal-content" onClick = {( e ) => e. stopPropagation ()}>
< div className = "modal-header" >
< button onClick = {onClose} className = "close-btn" >
< div className = "modal-body" >
< div className = "loading-overlay" >
< div className = "spinner" ></ div >
< div className = "error-message" >
< button onClick = {() => window.location. reload ()}>
onLoad = {handleIframeLoad}
onError = {handleIframeError}
style = {{ display: error ? 'none' : 'block' }}
// Render list component with edit functionality
function RenderGallery ({ renders , userId , configId }) {
const [ editingRender , setEditingRender ] = useState ( null );
const handleEditRender = ( render ) => {
setEditingRender (render);
const handleSaveRender = ( updatedRender ) => {
console. log ( 'Render saved:' , updatedRender);
const handleCloseEditor = () => {
< div className = "render-gallery" >
< div className = "render-grid" >
{renders. map (( render ) => (
< div key = {render.id} className = "render-item" >
< img src = {render.thumbnail} alt = {render.name} />
< div className = "render-actions" >
onClick = {() => handleEditRender (render)}
renderId = {editingRender.id}
onSave = {handleSaveRender}
onClose = {handleCloseEditor}
// Hook for render editing functionality
function useRenderEditor ( configId ) {
const [ isEditing , setIsEditing ] = useState ( false );
const [ currentRender , setCurrentRender ] = useState ( null );
const editRender = useCallback (( renderId , userId ) => {
setCurrentRender ({ id: renderId, userId });
const closeEditor = useCallback (() => {
RenderEditorComponent: isEditing && currentRender ? (
renderId = {currentRender.id}
userId = {currentRender.userId}
export { RenderEditor, RenderGallery, useRenderEditor };
Create a clone of a template that doesn’t appear in your dashboard.
function cloneTemplate ( templateId , userId , customizations = {}) {
customizations: customizations
const encodedMetadata = btoa ( JSON . stringify (metadata));
const embedUrl = `https://app.templated.io/editor/${ templateId }?embed=YOUR_CONFIG_ID&metadata=${ encodedMetadata }` ;
const newWindow = window. open (embedUrl, '_blank' );
// Optional: Listen for completion
const checkClosed = setInterval (() => {
clearInterval (checkClosed);
console. log ( 'Template clone editor closed' );
// Handle post-clone actions
// Example with product customization
function customizeProduct ( productId , templateId ) {
allowedElements: [ 'text' , 'image' ], // Restrict editing
hiddenLayers: [ 'background' , 'logo' ], // Lock certain layers
requiredFields: [ 'customer_name' , 'order_number' ]
cloneTemplate (templateId, 'customer_123' , customizations);
const templateId = 'template_xyz789' ;
const userId = 'user_456' ;
cloneTemplate (templateId, userId);
// Clone with restrictions
cloneTemplate (templateId, userId, {
allowedElements: [ 'text' ],
import React, { useState, useEffect, useRef } from 'react' ;
function TemplateCloneButton ({ templateId , configId , userId , onComplete , customizations = {} }) {
const [ isLoading , setIsLoading ] = useState ( false );
const popupRef = useRef ( null );
const handleClone = () => {
customizations: customizations,
returnUrl: window.location.href,
timestamp: new Date (). toISOString ()
const encodedMetadata = btoa ( JSON . stringify (metadata));
const embedUrl = `https://app.templated.io/editor/${ templateId }?embed=${ configId }&metadata=${ encodedMetadata }` ;
// Use popup window for better UX
popupRef.current = window. open (
'width=1200,height=800,scrollbars=yes,resizable=yes'
// Listen for completion message
const messageHandler = ( event ) => {
if (event.origin === 'https://app.templated.io' && event.data.type === 'template_saved' ) {
popupRef.current. close ();
onComplete ?.(event.data.template);
window. removeEventListener ( 'message' , messageHandler);
window. addEventListener ( 'message' , messageHandler);
// Handle popup closed manually
const checkClosed = setInterval (() => {
if (popupRef.current?.closed) {
clearInterval (checkClosed);
window. removeEventListener ( 'message' , messageHandler);
className = "clone-template-btn"
{isLoading ? 'Opening Editor...' : 'Customize This Design' }
// Advanced template clone component with modal support
function TemplateCloneModal ({ templateId , configId , userId , isOpen , onClose , onComplete }) {
const [ embedUrl , setEmbedUrl ] = useState ( '' );
if (isOpen && templateId) {
timestamp: new Date (). toISOString ()
const encodedMetadata = btoa ( JSON . stringify (metadata));
setEmbedUrl ( `https://app.templated.io/editor/${ templateId }?embed=${ configId }&metadata=${ encodedMetadata }` );
}, [isOpen, templateId, configId, userId]);
if ( ! isOpen) return null ;
< div className = "template-clone-modal" >
< div className = "modal-overlay" onClick = {onClose}>
< div className = "modal-content" onClick = {( e ) => e. stopPropagation ()}>
< div className = "modal-header" >
< button onClick = {onClose} className = "close-btn" >×</ button >
< div className = "modal-body" >
title = "Template Clone Editor"
// Template gallery with clone functionality
function TemplateGallery ({ templates , configId , userId }) {
const [ cloneModal , setCloneModal ] = useState ({ isOpen: false , templateId: null });
const handleCloneTemplate = ( templateId ) => {
setCloneModal ({ isOpen: true , templateId });
const handleCloneComplete = ( newTemplate ) => {
console. log ( 'Template cloned:' , newTemplate);
setCloneModal ({ isOpen: false , templateId: null });
// Refresh template list or show success message
const handleCloseModal = () => {
setCloneModal ({ isOpen: false , templateId: null });
< div className = "template-gallery" >
< div className = "template-grid" >
{templates. map (( template ) => (
< div key = {template.id} className = "template-card" >
< img src = {template.thumbnail} alt = {template.name} />
< div className = "template-info" >
< p >{template.description}</ p >
< div className = "template-actions" >
onComplete = {handleCloneComplete}
onClick = {() => handleCloneTemplate (template.id)}
className = "btn-secondary"
templateId = {cloneModal.templateId}
isOpen = {cloneModal.isOpen}
onClose = {handleCloseModal}
onComplete = {handleCloneComplete}
// Custom hook for template cloning
function useTemplateClone ( configId ) {
const [ isCloning , setIsCloning ] = useState ( false );
const [ clonedTemplates , setClonedTemplates ] = useState ([]);
const cloneTemplate = ( templateId , userId , customizations = {}) => {
return new Promise (( resolve , reject ) => {
timestamp: new Date (). toISOString ()
const encodedMetadata = btoa ( JSON . stringify (metadata));
const embedUrl = `https://app.templated.io/editor/${ templateId }?embed=${ configId }&metadata=${ encodedMetadata }` ;
const popup = window. open (embedUrl, 'template-clone' , 'width=1200,height=800' );
const messageHandler = ( event ) => {
if (event.origin === 'https://app.templated.io' && event.data.type === 'template_saved' ) {
setClonedTemplates ( prev => [ ... prev, event.data.template]);
resolve (event.data.template);
window. removeEventListener ( 'message' , messageHandler);
window. addEventListener ( 'message' , messageHandler);
const checkClosed = setInterval (() => {
clearInterval (checkClosed);
window. removeEventListener ( 'message' , messageHandler);
reject ( new Error ( 'Popup closed by user' ));
Implementation Tips
Start Simple: Begin with a basic modal implementation and gradually add features.
Test Thoroughly: Always test your webhook endpoints and metadata encoding.
Security First: Validate all metadata on your server before processing.
User Experience: Provide clear feedback and loading states for users.
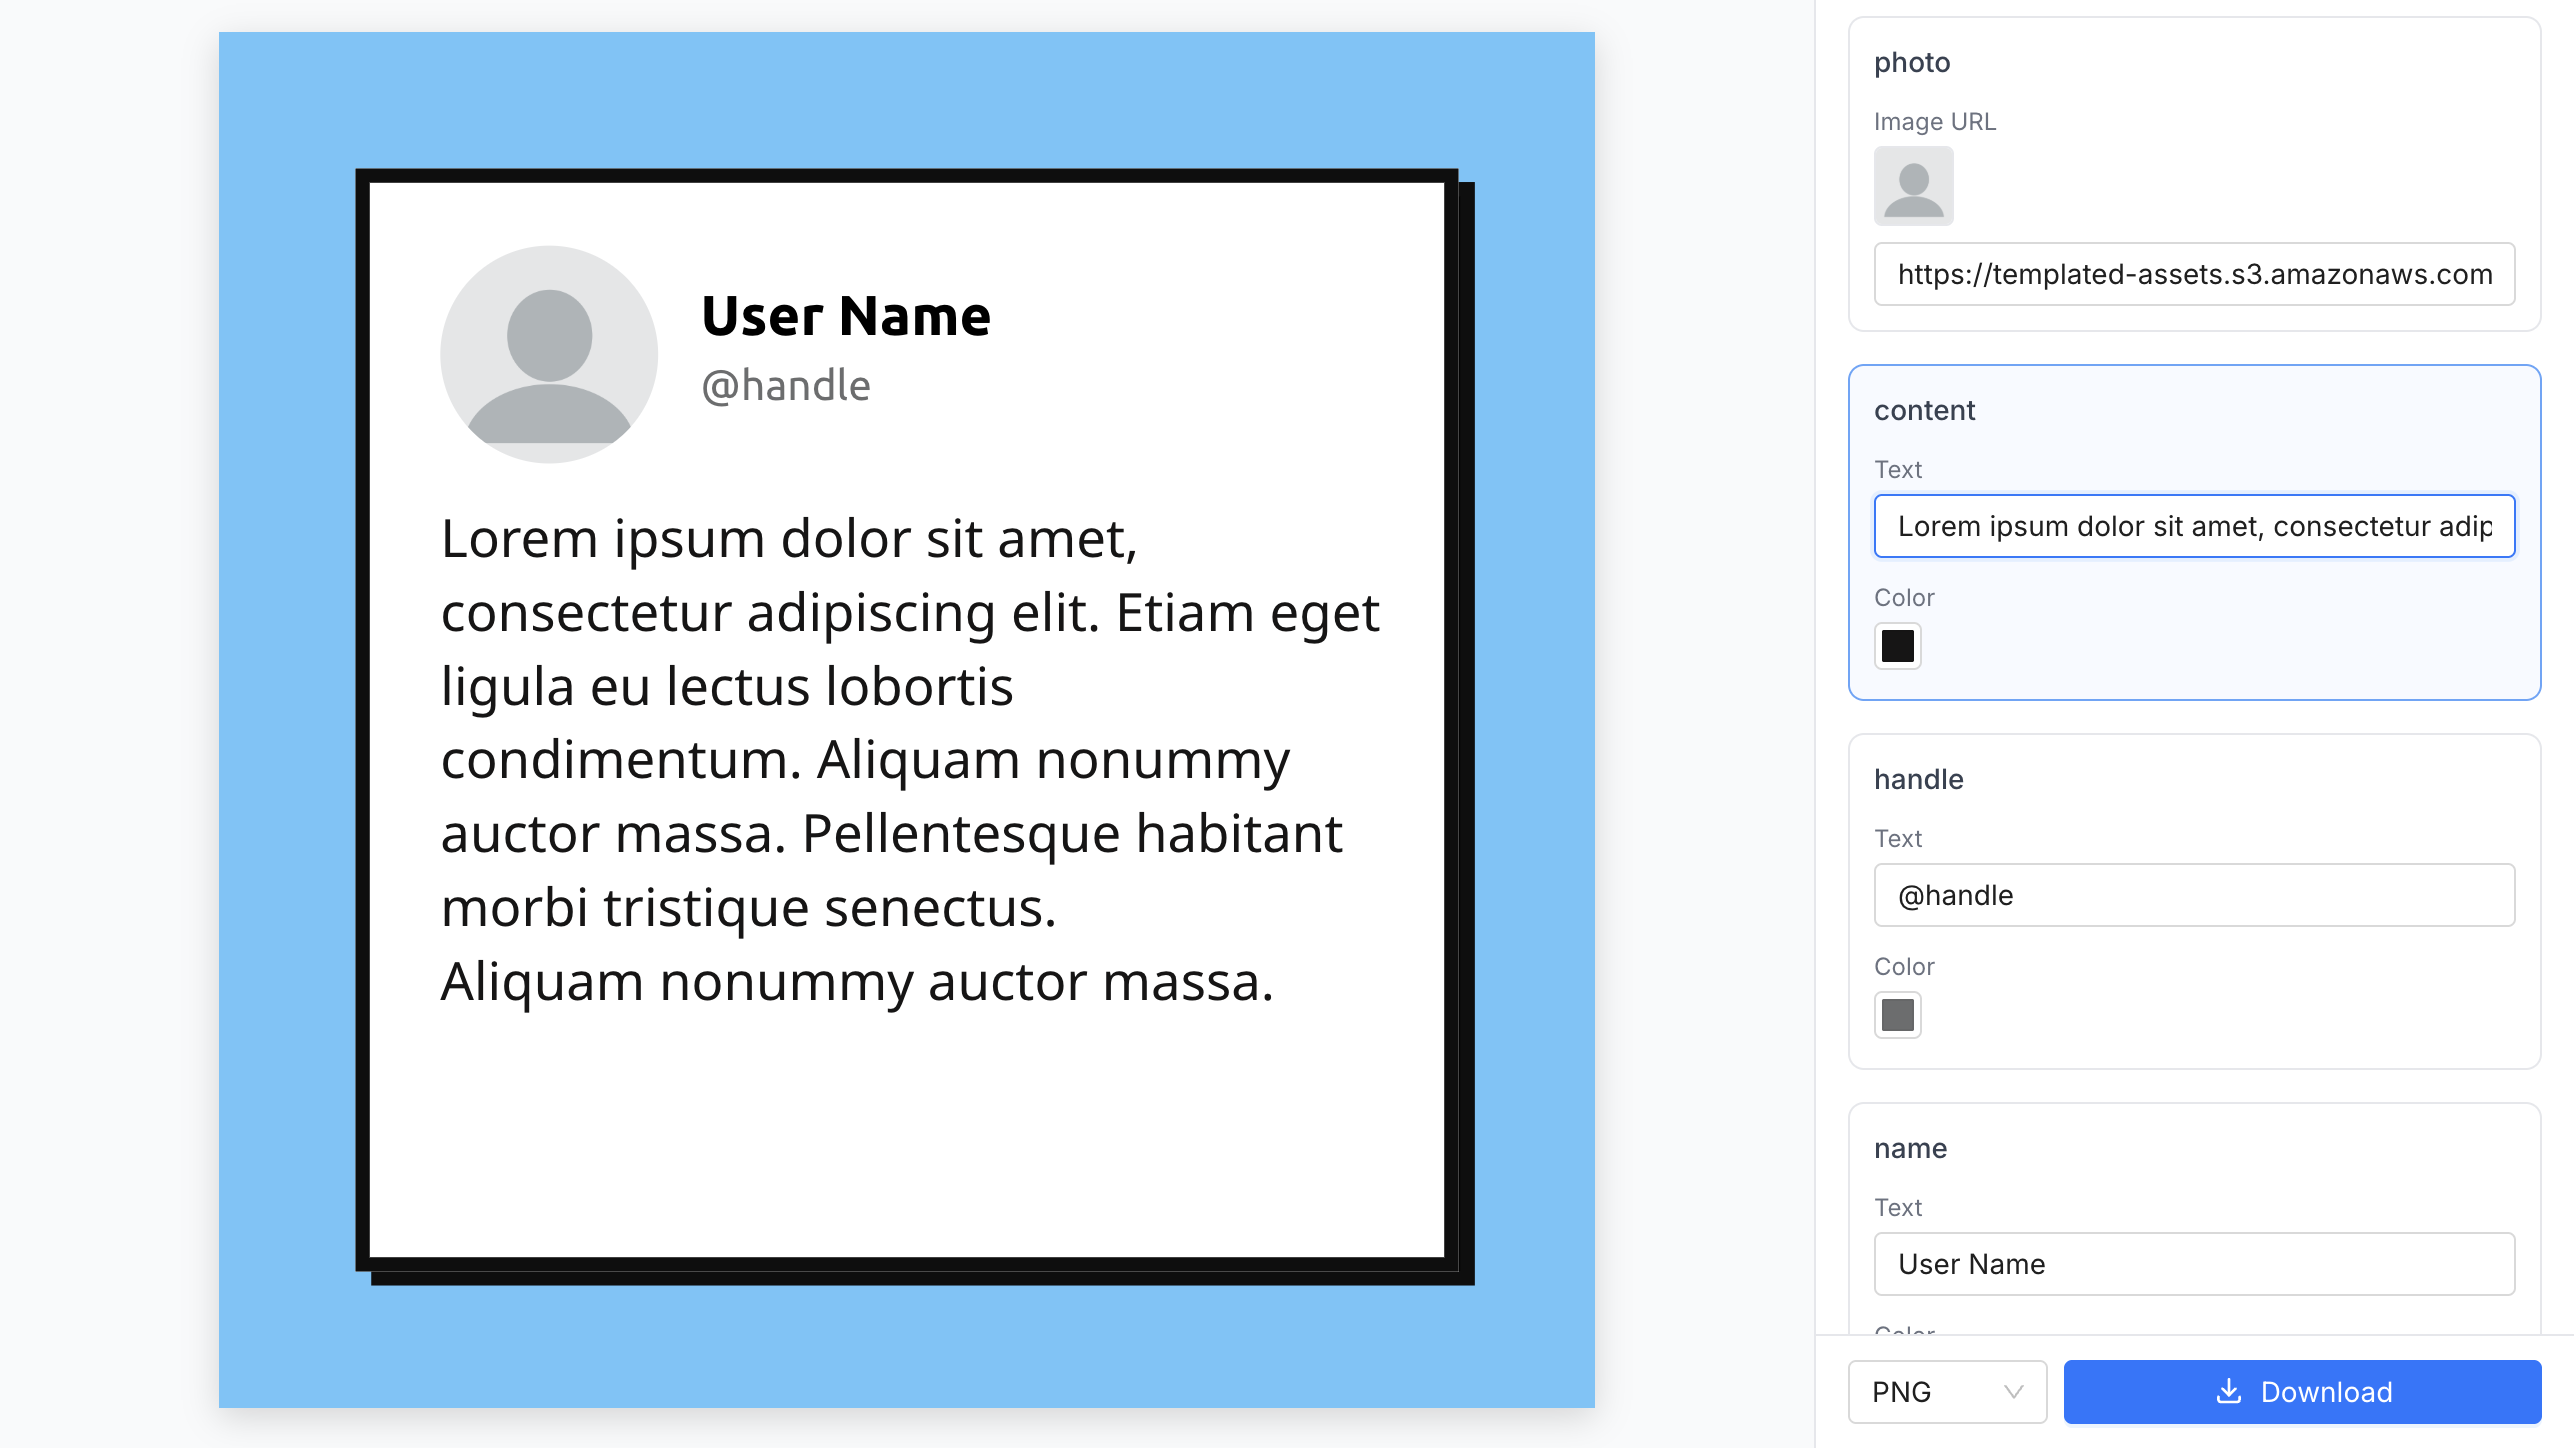
# Form Mode
> Canvas + auto-generated form panel for end-users to customize template layers without the full editor.
Form Mode displays a canvas alongside an auto-generated form panel. End-users fill in text, images, and colors through the form; the canvas updates in real-time. Designed for embedding via iframe when you want users to customize templates without the full editor UI.
Check out how it looks like:
Use the form base path: /editor/form/{TEMPLATE_ID}?embed={CONFIG_ID}.
src = "https://app.templated.io/editor/form/{$TEMPLATE_ID}?embed={$CONFIG_ID}"
form-panel-position (left|right) — form panel position, default right
All Preview Mode URL parameters also work in Form Mode — including zoom, layers, metadata, clone, allow-*, hide-*, and integration options.
The download button visibility and allowed formats are controlled by the existing allow-download parameter and the Download Formats setting in your embed configuration dashboard.
See URL Parameters Reference .
Example with flags:
src = "https://app.templated.io/editor/form/{$TEMPLATE_ID}?embed={$CONFIG_ID}
&form-panel-position=left&allow-download=true"
width = "100%" height = "600" frameborder = "0"
Lock layers in the editor to hide them from the form.
Each layer type renders a different set of form controls:
Layer type Form controls Text Text input + color picker Image URL input Shape Fill color picker + stroke color picker QR Code Text input for data Barcode Text input for data Rating Number input
After the iframe loads, you can control Form Mode at runtime using postMessage. The editor will also send events back.
// Toggle form mode on or off
iframe.contentWindow. postMessage ({
// Change the form panel position
iframe.contentWindow. postMessage ({
type: 'SET_FORM_PANEL_POSITION' ,
position: 'left' // 'left' | 'right'
window. addEventListener ( 'message' , ( event ) => {
// Optional: verify origin: if (event.origin !== 'https://app.templated.io') return;
case 'FORM_MODE_UPDATED' :
console. log ( 'Form mode:' , msg.enabled, 'Success:' , msg.success);
// Panel position changed
case 'FORM_PANEL_POSITION_UPDATED' :
console. log ( 'Panel position:' , msg.position, 'Success:' , msg.success);
// A form field value changed
case 'FORM_VALUES_CHANGED' :
// msg.data contains { layerName: { prop: value } }
console. log ( 'Form values changed:' , msg.data);
// User clicked the render button in the form
case 'FORM_RENDER_REQUESTED' :
console. log ( 'Render requested:' , msg.format, msg.templateId);
On screens narrower than 1024px, the form panel automatically stacks below the canvas for a mobile-friendly layout.
< iframe id = "template-embed" width = "100%" height = "700" frameborder = "0" ></ iframe >
< button onclick = " toggleFormMode ()" >Toggle Form Mode</ button >
< button onclick = " switchPanelPosition ()" >Switch Panel Position</ button >
const iframe = document. getElementById ( 'template-embed' );
const CONFIG_ID = 'YOUR_EMBED_CONFIG_ID' ;
const TEMPLATE_ID = 'tpl_ABC123' ;
let panelPosition = 'right' ;
// 1) Initial URL-based load
const url = new URL ( `https://app.templated.io/editor/form/${ TEMPLATE_ID }` );
url.searchParams. set ( 'embed' , CONFIG_ID );
url.searchParams. set ( 'form-panel-position' , 'right' );
iframe.src = url. toString ();
// 2) Listen for editor events
window. addEventListener ( 'message' , ( event ) => {
console. log ( 'Received message:' , msg);
console. log ( 'Editor ready for interactions' );
case 'FORM_MODE_UPDATED' :
formEnabled = msg.enabled;
console. log ( 'Form mode:' , formEnabled ? 'enabled' : 'disabled' );
case 'FORM_PANEL_POSITION_UPDATED' :
panelPosition = msg.position;
console. log ( 'Panel position:' , panelPosition);
case 'FORM_VALUES_CHANGED' :
console. log ( 'Form values changed:' , msg.data);
case 'FORM_RENDER_REQUESTED' :
console. log ( 'Render requested:' , msg.format, msg.templateId);
function toggleFormMode () {
formEnabled = ! formEnabled;
iframe.contentWindow. postMessage ({
function switchPanelPosition () {
panelPosition = panelPosition === 'right' ? 'left' : 'right' ;
iframe.contentWindow. postMessage ({
type: 'SET_FORM_PANEL_POSITION' ,
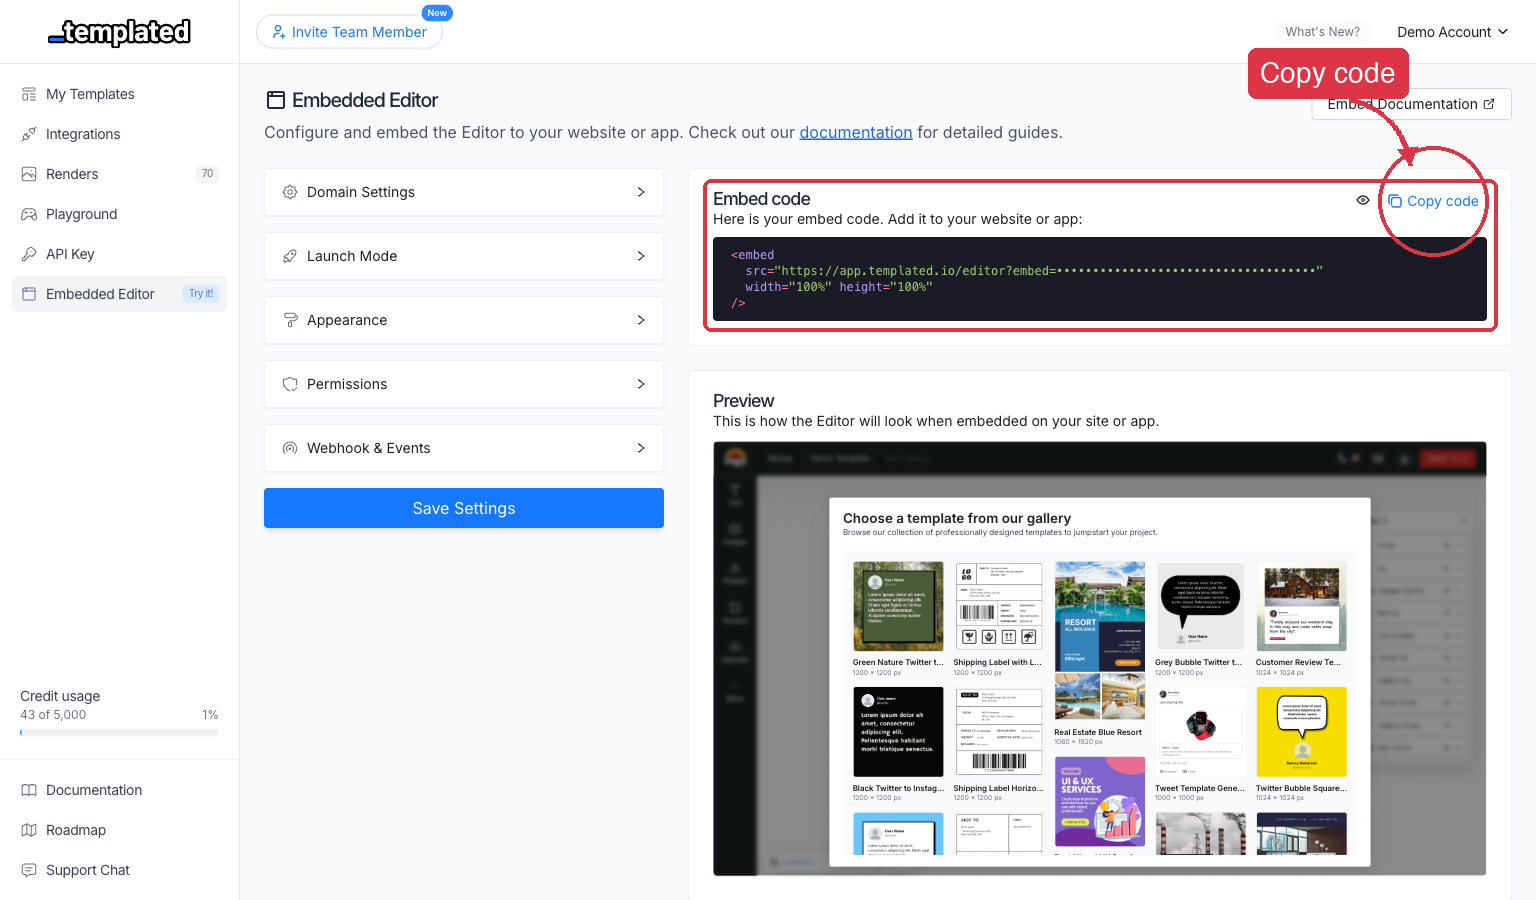
The Embedded Editor allows you to integrate Templated’s powerful template editing capabilities directly into your website or application. here
Simple Integration
Embed the editor with a simple HTML embed tag. No complex setup required.
Customizable
Customize colors, logos, permissions, and behavior to match your brand.
Launch Modes
Start with your templates, template gallery, or blank canvas.
Webhook
Receive real-time notifications when users save or download templates.
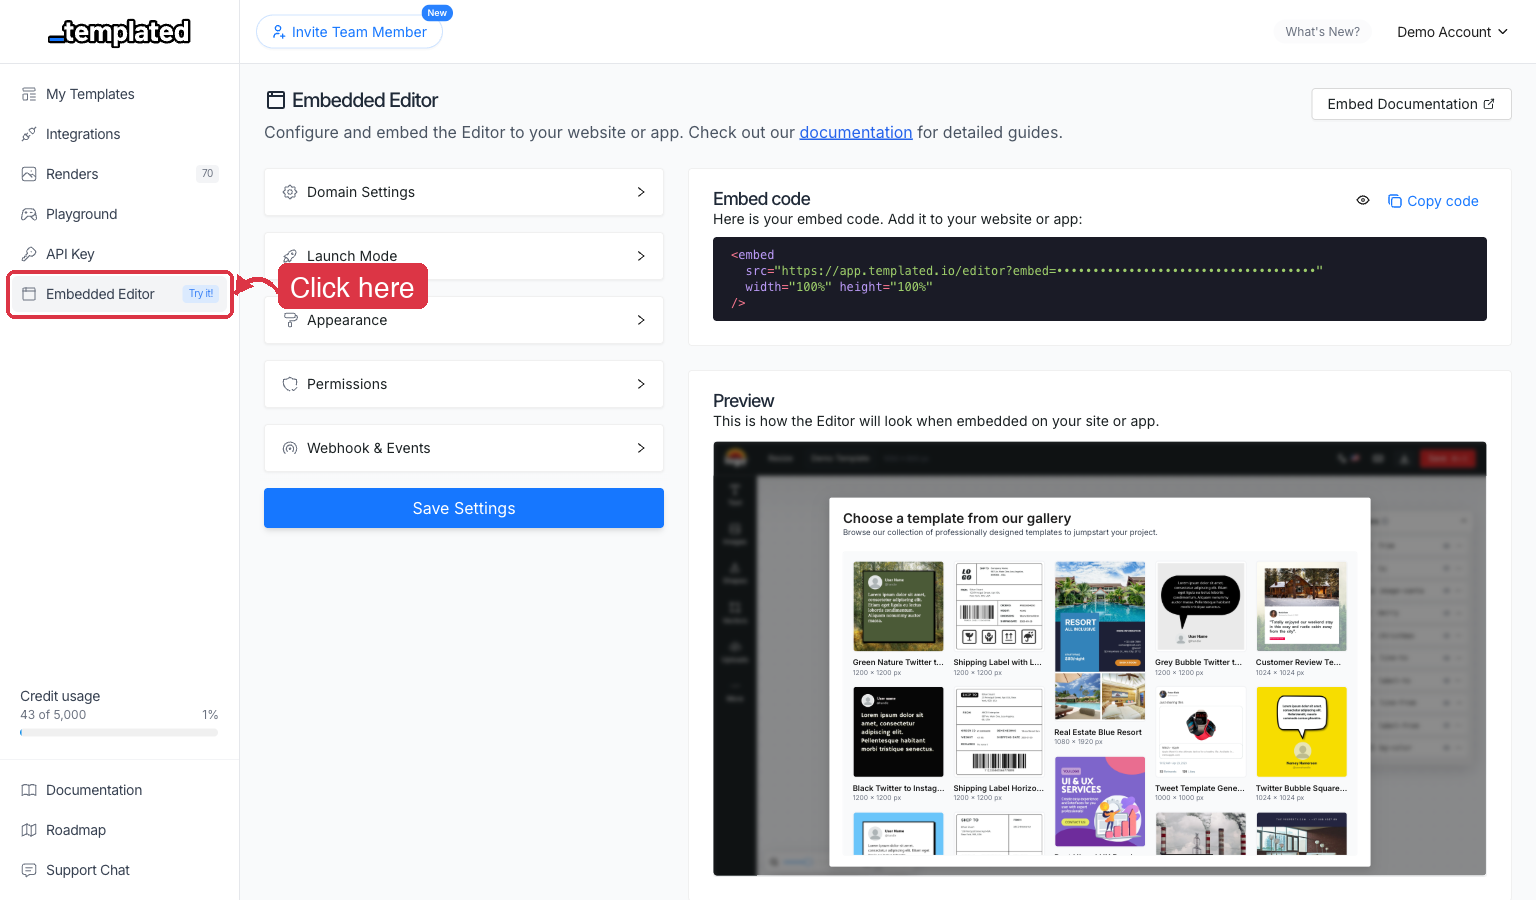
Navigate to the Embedded Editor settings
Log in to your Templated dashboard and click on Embedded Editor in the sidebar.
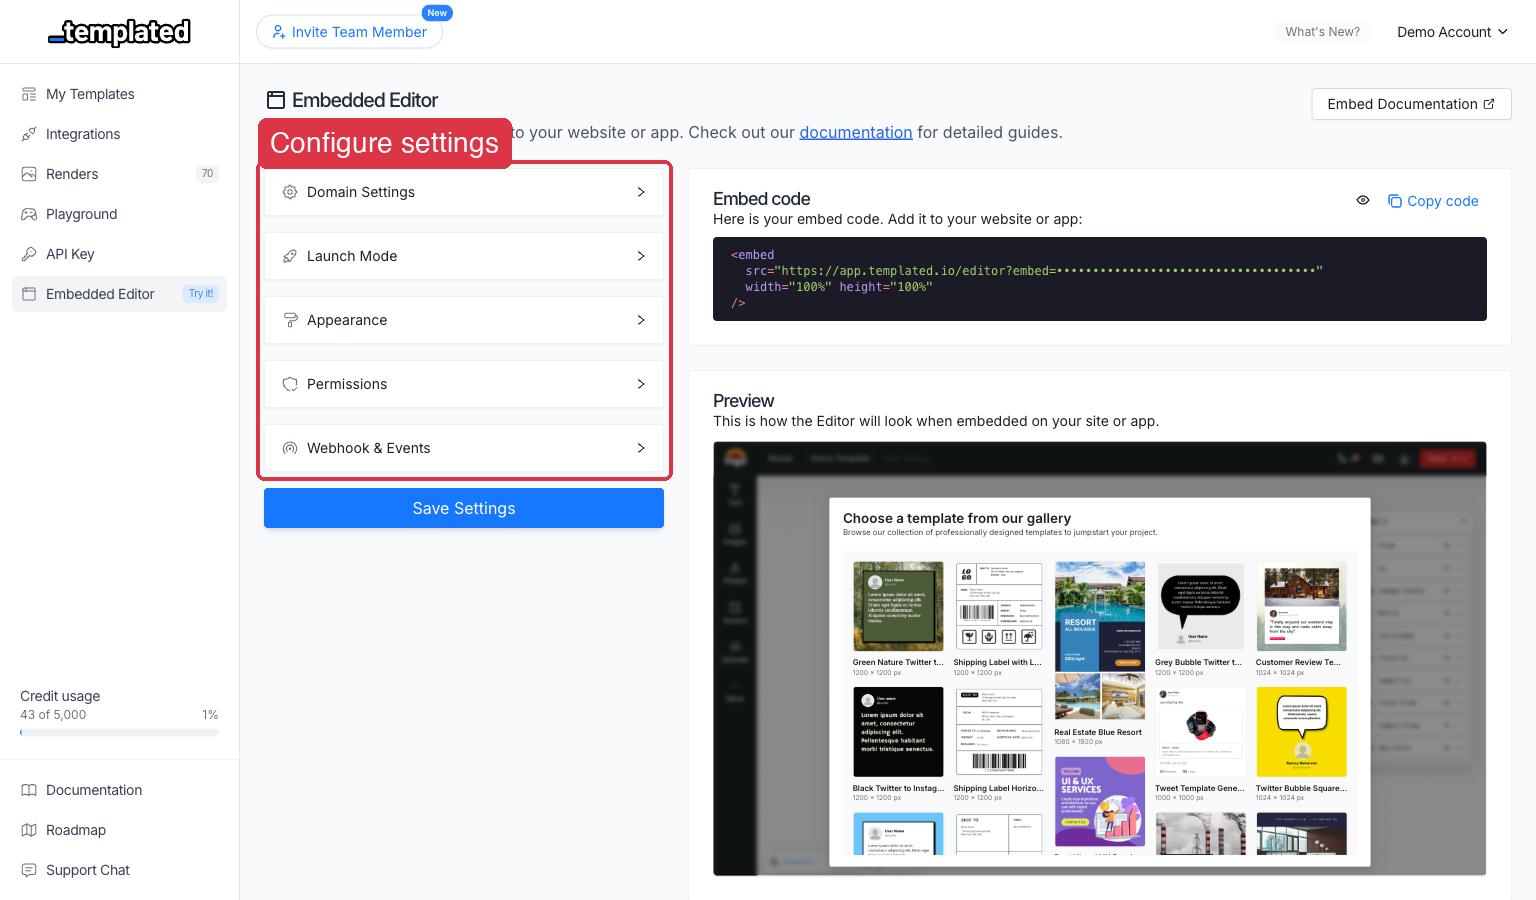
Configure your embed settings
Set up your domain, branding, permissions, and launch behavior using the configuration panels.
Copy the embed code
Click the Copy code button to copy the HTML <embed> tag customized for your configuration.
Add to your website or app
Paste the embed code wherever you want the editor to appear.
Users start editing
Your users can now create and edit templates directly in your platform.
The simplest way to embed the editor is with an HTML embed tag:
src = "https://app.templated.io/editor?embed=YOUR_EMBED_CONFIG_ID"
The embedded editor supports many advanced features through URL parameters:
Custom metadata - Pass user data to your webhooksSpecific template launching - Start with a particular templateLayer data injection - Pre-populate template contentClone functionality - Create template copies without affecting originalsRender editing - Allow users to edit existing rendersPermission controls - Fine-tune what users can and cannot doUI customization - Hide or show specific interface elements
SaaS Platforms
Offer template editing as a feature in your software platform.
Marketing Agencies
Let clients edit templates directly from your client portal.
E-commerce
Allow customers to customize product designs and marketing materials.
Education
Enable students to create presentations and educational materials.
News publishers
Allow users to create, edit and automate your news images.
Automation software
Create software that allows users to create, edit and automate their content.
Ready to integrate the Embedded Editor? Follow these steps:
Set up your embed configuration Learn about launch modes Explore URL parameters Use Preview Mode Implement webhook integration Explore advanced features
For development: Works on localhost and local environmentsFor production: Requires a Scale plan subscriptionDomain verification: Your domain must be configured in the embed settings\
We’re glad to assist you integrating the editor to your website or application.chat widget in your dashboard or via email at support@templated.io
# Launch Modes
> Learn about different ways to initialize the embedded editor for your users.
Launch modes determine how the embedded editor initializes when your users first access it. Choose the mode that best fits your use case and user workflow.
Launch with your account templates, giving users access to your professionally designed templates.
Creates a new template from the selected one. Changes are saved as a new template in your account.
Creates a clone that doesn’t appear in your dashboard. Perfect for temporary edits or user-specific variations.
Directly edit the selected template. Changes are saved to the original template. This is the default mode.
Launch with Templated’s public template gallery, giving users access to hundreds of professionally designed templates.
Launch with the user’s previously rendered designs, giving users access to their previously rendered designs.
Start with a completely blank canvas for custom designs.
Consider your users’ experience level, your content strategy, and integration context when choosing launch modes. You can always change modes or offer multiple entry points.
Launch directly into editing a specific template or render, bypassing the selection modal entirely.
Launch directly into editing a specific template, bypassing the selection modal entirely.
// Pass the template ID as a parameter to the editor
src = "https://app.templated.io/editor/${TEMPLATE_ID}?embed=${YOUR_CONFIG_ID}"
Create a clone of a specific template:
// Pass the template ID as a parameter to the editor and add the clone parameter as true
src = "https://app.templated.io/editor/${TEMPLATE_ID}?embed=${YOUR_CONFIG_ID}&clone=true"
Allow users to edit an existing render, automatically creating a clone template:
// Pass the render ID as a parameter to the editor
src = "https://app.templated.io/editor?embed=${YOUR_CONFIG_ID}&render=${RENDER_ID}"
Choose launch modes dynamically based on user context:
function generateEmbedUrl ( embedId , templateId ) {
const baseUrl = `https://app.templated.io/editor?embed=${ embedId }` ;
return `https://app.templated.io/editor/${ templateId }?embed=${ embedId }` ;
// Update embed src dynamically
const embedElement = document. querySelector ( '#template-editor' );
embedElement.src = generateEmbedUrl (currentEmbedId, currentTemplateId);
import React, { useMemo } from 'react' ;
function TemplateEditor ({ embedId , templateId }) {
const embedUrl = useMemo (() => {
const baseUrl = `https://app.templated.io/editor?embed=${ embedId }` ;
return `https://app.templated.io/editor/${ templateId }?embed=${ embedId }` ;
}, [templateId, embedId]);
# Preview Mode
> Canvas-only embedded editor with URL flags and runtime control via postMessage.
The Preview Mode is a canvas-only version of the editor designed for fast, distraction-free embedding. It hides the editor UI and focuses on rendering and manipulating template content. You can configure the initial state via URL parameters and control behavior at runtime with postMessage.
You can try a demo implementation here .
Use the preview base path: /editor/preview/{TEMPLATE_ID}?embed={CONFIG_ID}.
src = "https://app.templated.io/editor/preview/{$TEMPLATE_ID}?embed={$CONFIG_ID}"
zoom (10–100) – initial zoom level; 50 equals 100% scaleclone (true|false) – create a clone instead of editing original templatelayers – base64-encoded JSON with initial layer data (see Advanced page)metadata – base64-encoded JSON with custom metadata for webhookspage (string) – show only a specific page by name or ID (hides all other pages)
allow-layer-move (true|false) – allow moving layers in previewallow-layer-resize (true|false) – allow resizing layers in previewallow-layer-select (true|false) – allow selecting layersallow-layer-unlock (true|false) – allow unlocking locked layersallow-layer-rename (true|false) – allow renaming layersallow-text-edition (true|false) – allow double-click text editing in preview
allow-rename (true|false) – allow renaming the templateallow-save (true|false) – enable save functionalityallow-download (true|false) – enable download functionalityallow-resize (true|false) – allow resizing template dimensionsallow-create-template (true|false) – enable creating new templates
hide-sidebar (true|false) – hide the left sidebar panelhide-header (true|false) – hide the top header barhide-layers-panel (true|false) – hide the layers panelhide-language-toggle (true|false) – hide the language switcher
webhook-url (string) – override default webhook URL for this sessionexternal-id (string) – session identifier for persistent uploads, fonts, and content taggingmove-to-folder (string) – automatically move saved templates to folder IDfolder (string) – limit template selection to specific folder IDimage-url (string) – URL of image to load as background or layerw (number) – custom template width in pixelsh (number) – custom template height in pixels
Example with flags:
src = "https://app.templated.io/editor/preview/{$TEMPLATE_ID}?embed={$CONFIG_ID}
&zoom=50&allow-layer-move=true&allow-layer-resize=true"
width = "100%" height = "600" frameborder = "0"
After the iframe loads, you can control Preview Mode without reloading using postMessage. The editor will also send status events back.
iframe.contentWindow. postMessage ({
'headline' : { text: 'New title' , color: '#FF0000' },
'hero-image' : { image_url: 'https://example.com/image.jpg' }
// Update layer values with template background
iframe.contentWindow. postMessage ({
background: '#0066CC' , // Template-level background color
'headline' : { text: 'New title' , color: '#FF0000' },
'hero-image' : { image_url: 'https://example.com/image.jpg' }
// Set zoom (10–100; 50 = 100% scale)
iframe.contentWindow. postMessage ({ type: 'SET_ZOOM' , zoom: 60 }, '*' );
// Toggle layer capabilities
iframe.contentWindow. postMessage ({ type: 'SET_ALLOW_LAYER_MOVE' , allowLayerMove: true }, '*' );
iframe.contentWindow. postMessage ({ type: 'SET_ALLOW_LAYER_RESIZE' , allowLayerResize: true }, '*' );
iframe.contentWindow. postMessage ({ type: 'SET_ALLOW_LAYER_UNLOCK' , allowLayerUnlock: true }, '*' );
iframe.contentWindow. postMessage ({ type: 'SET_ALLOW_LAYER_RENAME' , allowLayerRename: true }, '*' );
iframe.contentWindow. postMessage ({ type: 'SET_ALLOW_TEXT_EDITION' , allowTextEdition: true }, '*' );
// Toggle template capabilities
iframe.contentWindow. postMessage ({ type: 'SET_ALLOW_RENAME' , allowRename: true }, '*' );
iframe.contentWindow. postMessage ({ type: 'SET_ALLOW_SAVE' , allowSave: true }, '*' );
iframe.contentWindow. postMessage ({ type: 'SET_ALLOW_DOWNLOAD' , allowDownload: true }, '*' );
iframe.contentWindow. postMessage ({ type: 'SET_ALLOW_RESIZE' , allowResize: true }, '*' );
iframe.contentWindow. postMessage ({ type: 'SET_ALLOW_CREATE_TEMPLATE' , allowCreateTemplate: true }, '*' );
// Load a different template without reloading the iframe
iframe.contentWindow. postMessage ({ type: 'LOAD_TEMPLATE' , templateId: 'tpl_123' , clone: false }, '*' );
// Save the current template
iframe.contentWindow. postMessage ({ type: 'SAVE' }, '*' );
// Download the template (uses the format currently selected in the editor)
iframe.contentWindow. postMessage ({ type: 'DOWNLOAD' }, '*' );
// Download with explicit format and page selection
iframe.contentWindow. postMessage ({
format: 'pdf' , // optional: 'jpg' | 'png' | 'pdf' | 'mp4'
pages: 'all' // optional: 'all' (default) or comma-separated page ids e.g. '1,3'
iframe.contentWindow. postMessage ({
type: 'text' , // required: 'text' | 'image' | 'video' | 'shape' | 'qr-code'
name: 'my-text-layer' , // optional, auto-generated if omitted
x: 100 , // optional, default: 0
y: 50 , // optional, default: 0
width: 200 , // optional, default: 100
height: 50 , // optional, default: 100
text: 'Hello World' , // for text layers
fontSize: 24 , // for text layers
color: '#333333' , // for text layers
fontFamily: 'Arial' , // for text layers
page: 'page-1' // optional, defaults to current page
iframe.contentWindow. postMessage ({
src: 'https://example.com/image.jpg' ,
iframe.contentWindow. postMessage ({
shapeType: 'rect' , // 'rect' | 'circle' | 'ellipse' | 'line'
fillColor: 'rgb(200,200,200)' ,
strokeColor: 'rgb(0,0,0)' ,
// Remove a layer by name
iframe.contentWindow. postMessage ({
name: 'my-text-layer' , // layer name (required)
page: 'page-1' // optional, limits search to specific page
// Show only a specific page (hides all others)
iframe.contentWindow. postMessage ({
pageId: 'page-1' // page name or ID
// Show all pages (restore multi-page view)
iframe.contentWindow. postMessage ({ type: 'SHOW_ALL_PAGES' }, '*' );
// Get all layers (name and type only)
iframe.contentWindow. postMessage ({ type: 'GET_LAYERS' }, '*' );
// Get all pages with their layers
iframe.contentWindow. postMessage ({ type: 'GET_PAGES' }, '*' );
window. addEventListener ( 'message' , ( event ) => {
// Optional: verify origin: if (event.origin !== 'https://app.templated.io') return;
// Editor initialized; safe to send UPDATE_LAYERS / SET_* messages
// URL-based initial load completed; contains template details
console. log ( 'Loaded via URL:' , msg.template);
case 'TEMPLATE_LOADED_SUCCESS' :
// Successful LOAD_TEMPLATE postMessage
console. log ( 'Template switched:' , msg.templateId);
case 'TEMPLATE_LOAD_ERROR' :
console. error ( 'Template load failed:' , msg.error);
case 'TEMPLATE_SAVED_SUCCESS' :
console. log ( 'Template saved:' , msg.templateId);
case 'TEMPLATE_SAVE_ERROR' :
console. error ( 'Template save failed:' , msg.error);
case 'TEMPLATE_DOWNLOADED_SUCCESS' :
// Successful DOWNLOAD postMessage
console. log ( 'Template downloaded:' , msg.templateId, msg.format, msg.renderUrl);
case 'TEMPLATE_DOWNLOAD_ERROR' :
console. error ( 'Template download failed:' , msg.error);
// Acknowledges UPDATE_LAYERS
case 'LAYER_UPDATE_ERROR' :
console. error ( 'Layer update failed:' , msg.error);
// Layer successfully added
console. log ( 'Layer added:' , msg.layerId, msg.layerName);
console. error ( 'Add layer failed:' , msg.error);
// Layer successfully removed
console. log ( 'Layer removed:' , msg.layerName);
case 'REMOVE_LAYER_ERROR' :
console. error ( 'Remove layer failed:' , msg.error);
// Page visibility changed via SET_PAGE
console. log ( 'Page changed to:' , msg.pageId, 'Success:' , msg.success);
// All pages are now visible via SHOW_ALL_PAGES
console. log ( 'All pages are now visible' );
// Layer and page data retrieval
// Response to GET_LAYERS — flat list of { name, type }
console. log ( 'Layers:' , msg.layers);
console. error ( 'Failed to get layers:' , msg.error);
// Response to GET_PAGES — array of { page, layers: [{ name, type }] }
console. log ( 'Pages:' , msg.pages);
console. error ( 'Failed to get pages:' , msg.error);
console. log ( 'Zoom now:' , msg.zoom); // same 10–100 scale where 50 = 100%
case 'ZOOM_UPDATE_ERROR' :
console. error ( 'Zoom update failed:' , msg.error);
// Layer capability events
case 'ALLOW_LAYER_MOVE_UPDATED' :
console. log ( 'Layer move permission:' , msg.allowLayerMove);
case 'ALLOW_LAYER_RESIZE_UPDATED' :
console. log ( 'Layer resize permission:' , msg.allowLayerResize);
case 'ALLOW_LAYER_UNLOCK_UPDATED' :
console. log ( 'Layer unlock permission:' , msg.allowLayerUnlock);
case 'ALLOW_LAYER_RENAME_UPDATED' :
console. log ( 'Layer rename permission:' , msg.allowLayerRename);
case 'ALLOW_TEXT_EDITION_UPDATED' :
console. log ( 'Text edition permission:' , msg.allowTextEdition);
// Template capability events
case 'ALLOW_RENAME_UPDATED' :
console. log ( 'Rename permission:' , msg.allowRename);
case 'ALLOW_SAVE_UPDATED' :
console. log ( 'Save permission:' , msg.allowSave);
case 'ALLOW_DOWNLOAD_UPDATED' :
console. log ( 'Download permission:' , msg.allowDownload);
case 'ALLOW_RESIZE_UPDATED' :
console. log ( 'Resize permission:' , msg.allowResize);
case 'ALLOW_CREATE_TEMPLATE_UPDATED' :
console. log ( 'Create template permission:' , msg.allowCreateTemplate);
case 'ALLOW_LAYER_MOVE_UPDATE_ERROR' :
case 'ALLOW_LAYER_RESIZE_UPDATE_ERROR' :
case 'ALLOW_LAYER_UNLOCK_UPDATE_ERROR' :
case 'ALLOW_LAYER_RENAME_UPDATE_ERROR' :
case 'ALLOW_TEXT_EDITION_UPDATE_ERROR' :
case 'ALLOW_RENAME_UPDATE_ERROR' :
case 'ALLOW_SAVE_UPDATE_ERROR' :
case 'ALLOW_DOWNLOAD_UPDATE_ERROR' :
case 'ALLOW_RESIZE_UPDATE_ERROR' :
case 'ALLOW_CREATE_TEMPLATE_UPDATE_ERROR' :
case 'REMOVE_LAYER_ERROR' :
console. error ( 'Permission update failed:' , msg.error);
For best performance and reliable initialization:
Load the first template using the URL (/editor/preview/{templateId}?embed=...) so the editor initializes correctly.
Switch to other templates using the LOAD_TEMPLATE message to avoid iframe reloads and keep caches warm.
< iframe id = "template-embed" width = "100%" height = "700" frameborder = "0" ></ iframe >
< button onclick = " toggleLayerMove ()" >Toggle Layer Move</ button >
< button onclick = " toggleLayerResize ()" >Toggle Layer Resize</ button >
< button onclick = " toggleTextEditing ()" >Toggle Text Editing</ button >
< button onclick = " updateContent ()" >Update Content</ button >
< button onclick = " saveTemplate ()" >Save Template</ button >
const iframe = document. getElementById ( 'template-embed' );
const CONFIG_ID = 'YOUR_EMBED_CONFIG_ID' ;
const FIRST_TEMPLATE = 'tpl_ABC123' ;
let layerMoveEnabled = false ;
let layerResizeEnabled = false ;
let textEditingEnabled = false ;
// 1) Initial URL-based load with multiple flags
const url = new URL ( `https://app.templated.io/editor/preview/${ FIRST_TEMPLATE }` );
url.searchParams. set ( 'embed' , CONFIG_ID );
url.searchParams. set ( 'zoom' , '50' ); // 50 = 100% scale
url.searchParams. set ( 'allow-layer-move' , 'true' );
url.searchParams. set ( 'allow-text-edition' , 'true' );
url.searchParams. set ( 'hide-sidebar' , 'true' );
url.searchParams. set ( 'clone' , 'true' ); // Work with a clone
url.searchParams. set ( 'external-id' , 'user-demo-session' ); // Persistent session
iframe.src = url. toString ();
// 2) Listen for editor events
window. addEventListener ( 'message' , ( event ) => {
console. log ( 'Received message:' , msg);
console. log ( '✅ Editor ready for interactions' );
// Initialize with some content
console. log ( '📄 Template loaded:' , msg.template);
case 'TEMPLATE_SAVED_SUCCESS' :
console. log ( '💾 Template saved successfully:' , msg.templateId);
alert ( 'Template saved successfully!' );
case 'TEMPLATE_SAVE_ERROR' :
console. error ( '❌ Save failed:' , msg.error);
alert ( 'Failed to save template: ' + msg.error);
console. log ( '✅ Layers updated successfully' );
case 'ALLOW_LAYER_MOVE_UPDATED' :
layerMoveEnabled = msg.allowLayerMove;
console. log ( '🚀 Layer move:' , layerMoveEnabled ? 'enabled' : 'disabled' );
case 'ALLOW_LAYER_RESIZE_UPDATED' :
layerResizeEnabled = msg.allowLayerResize;
console. log ( '🔄 Layer resize:' , layerResizeEnabled ? 'enabled' : 'disabled' );
case 'ALLOW_TEXT_EDITION_UPDATED' :
textEditingEnabled = msg.allowTextEdition;
console. log ( '✏️ Text editing:' , textEditingEnabled ? 'enabled' : 'disabled' );
function toggleLayerMove () {
layerMoveEnabled = ! layerMoveEnabled;
iframe.contentWindow. postMessage ({
type: 'SET_ALLOW_LAYER_MOVE' ,
allowLayerMove: layerMoveEnabled
function toggleLayerResize () {
layerResizeEnabled = ! layerResizeEnabled;
iframe.contentWindow. postMessage ({
type: 'SET_ALLOW_LAYER_RESIZE' ,
allowLayerResize: layerResizeEnabled
function toggleTextEditing () {
textEditingEnabled = ! textEditingEnabled;
iframe.contentWindow. postMessage ({
type: 'SET_ALLOW_TEXT_EDITION' ,
allowTextEdition: textEditingEnabled
function updateContent () {
iframe.contentWindow. postMessage ({
text: 'Updated at ' + new Date (). toLocaleTimeString (),
text: 'This content was updated via postMessage API' ,
function saveTemplate () {
iframe.contentWindow. postMessage ({ type: 'SAVE' }, '*' );
This page provides a comprehensive reference of all URL parameters you can use to customize the embedded editor’s behavior and appearance.
embed string
src = "https://app.templated.io/editor?embed=YOUR_EMBED_CONFIG_ID"
clone booleanfalse
launch-mode string'template-gallery', 'user-templates', 'user-renders', 'blank'
auto-save booleanfalse
render string
folder string
image-url string
w number
h number
layers string
metadata string
allow-rename booleantrue
allow-save booleantrue
allow-download booleantrue
allow-resize booleanfalse
allow-create-template booleantrue
allow-template-selection booleanfalse
allow-video booleanfalse
allow-layer-move booleanfalse
allow-layer-resize booleanfalse
allow-layer-select booleanfalse
allow-layer-unlock booleanfalse
allow-layer-rename booleanfalse
allow-text-edition booleanfalse
allow-edit-text-only booleanfalse
hide-sidebar booleanfalse
hide-header booleanfalse
hide-layers-panel booleanfalse
hide-language-toggle booleanfalse
language string'en', 'pt', 'es', 'fr', 'zh', 'cs', 'nl', 'de', 'ja'. Default: 'en'
hide-canvas-background booleanfalse
page-layout-mode string'vertical', 'horizontal'. Default: 'vertical'
page string
hide-tabs stringtext, images, videos, shapes, vectors, uploads, qr-code, barcode, rating.&hide-tabs=barcode,qr-code,rating will hide the Barcode, QR Code, and Rating tabs.
zoom number (10-100)50 equals 100% scale. Auto-calculated if not set.
webhook-url string
external-id string
include-account-templates booleanexternal-id, includes both templates matching the external ID and account templates (templates without an external ID) in the initial template selection modal. Default: false
move-to-folder string
load-uploads booleanfalse
preview-on-download booleanfalse
src = "https://app.templated.io/editor/preview/TEMPLATE_ID?embed=CONFIG_ID
src = "https://app.templated.io/editor/TEMPLATE_ID?embed=CONFIG_ID
&hide-canvas-background=true
src = "https://app.templated.io/editor/TEMPLATE_ID?embed=CONFIG_ID
&canvas-background=transparent"
src = "https://app.templated.io/editor?embed=CONFIG_ID
&hide-language-toggle=true"
src = "https://app.templated.io/editor?embed=CONFIG_ID
&allow-create-template=false"
src = "https://app.templated.io/editor?embed=CONFIG_ID
&image-url=https://example.com/background.jpg
src = "https://app.templated.io/editor?embed=CONFIG_ID
&move-to-folder=EDITED_RENDERS_FOLDER
&external-id=user-456-editing-session"
src = "https://app.templated.io/editor/preview/TEMPLATE_ID?embed=CONFIG_ID
<!-- Each client gets their own persistent session -->
src = "https://app.templated.io/editor?embed=CONFIG_ID
&folder=CLIENT_TEMPLATES_FOLDER
&external-id=client-acme-corp-2024
&allow-create-template=false"
<!-- User sees both shared account templates and their own templates -->
src = "https://app.templated.io/editor?embed=CONFIG_ID
&launch-mode=user-templates
&include-account-templates=true"
src = "https://app.templated.io/editor/TEMPLATE_ID?embed=CONFIG_ID
&preview-on-download=true"
Use this when embedding the editor inside a mobile app’s WebView. After the user clicks Download, the rendered JPG or PNG is shown in a modal so they can press and hold the image to save it to their gallery — bypassing the native download trigger that mobile WebViews often block.
src = "https://app.templated.io/editor/TEMPLATE_ID?embed=CONFIG_ID
&hide-tabs=barcode,rating"
src = "https://app.templated.io/editor/TEMPLATE_ID?embed=CONFIG_ID
&hide-tabs=videos,shapes,vectors,uploads,qr-code,barcode,rating"
Common Parameter Combinations
Preview Mode for Interactive Demos:
?embed=CONFIG&preview=true&allow-layer-move=true&allow-text-edition=true&zoom=50
Restricted Editor for End Users:
?embed=CONFIG&clone=true&allow-download=false&allow-resize=false&hide-sidebar=true
Agency Client Portal:
?embed=CONFIG&folder=CLIENT_FOLDER&clone=true&allow-create-template=false&external-id=client-acme-corp
Hybrid Template Access (Account + User Templates):
?embed=CONFIG&launch-mode=user-templates&external-id=user-123&include-account-templates=true
Educational Platform:
?embed=CONFIG&launch-mode=gallery&allow-layer-unlock=true&load-uploads=true
Single Page from Multi-Page Template:
?embed=CONFIG&page=Cover&hide-sidebar=true&hide-header=true
Text-Only Editing (Lock Non-Text Layers):
?embed=CONFIG&allow-edit-text-only=true&hide-sidebar=true
Simplified Sidebar (Hide Advanced Tabs):
?embed=CONFIG&hide-tabs=qr-code,barcode,rating
The external-id parameter creates persistent sessions for your embedded editor instances. This is particularly useful for maintaining user context and asset continuity across multiple editor sessions.
When you provide an external-id, the editor:
Tags all created content with this identifierPersists user uploads and custom fonts for future sessionsMakes tagged entities accessible via the API using the same IDMaintains session continuity when users return to the editor
All content created during the session is tagged with the external ID:
Templates
Renders
Uploads
Fonts
<!-- Each user gets their own persistent session -->
src = "https://app.templated.io/editor?embed=CONFIG_ID&external-id=user-123"
When user-123 returns to the editor, all their previous uploads and fonts will be available.
<!-- All work for a specific project -->
src = "https://app.templated.io/editor?embed=CONFIG_ID&external-id=project-abc-campaign"
Perfect for maintaining project-specific assets and branding consistency.
<!-- Agency managing multiple clients -->
src = "https://app.templated.io/editor?embed=CONFIG_ID&external-id=client-acme-corp"
Keep each client’s assets, fonts, and templates separate and organized.
All entities tagged with an external ID can be retrieved via the Templated API:
// Get all templates for a specific external ID
const response = await fetch ( 'https://api.templated.io/v1/templates?external_id=user-123' , {
'Authorization' : 'Bearer YOUR_API_KEY'
const templates = await response. json ();
// Get all uploads for a specific external ID
const response = await fetch ( 'https://api.templated.io/v1/uploads?external_id=project-abc-campaign' , {
'Authorization' : 'Bearer YOUR_API_KEY'
const uploads = await response. json ();
External ID Best Practices
Naming Convention:
Use descriptive, unique identifiers
Include context: user-{id}, project-{name}, client-{company}
Avoid special characters that might cause URL encoding issues
Session Management:
Use the same external ID consistently for the same user/project/client
Consider implementing session cleanup for inactive external IDs
Document your external ID strategy for your team
API Integration:
Use external IDs to filter API responses
Implement external ID-based data exports
Consider external IDs in your backup and archival strategies
For parameters that accept JSON data (layers, metadata), you must base64-encode the JSON string:
"headline" : { text: "Custom Title" , color: "#FF0000" },
"description" : { text: "Custom description text" }
const encodedLayers = btoa ( JSON . stringify (layerData));
const embedUrl = `https://app.templated.io/editor/TEMPLATE_ID?embed=CONFIG_ID&layers=${ encodedLayers }` ;
"headline" : { "text" : "Custom Title" , "color" : "#FF0000" },
"description" : { "text" : "Custom description text" }
encoded_layers = base64.b64encode(
json.dumps(layer_data).encode( 'utf-8' )
embed_url = f "https://app.templated.io/editor/TEMPLATE_ID?embed=CONFIG_ID&layers= { encoded_layers } "
# Webhook Integration
> Learn how to receive real-time notifications when users interact with your embedded editor.
Webhooks allow you to receive real-time notifications when users save or download templates in your embedded editor. This enables you to track user activity, sync data, and trigger workflows in your application.
When a user performs an action in the embedded editor, Templated sends a POST request to your webhook URL with details about the action.
User performs action (create, save or download) in the embedded editor
Templated processes the action and captures relevant data
HTTP POST request sent to your configured webhook URL
Your server receives and processes the webhook data
Your application responds with appropriate actions or data storage
Set up your webhook URL in the embed configuration:
Go to your Embed Setup page
Expand Advanced Settings
Enter your webhook URL in the Webhook URL field
Save your configuration
Webhooks are triggered for the following actions:
Triggered when a user creates a new template in the embedded editor.
"templateId" : "tpl_456def" ,
// Custom metadata passed from your application
Triggered when a user saves a template in the embedded editor.
"templateId" : "tpl_456def" ,
// Custom metadata passed from your application
Triggered when a user downloads a template from the embedded editor.
"templateId" : "tpl_456def" ,
// Custom metadata passed from your application
You can also listen for events directly in the frontend using the postMessage API. This is useful for immediate UI updates or client-side tracking.
window. addEventListener ( 'message' , ( event ) => {
// Verify origin for security
if (event.origin !== 'https://app.templated.io' ) {
const { action , templateId , metadata } = event.data;
console. log ( 'Template created:' , templateId);
console. log ( 'Metadata:' , metadata);
// Update UI, show success message, etc.
console. log ( 'Template saved:' , templateId);
console. log ( 'Metadata:' , metadata);
// Track analytics, update download count, etc.
console. log ( 'Template downloaded:' , templateId);
console. log ( 'Metadata:' , metadata);
// Handle cleanup, redirect, etc.
Frontend vs Backend Events
Frontend Events: Immediate UI updates, client-side tracking, user feedbackBackend Webhooks: Data persistence, server-side processing, integrations with other systems
Use both for a complete integration experience.
const express = require ( 'express' );
// Middleware to parse JSON
app. post ( '/api/templated-webhook' , ( req , res ) => {
const { action , templateId , metadata } = req.body;
console. log ( `Received ${ action } action for template ${ templateId }` );
handleCreateEvent (templateId, metadata);
handleSaveEvent (templateId, metadata);
handleDownloadEvent (templateId, metadata);
console. log ( 'Unknown action type:' , action);
// Respond with 200 to acknowledge receipt
res. status ( 200 ). json ({ received: true });
function handleCreateEvent ( templateId , metadata ) {
// Your create logic here
console. log ( `Template ${ templateId } created` );
if (metadata && Object. keys (metadata). length > 0 ) {
console. log ( 'Metadata:' , metadata);
function handleSaveEvent ( templateId , metadata ) {
// Update user's project with new template
console. log ( `Template ${ templateId } saved` );
if (metadata && Object. keys (metadata). length > 0 ) {
console. log ( 'Metadata:' , metadata);
function handleDownloadEvent ( templateId , metadata ) {
// Track download metrics
// Trigger follow-up workflows
console. log ( `Template ${ templateId } downloaded` );
if (metadata && Object. keys (metadata). length > 0 ) {
console. log ( 'Metadata:' , metadata);
from flask import Flask, request, jsonify
from datetime import datetime
@app.route ( '/api/templated-webhook' , methods = [ 'POST' ])
data = request.get_json()
action = data.get( 'action' )
template_id = data.get( 'templateId' )
metadata = data.get( 'metadata' , {})
print ( f "Received { action } action for template { template_id } " )
handle_create_event(template_id, metadata)
handle_save_event(template_id, metadata)
elif action == 'download' :
handle_download_event(template_id, metadata)
print ( f "Unknown action type: { action } " )
return jsonify({ 'received' : True }), 200
def handle_create_event (template_id, metadata):
print ( f "Template { template_id } created" )
print ( f "Metadata: { metadata } " )
def handle_save_event (template_id, metadata):
print ( f "Template { template_id } saved" )
print ( f "Metadata: { metadata } " )
def handle_download_event (template_id, metadata):
# Your download logic here
print ( f "Template { template_id } downloaded" )
print ( f "Metadata: { metadata } " )
if __name__ == '__main__' :
$input = file_get_contents ( 'php://input' );
$data = json_decode ($input, true );
echo json_encode ([ 'error' => 'Invalid JSON' ]);
$action = $data[ 'action' ] ?? '' ;
$templateId = $data[ 'templateId' ] ?? '' ;
$metadata = $data[ 'metadata' ] ?? [];
error_log ( "Received { $action } action for template { $templateId }" );
handleCreateEvent ($templateId, $metadata);
handleSaveEvent ($templateId, $metadata);
handleDownloadEvent ($templateId, $metadata);
error_log ( "Unknown action type: { $action }" );
echo json_encode ([ 'received' => true ]);
function handleCreateEvent ($templateId, $metadata) {
// Your create logic here
error_log ( "Template { $templateId } created" );
error_log ( "Metadata: " . json_encode ($metadata));
function handleSaveEvent ($templateId, $metadata) {
error_log ( "Template { $templateId } saved" );
error_log ( "Metadata: " . json_encode ($metadata));
function handleDownloadEvent ($templateId, $metadata) {
// Your download logic here
error_log ( "Template { $templateId } downloaded" );
error_log ( "Metadata: " . json_encode ($metadata));
Webhook not receiving data
→ Verify your webhook URL is publicly accessible
Missing metadata
→ Verify metadata is being passed in the embed URL in the correct format
Timeout errors
→ Ensure your webhook handler responds quickly (< 10 seconds)
# Create a folder
> Learn how to create a new folder using the Templated API.
Create a new folder to organize your templates.
Here’s a sample request to create a new folder:
fetch ( 'https://api.templated.io/v1/folder' , {
'Content-Type' : 'application/json' ,
'Authorization' : Bearer ${ API_KEY }
name string REQUIRED
The API returns a JSON object with the folder details.
"createdAt" : "2024-03-20T10:30:00Z" ,
"updatedAt" : "2024-03-20T10:30:00Z"
Delete an existing folder and remove folder references from all templates within it.
Here’s a sample request to delete a folder:
fetch ( `https://api.templated.io/v1/folder/${ folderId }` , {
'Authorization' : Bearer ${ API_KEY }
id string REQUIRED
A successful deletion returns an empty response with a 204 status code. When deleting a folder:
All templates previously in the folder will have their folder reference removed
The folder will be permanently deleted
Templates themselves are not deleted, only their association with the folder
# The folder object
> Learn the properties of a folder object in the Templated API.
These attributes define the properties of a folder.
id string
name string
createdAt string
updatedAt string
Here’s a sample object of a folder:
"id" : "3c435c83-6682-4468-939f-6af175caacex" ,
"name" : "Marketing Folder" ,
"createdAt" : "2024-03-20T10:30:00Z" ,
"updatedAt" : "2024-03-20T10:30:00Z"
Lists all folders of an user.
Parameter Type Default Description querystring - Filter folders by name pageinteger 0 Page number for pagination limitinteger 25 Number of results per page
Here’s a sample request to list all user’s folders:
fetch ( `https://api.templated.io/v1/folders` , {
'Authorization' : `Bearer ${ API_KEY }`
// Example with all query parameters
. then ( response => response. json ())
. then ( data => console. log (data))
. catch ( error => console. error ( 'Error:' , error));
url = 'https://api.templated.io/v1/folders'
# Example with all query parameters
headers = { 'Authorization' : f 'Bearer { api_key } ' }
response = requests.get(url, params = params, headers = headers)
if response.status_code == 200 :
print ( 'Request failed. Response code:' , response.status_code)
import java.net.HttpURLConnection;
import java.io.BufferedReader;
import java.io.InputStreamReader;
import java.net.URLEncoder;
public class ListFolders {
public static void main ( String [] args ) {
String apiKey = " API_KEY " ;
// Example with all query parameters
String queryParams = String. format ( "?query=%s&page=%d&limit=%d" ,
URLEncoder. encode ( "My Folder" , "UTF-8" ),
URL url = new URL ( "https://api.templated.io/v1/folders" + queryParams);
HttpURLConnection connection = (HttpURLConnection) url. openConnection ();
connection. setRequestMethod ( "GET" );
connection. setRequestProperty ( "Authorization" , "Bearer " + apiKey);
int responseCode = connection. getResponseCode ();
if (responseCode == HttpURLConnection.HTTP_OK) {
BufferedReader in = new BufferedReader ( new InputStreamReader (connection. getInputStream ()));
StringBuilder response = new StringBuilder ();
while ((inputLine = in. readLine ()) != null ) {
response. append (inputLine);
System.out. println (response. toString ());
System.out. println ( "Request failed. Response Code: " + responseCode);
// Example with all query parameters
$url = "https://api.templated.io/v1/folders?" . http_build_query ($params);
The API returns an array of JSON objects with the folder details.
"createdAt" : "2024-03-20T10:30:00Z" ,
"updatedAt" : "2024-03-20T10:30:00Z"
"createdAt" : "2024-03-19T15:45:00Z" ,
"updatedAt" : "2024-03-20T09:15:00Z"
Each folder object contains the following properties:
id string
name string
templateCount integer
createdAt string
updatedAt string
Move an existing render into a folder.
Here’s a sample request to move a render to a folder:
PUT / v1 / folder / {folderId} / render / {renderId}
fetch ( `https://api.templated.io/v1/folder/${ folderId }/render/${ renderId }` , {
'Authorization' : `Bearer ${ API_KEY }`
folderId string REQUIRED
renderId string REQUIRED
A successful request returns an empty response with a 200 OK status code.
# List folder renders
> Learn how to list all renders of a folder using the Templated API.
Lists all renders of a folder.
folderId string REQUIRED
page number
limit number
Here’s a sample request to list all renders of a folder:
GET / v1 / folder / :folderId / renders
fetch ( `https://api.templated.io/v1/folder/${ folderId }/renders?page=0&limit=25` , {
'Authorization' : `Bearer ${ API_KEY }`
The API returns an array of JSON objects with the render details.
"url" : "renders/2024/03/my-render.png" ,
"folderId" : "fld_456def" ,
"templateId" : "tpl_789ghi" ,
"createdAt" : "2024-03-20T10:30:00Z" ,
"updatedAt" : "2024-03-20T10:30:00Z"
Move an existing template into a folder.
Here’s a sample request to move a template to a folder:
PUT / v1 / folder / {folderId} / template / {templateId}
fetch ( `https://api.templated.io/v1/folder/${ folderId }/template/${ templateId }` , {
'Authorization' : `Bearer ${ API_KEY }`
folderId string REQUIRED
templateId string REQUIRED
A successful request returns an empty response with a 200 OK status code.
# List folder templates
> Learn the list all templates of a folder using the Templated API.
Lists all templates of a folder.
id string REQUIRED
The folder id that you want to retrieve the templates.
Parameter Type Default Description querystring - Filter templates by name pageinteger 0 Page number for pagination limitinteger 25 Number of results per page widthinteger - Filter templates by width heightinteger - Filter templates by height tagsstring - Filter templates by tags includeLayersboolean false Include template layers in response
Here’s a sample request to list all templates of a folder:
GET / v1 / folder / :id / templates
fetch ( `https://api.templated.io/v1/folder/${ id }/templates` , {
'Authorization' : `Bearer ${ API_KEY }`
// Example with all query parameters
. then ( response => response. json ())
. then ( data => console. log (data))
. catch ( error => console. error ( 'Error:' , error));
url = f 'https://api.templated.io/v1/folder/ { folder_ id } /templates'
# Example with all query parameters
'query' : 'Template Name' ,
headers = { 'Authorization' : f 'Bearer { api_key } ' }
response = requests.get(url, params = params, headers = headers)
if response.status_code == 200 :
print ( 'Request failed. Response code:' , response.status_code)
import java.net.HttpURLConnection;
import java.io.BufferedReader;
import java.io.InputStreamReader;
import java.net.URLEncoder;
public class ListFolderTemplates {
public static vo id main ( String [] args ) {
String apiKey = " API_KEY " ;
// Example with all query parameters
String queryParams = String. format ( "?query=%s&page=%d&limit=%d&w id th=%d&height=%d&includeLayers=%b" ,
URLEncoder. encode ( "Template Name" , "UTF-8" ),
URL url = new URL ( "https://api.templated.io/v1/folder/" + folderId + "/templates" + queryParams);
HttpURLConnection connection = (HttpURLConnection) url. openConnection ();
connection. setRequestMethod ( "GET" );
connection. setRequestProperty ( "Authorization" , "Bearer " + apiKey);
int responseCode = connection. getResponseCode ();
if (responseCode == HttpURLConnection.HTTP_OK) {
BufferedReader in = new BufferedReader ( new InputStreamReader (connection. getInputStream ()));
StringBuilder response = new StringBuilder ();
while ((inputLine = in. readLine ()) != null ) {
response. append (inputLine);
System.out. println (response. toString ());
System.out. println ( "Request failed. Response Code: " + responseCode);
// Example with all query parameters
'query' => 'Template Name' ,
'includeLayers' => 'true'
$url = "https://api.templated.io/v1/folder/{ $folderId }/templates?" . http_build_query ($params);
'header' => "Authorization: Bearer { $apiKey } \r\n " ,
$context = stream_context_create ($options);
$result = file_get_contents ($url, false , $context);
echo "Error fetching data" ;
$data = json_decode ($result, true );
The API returns an array of JSON objects with the template details.
"name" : "Instagram Post" ,
"thumbnail" : "https://templated-assets.s3.amazonaws.com/thumbnail-123.png" ,
"folderId" : "fld_456def" ,
"createdAt" : "2024-03-20T10:30:00Z" ,
"updatedAt" : "2024-03-20T10:30:00Z" ,
Update a folder to change its name.
Here’s a sample request to update a folder:
fetch ( `https://api.templated.io/v1/folder/${ folderId }` , {
'Content-Type' : 'application/json' ,
'Authorization' : `Bearer ${ API_KEY }`
name: "My Updated Folder"
name string REQUIRED
The API returns a JSON object with the updated folder details.
"name" : "My Updated Folder" ,
"createdAt" : "2024-03-20T10:30:00Z" ,
"updatedAt" : "2024-03-20T10:35:00Z"
Delete one or multiple fonts by their names. All fonts with the specified names will be deleted for your account. If you have multiple fonts with the same name, all of them will be deleted.
Here’s a sample request to delete fonts:
DELETE / v1 / fonts ? fonts = FONT_NAME_1 & fonts = FONT_NAME_2
fetch ( `https://api.templated.io/v1/fonts?fonts=${ encodeURIComponent ( ' My Custom Font ' ) }` , {
'Authorization' : `Bearer ${ API_KEY }`
. then ( response => response. json ())
. then ( data => console. log ( 'Response:' , data))
. catch ( error => console. error ( 'Error:' , error));
const fontNames = [ ' My Custom Font ' , ' Another Font ' ];
const params = fontNames. map ( name => `fonts=${ encodeURIComponent ( name ) }` ). join ( '&' );
fetch ( `https://api.templated.io/v1/fonts?${ params }` , {
'Authorization' : `Bearer ${ API_KEY }`
. then ( response => response. json ())
. then ( data => console. log ( 'Response:' , data))
. catch ( error => console. error ( 'Error:' , error));
font_names = [ ' My Custom Font ' , ' Another Font ' ]
# Prepare query parameters
params = { 'fonts' : font_names}
url = 'https://api.templated.io/v1/fonts'
headers = { 'Authorization' : f 'Bearer { api_key } ' }
response = requests.delete(url, headers = headers, params = params)
if response.status_code == 200 :
print ( f "Successfully deleted: { result[ 'deleted' ] } " )
print ( f "Deleted by name: { result[ 'deleted_by_name' ] } " )
print ( 'Request failed. Response code:' , response.status_code)
import java.net.HttpURLConnection;
import java.net.URLEncoder;
import java.io.BufferedReader;
import java.io.InputStreamReader;
public class DeleteFonts {
public static void main ( String [] args ) {
String apiKey = " API_KEY " ;
String [] fontNames = { " My Custom Font " , " Another Font " };
// Build query parameters
StringBuilder params = new StringBuilder ();
for ( int i = 0 ; i < fontNames.length; i ++ ) {
if (i > 0 ) params. append ( "&" );
params. append ( "fonts=" ). append (URLEncoder. encode (fontNames[i], "UTF-8" ));
URL url = new URL ( "https://api.templated.io/v1/fonts?" + params. toString ());
HttpURLConnection connection = (HttpURLConnection) url. openConnection ();
connection. setRequestMethod ( "DELETE" );
connection. setRequestProperty ( "Authorization" , "Bearer " + apiKey);
int responseCode = connection. getResponseCode ();
if (responseCode == HttpURLConnection.HTTP_OK) {
BufferedReader reader = new BufferedReader ( new InputStreamReader (connection. getInputStream ()));
String response = reader. readLine ();
System.out. println ( "Response: " + response);
System.out. println ( "Request failed. Response Code: " + responseCode);
$fontNames = [ ' My Custom Font ' , ' Another Font ' ];
// Build query parameters
$params = http_build_query ([ 'fonts' => $fontNames]);
$url = "https://api.templated.io/v1/fonts?{ $params }" ;
'header' => "Authorization: Bearer { $apiKey } \r\n " ,
$context = stream_context_create ($options);
$result = file_get_contents ($url, false , $context);
$response = json_decode ($result, true );
echo "Successfully deleted: " . implode ( ', ' , $response[ 'deleted' ]) . " \n " ;
echo "Deleted by name: " . json_encode ($response[ 'deleted_by_name' ]) . " \n " ;
echo $response[ 'message' ] . " \n " ;
echo "Error deleting fonts \n " ;
A successful deletion will return a 200 OK response with details about the deleted fonts:
"deleted" : [ "font-id-1" , "font-id-2" , "font-id-3" ],
"message" : "Successfully deleted 3 font(s)"
The deleted_by_name object shows how many fonts were deleted for each font name. This is useful when you have multiple fonts with the same name.
Status Code Description Response Body 400 Bad Request - Font name(s) not found {"not_found": ["Font Name"], "error": "Cannot delete fonts: no fonts found with the specified name(s) for this user"}400 Bad Request - No font names provided {"error": "At least one font name must be provided"}401 Not authorized - Invalid or missing API key {"error": "Not authorized"}404 Not Found - User not found {"error": "User not found"}500 Internal Server Error - An unexpected error occurred {"error": "An unexpected error occurred"}
Atomic Operation : Either all fonts with the specified names are deleted, or none are deleted. If any font name has no matching fonts, the entire operation fails.Bulk Support : You can delete fonts with multiple names in a single request by passing multiple fonts parameters.Multiple Fonts : If you have multiple fonts with the same name, all of them will be deleted when that name is specified.Name Matching : Font names must match exactly (case-sensitive).
Parameter Type Required Description fontsstring[] Yes One or more font names to delete. Pass multiple fonts parameters for bulk deletion. All fonts with matching names will be deleted.
# List gallery fonts
> Retrieve all base fonts available in the Templated editor using the API.
Lists all base fonts available in the Templated editor./v1/fonts, this endpoint does not include team-uploaded fonts — it only returns the fonts built into the editor.
Parameter Type Default Description querystring - Filter fonts by name (case-insensitive) pageinteger 0 Page number for pagination limitinteger 50 Number of results per page
Returns an array of font objects. Each object includes the following field:
Field Type Description namestring The font name (use directly as a CSS font-family value)
fetch ( 'https://api.templated.io/v1/fonts/gallery' , {
'Authorization' : `Bearer ${ API_KEY }`
. then ( response => response. json ())
. then ( data => console. log (data))
. catch ( error => console. error ( 'Error:' , error));
url = 'https://api.templated.io/v1/fonts/gallery'
headers = { 'Authorization' : f 'Bearer { api_key } ' }
response = requests.get(url, headers = headers)
if response.status_code == 200 :
print ( 'Request failed. Response code:' , response.status_code)
$url = "https://api.templated.io/v1/fonts/gallery" ;
'header' => "Authorization: Bearer { $apiKey } \r\n " ,
$context = stream_context_create ($options);
$result = file_get_contents ($url, false , $context);
echo "Error fetching data" ;
$data = json_decode ($result, true );
{ "name" : "Bai Jamjuree" },
{ "name" : "Dancing Script" },
{ "name" : "IBM Plex Sans" },
{ "name" : "JetBrains Mono" },
{ "name" : "proxima-nova" },
fetch ( 'https://api.templated.io/v1/fonts/gallery?query=noto' , {
'Authorization' : `Bearer ${ API_KEY }`
Below is the complete list of fonts available in the gallery.
Font Font Font ABeeZee IM Fell DW Pica Quando Abel Jacques Francois Quantico Abhaya Libre Jacques Francois Shadow Quattrocento Abril Fatface Jaldi Quattrocento Sans Aclonica JetBrains Mono Questrial Agenda-Bold Jim Nightshade Racing Sans One Bad Script K2D Radley Bahiana Kadwa Rajdhani Bahianita Kalam Rakkas Bai Jamjuree Kameron Raleway Baloo 2 Kanit Sacramento Cabin Lacquer Sahitya Cabin Condensed Laila Sail Cabin Sketch Lakki Reddy Saira Caesar Dressing Lalezar Saira Condensed Cagliostro Lancelot Tajawal Co Headline Corp Regular Lexend Tangerine Damion M PLUS 1p Taprom Dancing Script M PLUS Rounded 1c Tauri Dangrek Ma Shan Zheng Taviraj Darker Grotesque Macondo Ubuntu David Libre Macondo Swash Caps Ubuntu Condensed Eagle Lake Nanum Brush Script Ubuntu Mono East Sea Dokdo Nanum Gothic Ultra Economica Nanum Gothic Coding Uncial Antiqua Eczar Nanum Myeongjo Vampiro One El Messiri Nanum Pen Script Varela Fanwood Text Noto Color Emoji Varela Round Farro Noto Sans Varta Fascinate Noto Sans Arabic Vast Shadow Fascinate Inline Noto Sans Bengali Walter Turncoat Faster One Noto Sans Gurmukhi Warnes Gabriela Noto Sans JP Wellfleet Gaegu Noto Sans KR Wendy One Gafata Noto Sans Thai Wire One Geist Odibee Sans Xanh Mono GFS Didot Odor Mean Chey Yanone Kaffeesatz GFS Neohellenic Offside Yantramanav Habibi Old Standard TT Yatra One Hachi Maru Pop Oldenburg Yellowtail Halant Padauk Yeon Sung Hammersmith One Palanquin ZCOOL KuaiLe IBM Plex Mono Palanquin Dark ZCOOL QingKe HuangYou IBM Plex Sans Pangolin ZCOOL XiaoWei IBM Plex Sans Arabic Paprika Zeyada IBM Plex Sans Condensed Poppins Zilla Slab IBM Plex Serif proxima-nova
# The font object
> Learn the properties of a font object in the Templated API.
These attributes define the properties of a font object.
name string
isGoogleFont boolean
isUploadedFont boolean
Here’s a sample object of a Google Font:
# List all fonts
> Learn how to retrieve both Google Fonts and user-uploaded fonts using the Templated API.
Lists all available fonts, including both Google Fonts and user-uploaded custom fonts.
Here’s a sample request to list all available fonts:
fetch ( 'https://api.templated.io/v1/fonts' , {
'Authorization' : `Bearer ${ API_KEY }`
The response will be an array of font objects. Each object will follow either the Google Font or user-uploaded font structure.
"name" : "My Custom Font" ,
Upload a custom font to your account for use in your templates.
Font file must be in TTF, OTF, WOFF, or WOFF2 format
Maximum file size: 10MB
You must be on a paid plan to upload custom fonts
Note
Custom font uploads are only available for paid plans.
Here’s a sample request to upload a font:
Content - Type : multipart / form - data
const fileInput = document. getElementById ( 'fontFileInput' );
const formData = new FormData ();
formData. append ( 'file' , fileInput.files[ 0 ]);
fetch ( 'https://api.templated.io/v1/font' , {
'Authorization' : `Bearer ${ API_KEY }`
. then ( response => response. json ())
. then ( data => console. log (data))
. catch ( error => console. error ( 'Error uploading font:' , error));
With the Templated API you can automate the generation of images, videos, and PDFs.
Sign up for an account.
Create your template in our editor, import from Canva or select one from our Template Gallery.
VIDEO
Get your API key in your dashboard in the API Key tab.
Make a call to generate a render (image, video, or PDF).
fetch ( 'https://api.templated.io/v1/render' , {
text: 'This is my text to be rendered' ,
image_url: 'https://picsum.photos/200/300.jpg' ,
'Content-Type' : 'application/json' ,
'Authorization' : `Bearer ${ API_KEY }`
Integrate our API to your workflow. Create a render endpoint documentation for more details.
Want to explore our API quickly? Check out our complete API collection in Postman where you can test all endpoints, see request examples, and get started faster.
# MCP Examples
> Real-world examples and use cases for the Templated MCP integration.
This page provides practical examples of how to use the Templated MCP server with your AI assistant.
Start by exploring what templates you have available:
Prompt:
“Show me all my Templated templates”
The AI will call list_templates and display your templates with their IDs, names, and dimensions.
Generate an image from an existing template:
Prompt:
“Create a render from template [ID] with the title set to ‘Welcome to Our Store’”
Replace [ID] with your actual template ID.
Before customizing a template, see what layers are available:
Prompt:
“What layers does template [ID] have?”
Customize several layers in a single render:
Prompt:
“Create a render from template [ID] with these changes:
Set the ‘headline’ layer text to ‘Summer Sale - 50% Off’
Change the ‘headline’ color to red
Set the ‘product-image’ layer to this image: product.jpg
Change the background to #f5f5f5”
Generate an image with a transparent background:
Prompt:
“Generate a transparent PNG from my logo template”
Create a PDF document:
Prompt:
“Create a PDF from template [ID] with the name ‘Invoice-001’ and set the customer name to ‘John Smith‘“
Build a new template from scratch:
Prompt:
“Create a new template called ‘Instagram Post’ with dimensions 1080x1080, a white background, and a centered text layer for the headline”
Build a more complex template:
Prompt:
“Create a template for a product announcement with:
Size: 1200x630 (Facebook post)
Gradient background from blue to purple
A large image layer on the left for the product
A headline text layer on the right in white, bold
A smaller description text layer below the headline
A ‘Buy Now’ button shape at the bottom right”
Create variations of existing templates:
Prompt:
“Clone my Instagram template, rename it to ‘Twitter Post’, and change the dimensions to 1200x675”
Generate several variations:
Prompt:
“Create 3 renders from template [ID]:
Title: ‘Spring Collection’ with green background
Title: ‘Summer Vibes’ with yellow background
Title: ‘Fall Fashion’ with orange background”
Combine multiple renders:
Prompt:
“Merge my last 5 renders into a single PDF called ‘Product Catalog‘“
Add an image to your library:
Prompt:
“Upload this image to Templated: logo.png”
Create organization structure:
Prompt:
“Create a folder called ‘Q1 Marketing’ and move my Instagram and Facebook templates into it”
Add a custom font:
Generate an MP4 video:
Prompt:
“Create a 10-second video from my animated template at 30fps”
Monitor your API usage:
Prompt:
“Show my Templated account info and how many credits I have left”
Every morning, create social media content for the day:
“Show me my social media templates”
“Create a render from my Instagram template with today’s quote: ‘Success is not final, failure is not fatal’”
“Clone that render but change the dimensions for Twitter (1200x675)”
“Create another version for Facebook stories (1080x1920)“
Generate certificates for course graduates:
“Show me the layers in my certificate template”
“Create a PDF from my certificate template with:
Name: ‘Sarah Johnson’
Course: ‘Advanced Marketing’
Date: ‘January 28, 2026’
Certificate ID: ‘CERT-2026-001‘“
Be Specific
Include exact values for colors (hex codes), dimensions (pixels), and text content.
Reference Layers by Name
Use get_template_layers first to see layer names, then reference them accurately.
Chain Operations
You can ask for multiple operations in one prompt—the AI will execute them in sequence.
Use Template IDs
Keep your template IDs handy. The AI can look them up, but providing them is faster.
The Model Context Protocol (MCP) is an open standard that allows AI assistants to securely connect to external tools and data sources. With our MCP server, you can use Templated directly from Claude, Cursor, ChatGPT, and other compatible AI assistants.
The Templated MCP server enables you to:
Generate images, videos, and PDFs using natural language commandsCreate and edit templates directly from your AI assistantManage your assets including uploads, fonts, and foldersAccess all API features through conversational prompts
Instead of writing code or using the dashboard, simply tell your AI assistant what you want:
“Create a render from my Instagram template with the title set to ‘Summer Sale’ and change the background to blue”
The Templated MCP works with AI-powered app builders and coding assistants. Simply prompt these tools to use Templated for image generation, and they’ll integrate it into your app automatically.
Example prompt for AI app builders:
“Build me a social media post generator app that uses Templated MCP to create images. Users should be able to enter a headline and select a template, then generate and download the image. See the Templated MCP documentation at https://templated.io/docs/integrations/mcp/ for setup instructions.”
These AI tools can automatically set up the MCP connection, create the UI, and handle the image generation workflow—all from a simple prompt.
The Templated MCP server supports two connection modes:
Remote Server (Recommended)
Connect directly to our hosted MCP server at mcp.templated.io. No installation required—just add the URL to your AI assistant’s configuration.
Best for: ChatGPT, Cursor, quick setup
Local Server
Run the MCP server locally using npx. The server runs on your machine and connects to our API.
Best for: Claude Desktop, offline development
Add this configuration to your AI assistant:
"url" : "https://mcp.templated.io/mcp?apiKey=YOUR_API_KEY"
Replace YOUR_API_KEY with your API key .
Add this configuration to your AI assistant:
"args" : [ "mcp-server-templated" ],
"TEMPLATED_API_KEY" : "YOUR_API_KEY"
Replace YOUR_API_KEY with your API key .
Assistant Remote Server Local Server Claude Desktop ✓ ✓ Cursor ✓ ✓ ChatGPT ✓ — Claude.ai (web) ✓ —
Create images, PDFs, and videos from templates
Customize layer properties (text, images, colors, positions)
Batch render multiple variations
Merge multiple renders into a single PDF
List all your templates
Create new templates programmatically
Update template properties and layers
Clone templates for variations
Delete templates you no longer need
Upload images and fonts
Create and manage folders
Move templates and renders between folders
View account information and usage
Scope access by folder or external ID to isolate resources per customer
Enforce access control at the server level, immune to prompt injection
Ideal for building customer-facing chat interfaces on top of Templated
Learn more about scoping access →
Try these prompts with your AI assistant:
“List all my Templated templates"
"Create a render from template [ID] with the headline ‘New Product Launch’"
"Generate a transparent PNG from my logo template"
"Create a new template called ‘Social Post’ with dimensions 1080x1080"
"Clone my Instagram template and rename it to ‘TikTok Post’"
"Show my API usage and account information”
This guide walks you through setting up the Templated MCP server with different AI assistants.
Before you begin, make sure you have:
A Templated account — Sign up for free
Your API key — Find it in your dashboard
For local server mode, you’ll also need:
Node.js 18 or higher installed
Claude Desktop supports both remote and local MCP servers.
Locate your config file
The Claude Desktop configuration file is located at:
macOS: ~/Library/Application Support/Claude/claude_desktop_config.jsonWindows: %APPDATA%\Claude\claude_desktop_config.json
Edit the configuration
Open the file and add the Templated MCP server:
"args" : [ "mcp-server-templated" ],
"TEMPLATED_API_KEY" : " YOUR_API_KEY "
Replace YOUR_API_KEY with your actual API key.
Restart Claude Desktop
Completely quit and reopen Claude Desktop for the changes to take effect.
Verify the connection
Look for a tools icon (hammer) in the chat input area. Click it to see available Templated tools.
Locate your config file
Same location as above.
Edit the configuration
"url" : "https://mcp.templated.io/mcp?apiKey= YOUR_API_KEY "
Restart Claude Desktop
Completely quit and reopen Claude Desktop.
Cursor supports MCP servers through its configuration file.
Locate your config file
The Cursor MCP configuration file is located at:
macOS/Linux: ~/.cursor/mcp.jsonWindows: %USERPROFILE%\.cursor\mcp.json
Create or edit the configuration
"url" : "https://mcp.templated.io/mcp?apiKey= YOUR_API_KEY "
Restart Cursor
Close and reopen Cursor for the changes to take effect.
Start using Templated
In the Composer or Chat panel, you can now ask Cursor to use Templated tools.
Locate your config file
Same location as above.
Edit the configuration
"args" : [ "mcp-server-templated" ],
"TEMPLATED_API_KEY" : " YOUR_API_KEY "
Restart Cursor
ChatGPT supports MCP servers through Connected Apps in the settings.
Open ChatGPT Settings
Go to Settings → Connected Apps → Add MCP Server
Enter the server URL
https://mcp.templated.io/mcp?apiKey=YOUR_API_KEY
Replace YOUR_API_KEY with your actual API key.
Set authentication to “No Auth”
Since the API key is included in the URL, select “No Auth” for authentication type.
Click Create
ChatGPT will verify the connection and add Templated to your connected apps.
Start using Templated
In any conversation, you can now ask ChatGPT to use Templated tools to generate images, manage templates, and more.
Claude.ai web interface also supports MCP servers.
Go to Settings
Click on your profile icon and navigate to Settings → Developer → MCP Servers
Add a new server
Click Add Server and enter:
Name: TemplatedURL: https://mcp.templated.io/mcp?apiKey=YOUR_API_KEY
Save and start chatting
The Templated tools will now be available in your conversations.
When building multi-tenant applications (e.g. a chat interface where each customer edits their own templates), you can scope the MCP server so that each session only has access to a specific subset of resources. This is enforced at the server level, making it immune to prompt injection.
You can scope by folder ID , external ID , or both.
If you already use externalId to link templates to your own customers (e.g. via the Embedded Editor ), you can use the same identifier to scope MCP access.
When set, the MCP server will:
Only list templates and renders matching that external ID Automatically assign the external ID to new templates Reject any operation on a template that doesn’t match Add the externalId query parameter to the URL:
https://mcp.templated.io/mcp?apiKey=YOUR_API_KEY&externalId=CUSTOMER_123
Set the TEMPLATED_EXTERNAL_ID environment variable:
"args" : [ "mcp-server-templated" ],
"TEMPLATED_API_KEY" : "YOUR_API_KEY" ,
"TEMPLATED_EXTERNAL_ID" : "CUSTOMER_123"
You can also restrict access to a specific folder. When set, the MCP server will:
Only list templates and renders from that folder Automatically move new templates into the folder Reject any operation on a template outside the folder Hide folder management tools (since the folder is fixed) Add the folderId query parameter to the URL:
https://mcp.templated.io/mcp?apiKey=YOUR_API_KEY&folderId=FOLDER_ID
Set the TEMPLATED_FOLDER_ID environment variable:
"args" : [ "mcp-server-templated" ],
"TEMPLATED_API_KEY" : "YOUR_API_KEY" ,
"TEMPLATED_FOLDER_ID" : "FOLDER_ID"
You can use both scoping parameters together for stricter isolation. For example, to restrict access to a specific folder AND external ID:
https://mcp.templated.io/mcp?apiKey=YOUR_API_KEY&folderId=FOLDER_ID&externalId=CUSTOMER_123
Invalid API key: Double-check your API key is correctJSON syntax error: Validate your config file is valid JSONNode.js not found: For local server, ensure Node.js 18+ is installed and in your PATHServer timeout: Check your internet connection
If the tools don’t appear after configuration:
Completely restart the AI assistant (not just close the window)Check the config file location — it must be in the exact path specifiedVerify JSON syntax — use a JSON validator to check for errorsCheck for existing configs — you may need to merge with existing mcpServers
If using local server mode:
node --version # Should be 18.0.0 or higher
# Test the MCP server directly
TEMPLATED_API_KEY = your_key npx mcp-server-templated
If you’re still having issues:
# MCP Tools Reference
> Complete reference of all available tools in the Templated MCP server.
The Templated MCP server provides 25+ tools that cover the full Templated API. This page documents all available tools and their parameters.
Tools for creating and managing renders (generated images, videos, and PDFs).
Creates a new render from a template.
Parameter Type Required Description templatestring ✓ Template ID to render layersobject — Layer modifications (key: layer name, value: properties). Supports animation object for video renders. formatstring — Output format: jpg, png, webp, pdf, mp4 (default: jpg) transparentboolean — Make background transparent (PNG only) widthnumber — Custom width in pixels heightnumber — Custom height in pixels namestring — Custom name for the render webhook_urlstring — URL to POST render result to durationnumber — Video duration in milliseconds (MP4 only, max 90000) fpsnumber — Frames per second (MP4 only, 1-60)
Example prompt:
“Create a render from template abc123 with the title layer set to ‘Hello World’ and format as PNG”
Retrieves details of a specific render.
Parameter Type Required Description idstring ✓ Render ID
Lists all renders, optionally filtered.
Parameter Type Required Description limitnumber — Maximum number to return (default: 20) templateIdstring — Filter by template ID folderIdstring — Filter by folder ID
Deletes a render.
Parameter Type Required Description idstring ✓ Render ID to delete
Merges multiple renders into a single PDF.
Parameter Type Required Description renderIdsarray ✓ Array of render IDs to merge namestring — Name for the merged PDF
Tools for managing templates.
Lists all templates in your account.
Parameter Type Required Description limitnumber — Maximum number to return (default: 20) folderIdstring — Filter by folder ID tagsarray — Filter by tags
Retrieves details of a specific template.
Parameter Type Required Description idstring ✓ Template ID
Gets all layers in a template with their properties.
Parameter Type Required Description idstring ✓ Template ID
Example prompt:
“Show me all the layers in template abc123”
Gets all pages in a multi-page template.
Parameter Type Required Description idstring ✓ Template ID
Creates a new template programmatically.
Parameter Type Required Description namestring ✓ Template name widthnumber ✓ Width in pixels heightnumber ✓ Height in pixels backgroundstring — Background color (hex) durationnumber — Default video duration in milliseconds (MP4 renders) layersarray — Array of layer objects folderIdstring — Folder to create template in
Layer object properties:
Property Type Description layerstring Unique layer name (required) typestring Layer type: text, image, shape (required) xnumber X position ynumber Y position widthnumber Layer width heightnumber Layer height textstring Text content (for text layers) colorstring Text color (hex) font_familystring Font family name font_sizestring Font size (e.g., “24px”) image_urlstring Image URL (for image layers) backgroundstring Background color (hex) border_radiusstring Border radius (e.g., “10px”) animationobject Animation config for video renders (see below)
Animation object properties (MP4 only):
Property Type Description inobject Entrance animation: type (slide, fade, zoom, rotate), direction, duration (ms), writingStyle loopobject Looping animation: type (spin, pulse), duration (ms) outobject Exit animation: type (slide, fade, zoom), direction, duration (ms) startinteger Time in milliseconds when layer becomes visible (default: 0) endinteger Time in milliseconds when layer disappears (default: video duration)
Example prompt:
“Create a new template called ‘Social Post’ that’s 1080x1080 with a blue background and a white text layer for the title”
Updates an existing template.
Parameter Type Required Description idstring ✓ Template ID namestring — New template name widthnumber — New width heightnumber — New height backgroundstring — New background color durationnumber — Default video duration in milliseconds layersarray — Updated layers
Creates a copy of a template.
Parameter Type Required Description idstring ✓ Template ID to clone namestring — Name for the cloned template
Example prompt:
“Clone my Instagram template and name it ‘TikTok Version‘“
Deletes a template.
Parameter Type Required Description idstring ✓ Template ID to delete
Lists all renders created from a specific template.
Parameter Type Required Description idstring ✓ Template ID limitnumber — Maximum number to return
Tools for organizing templates and renders into folders.
Lists all folders.
Parameter Type Required Description limitnumber — Maximum number to return
Creates a new folder.
Parameter Type Required Description namestring ✓ Folder name colorstring — Folder color (hex)
Updates a folder’s name or color.
Parameter Type Required Description idstring ✓ Folder ID namestring — New folder name colorstring — New folder color
Deletes a folder.
Parameter Type Required Description idstring ✓ Folder ID to delete
Tools for managing uploaded images.
Lists all uploaded images.
Parameter Type Required Description limitnumber — Maximum number to return
Uploads an image from a URL.
Parameter Type Required Description urlstring ✓ URL of the image to upload namestring — Name for the upload
Example prompt:
“Upload this image logo.png to my Templated account”
Deletes an uploaded image.
Parameter Type Required Description idstring ✓ Upload ID to delete
Tools for managing custom fonts.
Lists all uploaded custom fonts.
Parameter Type Required Description limitnumber — Maximum number to return
Uploads a custom font from a URL.
Parameter Type Required Description urlstring ✓ URL of the font file (.ttf, .otf, .woff, .woff2) namestring — Name for the font
Deletes a custom font.
Parameter Type Required Description idstring ✓ Font ID to delete
Retrieves account information including usage statistics.
No parameters required.
Returns:
Account name and email
Current plan
API usage statistics
Remaining credits
Example prompt:
“Show me my Templated account information and usage”
Category Tools Description Renders 5 Create, view, list, delete, and merge renders Templates 9 Full template lifecycle management Folders 4 Organize content into folders Uploads 3 Manage uploaded images Fonts 3 Manage custom fonts Account 1 View account information
When asking your AI assistant to use these tools, you don’t need to use the exact parameter names. Natural language works great!
For example, instead of saying:
“Use create_render with template=abc123 and format=png”
You can simply say:
“Create a PNG from template abc123”
# Create a render
> Learn to create a render (image, PDF, or video) using the Templated API.
This is the endpoint to create a render.
It responds with 200 OK and returns the render data including the render URL. 2 seconds to complete (videos may take longer depending on duration and complexity).
Once generated, the image/PDF/video file is immediately available at the returned URL.
Here’s a sample request to create a render:
fetch ( 'https://api.templated.io/v1/render' , {
"template" : TEMPLATE_ID ,
"text" : "This is my text to be rendered" ,
"image_url" : "https://picsum.photos/200/300.jpg"
'Content-Type' : 'application/json' ,
'Authorization' : `Bearer ${ API_KEY }`
template_id = ' TEMPLATE_ID '
url = 'https://api.templated.io/v1/render'
'Content-Type' : 'application/json' ,
'Authorization' : f 'Bearer { api_key } '
'text' : 'This is my text to be rendered' ,
'image_url' : 'https://picsum.photos/200/300.jpg'
response = requests.post(url, json = data, headers = headers)
if response.status_code == 200 :
print ( 'Render request accepted.' )
print ( 'Render request failed. Response code:' , response.status_code)
import java.net.HttpURLConnection;
import java.io.OutputStream;
import org.json.JSONObject;
public class RenderRequest {
public static void main ( String [] args ) {
String apiKey = " API_KEY " ;
String templateId = " TEMPLATE_ID " ;
URL url = new URL ( "https://api.templated.io/v1/render" );
HttpURLConnection connection = (HttpURLConnection) url. openConnection ();
connection. setRequestMethod ( "POST" );
connection. setRequestProperty ( "Content-Type" , "application/json" );
connection. setRequestProperty ( "Authorization" , "Bearer " + apiKey);
connection. setDoOutput ( true );
JSONObject layers = new JSONObject ()
. put ( "text-1" , new JSONObject ()
. put ( "text" , "This is my text to be rendered" )
. put ( "background" , "#0000FF" ))
. put ( "image-1" , new JSONObject ()
. put ( "image_url" , "https://picsum.photos/200/300.jpg" ));
JSONObject jsonInput = new JSONObject ()
. put ( "template" , templateId)
try (OutputStream os = connection. getOutputStream ()) {
byte [] input = jsonInput. toString (). getBytes ( "utf-8" );
os. write (input, 0 , input.length);
int responseCode = connection. getResponseCode ();
System.out. println (responseCode);
$templateId = ' TEMPLATE_ID ' ;
$url = 'https://api.templated.io/v1/render' ;
'template' => $templateId,
'text' => 'This is my text to be rendered' ,
'background' => '#0000FF'
'image_url' => 'https://picsum.photos/200/300.jpg'
'Content-Type: application/json' ,
'Authorization: Bearer ' . $apiKey
'content' => json_encode ($data)
$context = stream_context_create ($options);
$result = file_get_contents ($url, false , $context);
curl -X POST https://api.templated.io/v1/render \
-H "Content-Type: application/json" \
-H "Authorization: Bearer API_KEY " \
"template": " TEMPLATE_ID ",
"text": "This is my text to be rendered",
"image_url": "https://picsum.photos/200/300.jpg"
template string REQUIRED
templates array template parameter will be ignored and will not be required. "templates": ["template-id-1", "template-id-2"]
format string jpg, png, webp, pdf, or mp4). Default is jpg.
transparent boolean png. Default is false.
duration number mp4.
fps number mp4. 1. Maximum is 60. Default is 30.
flatten boolean pdf. false.
cmyk boolean pdf. false.
name string
background string
width number
height number
scale number 0.1, maximum 2.0). 0.5 will render at 50% size, 2.0 will render at 200% size. Default is 1.0.
external_id string
async boolean false, the render will be created synchronously. Default is false.
webhook_url string
merge boolean true and multiple renders are generated (multi-page templates), automatically merge all renders into a single PDF. Default is false.
pages array page (page identifier) and layers (layer modifications for that page).width and height to override the dimensions of individual pages. When using pages, the layers parameter is ignored.
layers object Use this for single-page templates or to apply the same changes to all pages in multi-page templates.
These are the parameters that can be used to override the template layers attributes.
text string If the layer is a QR Code or a Barcode this will be the value used.
image_url string
color string
color_2 string* in the text layer.
background string
font_family string
font_family_2 string* in the text layer.
font_size string
font_weight string
letter_spacing string
line_height string
text_stroke_width double
text_stroke_color string
text_highlight_color string
padding_x integer
padding_y integer
horizontal_align string
vertical_align string
autofit string
border_width integer
border_color string
border_radius string
border_style string
dash_length double
dash_gap double
fill string
stroke string
preserve_ratio booleanfalse to allow free scaling of SVG shapes and vectors without preserving the aspect ratio.false, the SVG content will stretch to fill the layer dimensions. Default is true.
hide boolean
opacity double
link stringhttp:// or https://.
x integer
y integer
rotation integer
width integer
height integer
flip_x booleantrue to mirror the layer along the Y-axis.
flip_y booleantrue to mirror the layer along the X-axis.
object_fit string
object_position stringobject_fit: "cover" or "contain"."center", "top", "bottom left", "25% 75%", etc.
crop_x doublecrop_width and crop_height to crop an image layer.
crop_y double
crop_width double50 means the crop area covers 50% of the image width.
crop_height double50 means the crop area covers 50% of the image height.
filter string"blur(4px) brightness(68%) hue-rotate(27deg) contrast(70%) saturate(125%) sepia(53%) grayscale(27%) invert(25%)"
barcode_format stringCODE128 , CODE39 , EAN13 , EAN8 , ITF14 , UPC .
rating double
html string"<ul><li>Item 1</li><li>Item 2</li><li>Item 3</li></ul>"
animation object
in object — Entrance animation. Properties:
type string — Animation type: slide, fade, zoom, rotatedirection string — Direction: left, right, up, down (for slide), in, out (for zoom)duration integer — Duration in millisecondswritingStyle string — Text animation style: block, word, character (text layers with slide/fade)
loop object — Looping animation. Properties:
type string — Animation type: spin, pulseduration integer — Duration in milliseconds per cycle
out object — Exit animation. Properties:
type string — Animation type: slide, fade, zoomdirection string — Direction: left, right, up, down (for slide), in, out (for zoom)duration integer — Duration in milliseconds
start integer — Time in milliseconds when the layer becomes visible (default: 0)end integer — Time in milliseconds when the layer disappears (default: video duration) The API returns a JSON object with the render details.
"id" : "ce424057-6b54-41bb-afec-adc35a2b9175" ,
"url" : "https://templated-assets.s3.amazonaws.com/renders/ce424057-6b54-41bb-afec-adc35a2b9175.jpg" ,
"templateId" : "1f1231-dasd123-fsdf12312-fds4123-asdas23" ,
"templateName" : "Sample Template" ,
"createdAt" : "2025-04-22 08:30:58" ,
If you are using a multi-page template, you can use the pages parameter to specify different layer modifications for each page.
Similarly to the single-page template, you can use the layers parameter to apply the same modifications to all pages:
fetch ( 'https://api.templated.io/v1/render' , {
"company_name" : { "text" : "ACME Corporation" },
"logo" : { "image_url" : "https://example.com/logo.png" }
'Content-Type' : 'application/json' ,
'Authorization' : `Bearer ${ API_KEY }`
Use the pages parameter to specify different layer modifications for each page.
fetch ( 'https://api.templated.io/v1/render' , {
"title" : { "text" : "Welcome to Our Company" },
"subtitle" : { "text" : "Page 1 Content" }
"title" : { "text" : "Our Services" },
"content" : { "text" : "We offer amazing services..." }
"title" : { "text" : "Contact Us" },
"contact" : { "text" : "support@company.com" }
'Content-Type' : 'application/json' ,
'Authorization' : `Bearer ${ API_KEY }`
'template' : ' TEMPLATE_ID ' ,
'title' : { 'text' : 'Welcome to Our Company' },
'subtitle' : { 'text' : 'Page 1 Content' }
'title' : { 'text' : 'Our Services' },
'content' : { 'text' : 'We offer amazing services...' }
'title' : { 'text' : 'Contact Us' },
'contact' : { 'text' : 'support@company.com' }
response = requests.post(
'https://api.templated.io/v1/render' ,
headers = { 'Authorization' : 'Bearer API_KEY ' }
You can set different dimensions for each page using the width and height parameters inside each page object.
This is useful for creating collections with mixed formats (e.g. a cover at 1920×1080, content at 1080×1080, and stories at 1080×1920).
"template" : " TEMPLATE_ID " ,
"title" : { "text" : "Welcome" }
"title" : { "text" : "Our Services" }
"title" : { "text" : "Follow Us" }
If width or height is not specified for a page, it falls back to the dimensions set in the page’s HTML style, then to the global width/height parameters, and finally to the template’s default dimensions.
When multiple pages are rendered (using pages parameter or multi-page templates with layers), you will receive an array of render objects in the response:
"url" : "https://templated-assets.s3.amazonaws.com/renders/render-page1-id.jpg" ,
"templateId" : "template-id" ,
"templateName" : "Multi-Page Template" ,
"createdAt" : "2025-04-22 08:30:58"
"url" : "https://templated-assets.s3.amazonaws.com/renders/render-page2-id.jpg" ,
"templateId" : "template-id" ,
"templateName" : "Multi-Page Template" ,
"createdAt" : "2025-04-22 08:30:58"
• If your template has multiple pages but you use the layers parameter, the same layer modifications will be applied to all pages pages parameter when you need different content per page "merge": true to get a single PDF with multiple pages instead of separate images
Templated supports rendering templates as MP4 videos. This is ideal for templates with animations, video layers, or when you want to create dynamic video content from your designs.
When rendering videos, you can control the following parameters:
Parameter Type Description Default formatstring Set to "mp4" for video output "jpg"durationnumber Video duration in milliseconds (max 90000). Falls back to the template’s default duration if not specified. 5000fpsnumber Frames per second (10, 30, or 60) 30
fetch ( 'https://api.templated.io/v1/render' , {
"duration" : 10000 , // 10 seconds
"title" : { "text" : "Welcome to my video!" },
"background-video" : { "video_url" : "https://example.com/video.mp4" }
'Content-Type' : 'application/json' ,
'Authorization' : `Bearer ${ API_KEY }`
'template' : ' TEMPLATE_ID ' ,
'duration' : 10000 , # 10 seconds
'title' : { 'text' : 'Welcome to my video!' },
'background-video' : { 'video_url' : 'https://example.com/video.mp4' }
response = requests.post(
'https://api.templated.io/v1/render' ,
headers = { 'Authorization' : 'Bearer API_KEY ' }
curl -X POST https://api.templated.io/v1/render \
-H "Content-Type: application/json" \
-H "Authorization: Bearer API_KEY " \
"template": " TEMPLATE_ID ",
"title": { "text": "Welcome to my video!" },
"background-video": { "video_url": "https://example.com/video.mp4" }
You can add entrance, looping, and exit animations to any layer via the animation property. Animations only apply to video (MP4) renders.
"template" : "TEMPLATE_ID" ,
"in" : { "type" : "slide" , "direction" : "left" , "duration" : 500 },
"loop" : { "type" : "pulse" , "duration" : 1000 },
"out" : { "type" : "fade" , "duration" : 500 },
All time values in the animation object are in milliseconds , consistent with the top-level duration parameter.
Category Types Properties in (entrance)slide, fade, zoom, rotatetype, direction, duration, writingStyleloop (repeating)spin, pulsetype, durationout (exit)slide, fade, zoomtype, direction, duration
Direction values: left, right, up, down (for slide) — in, out (for zoom)
Writing style (text layers only): block (default), word, character — controls how text animates with slide/fade
The start and end properties control when a layer appears and disappears in the video:
start — time in milliseconds when the layer becomes visible (default: 0)end — time in milliseconds when the layer disappears (default: video duration)
Video rendering uses a credit system based on the template size, duration, and FPS.
Width × Height × FPS × Duration in seconds
50,000,000
Example: A 1920×1080 video at 30 FPS for 10 seconds would cost:
(1920 × 1080 × 30 × 10) / 50,000,000 = 12.4 credits (rounded up to 13 credits )
Use this calculator to estimate the number of credits required for a video render.
(1920 × 1080 × 30 × 10) / 50M
= 6.22 → rounded up
• Maximum duration: 90 secondsFPS options: 1-60 frames per secondProcessing time: Videos take longer to render than images (typically 10-60 seconds depending on duration and complexity)File size: Larger dimensions, higher FPS, and longer durations will result in larger file sizesAnimations: All CSS animations and video layers in your template will be captured in the output
Start with shorter durations - Test with 5-10 second videos before creating longer contentUse appropriate FPS - 30 FPS is suitable for most content; use 60 FPS only for smooth motion graphicsOptimize template animations - Ensure your animations are designed to loop or complete within the specified durationConsider async rendering - For longer videos, set "async": true and use webhooks to be notified when rendering completes
# Delete a render
> Learn how to delete a render using the Templated API.
Delete a specific render by its ID.
Here’s a sample request to delete a render:
fetch ( `https://api.templated.io/v1/render/${ RENDER_ID }` , {
'Authorization' : `Bearer ${ API_KEY }`
if (response.status === 204 ) {
console. log ( 'Render deleted successfully' );
. catch ( error => console. error ( 'Error:' , error));
url = f 'https://api.templated.io/v1/render/ { render_id } '
headers = { 'Authorization' : f 'Bearer { api_key } ' }
response = requests.delete(url, headers = headers)
if response.status_code == 204 :
print ( 'Render deleted successfully' )
print ( 'Request failed. Response code:' , response.status_code)
import java.net.HttpURLConnection;
public class DeleteRender {
public static void main ( String [] args ) {
String apiKey = " API_KEY " ;
String renderId = " RENDER_ID " ;
URL url = new URL ( "https://api.templated.io/v1/render/" + renderId);
HttpURLConnection connection = (HttpURLConnection) url. openConnection ();
connection. setRequestMethod ( "DELETE" );
connection. setRequestProperty ( "Authorization" , "Bearer " + apiKey);
int responseCode = connection. getResponseCode ();
if (responseCode == HttpURLConnection.HTTP_NO_CONTENT) {
System.out. println ( "Render deleted successfully" );
System.out. println ( "Request failed. Response Code: " + responseCode);
$url = "https://api.templated.io/v1/render/{ $renderId }" ;
'header' => "Authorization: Bearer { $apiKey } \r\n " ,
$context = stream_context_create ($options);
$result = @ file_get_contents ($url, false , $context);
if ($http_response_header[ 0 ] == 'HTTP/1.1 204 No Content' ) {
echo "Render deleted successfully" ;
echo "Error deleting render" ;
A successful deletion will return a 204 No Content response with no body.
Status Code Description 401 Not authorized - Invalid or missing API key 403 Forbidden - You don’t have permission to delete this render 404 Not Found - Render or user not found 500 Internal Server Error - An unexpected error occurred
# Duplicate a render
> Learn how to duplicate a render using the Templated API.
Creates a duplicate of an existing render.
id string REQUIRED
Here’s a sample request to duplicate a render:
POST / v1 / render / :id / duplicate
fetch ( `https://api.templated.io/v1/render/${ id }/duplicate` , {
'Authorization' : `Bearer ${ API_KEY }`
The API returns a JSON object with the duplicated render details.
"id" : "new-render-id-456" ,
"url" : "https://templated-assets.s3.amazonaws.com/renders/new-render-id-456.jpg" ,
"templateId" : "template-id-123" ,
"templateName" : "Sample Template" ,
"createdAt" : "2024-01-15T10:30:00Z" ,
A Render is what is generated when you render an image, PDF, or video from a template.
Bellow are the basic attributes of a Render.
id string
width number
height number
url string
name string
status string
format string
templateId string
templateName string
createdAt string
Here’s a sample object of a render:
"id" : "ce424057-6b54-41bb-afec-adc35a2b9175" ,
"url" : "https://templated-assets.s3.amazonaws.com/renders/ce424057-6b54-41bb-afec-adc35a2b9175.jpg" ,
"templateId" : "1f1231-dasd123-fsdf12312-fds4123-asdas23" ,
"templateName" : "Sample Template" ,
"createdAt" : "2023-10-02T10:00:00.077Z" ,
Lists all renders of an user.
Here’s a sample request to list all user’s renders:
fetch ( `https://api.templated.io/v1/renders` , {
'Authorization' : `Bearer ${ API_KEY }`
. then ( response => response. json ())
. then ( data => console. log (data))
. catch ( error => console. error ( 'Error:' , error));
url = 'https://api.templated.io/v1/renders'
headers = { 'Authorization' : f 'Bearer { api_key } ' }
response = requests.get(url, headers = headers)
if response.status_code == 200 :
print ( 'Request failed. Response code:' , response.status_code)
import java.net.HttpURLConnection;
import java.io.BufferedReader;
import java.io.InputStreamReader;
import java.net.URLEncoder;
public class ListRenders {
public static void main ( String [] args ) {
String apiKey = " API_KEY " ;
URL url = new URL ( "https://api.templated.io/v1/renders" );
HttpURLConnection connection = (HttpURLConnection) url. openConnection ();
connection. setRequestMethod ( "GET" );
connection. setRequestProperty ( "Authorization" , "Bearer " + apiKey);
int responseCode = connection. getResponseCode ();
if (responseCode == HttpURLConnection.HTTP_OK) {
BufferedReader in = new BufferedReader ( new InputStreamReader (connection. getInputStream ()));
StringBuilder response = new StringBuilder ();
while ((inputLine = in. readLine ()) != null ) {
response. append (inputLine);
System.out. println (response. toString ());
System.out. println ( "Request failed. Response Code: " + responseCode);
$url = "https://api.templated.io/v1/renders" ;
'header' => "Authorization: Bearer { $apiKey } \r\n " ,
$context = stream_context_create ($options);
$result = file_get_contents ($url, false , $context);
echo "Error fetching data" ;
$data = json_decode ($result, true );
# Merge renders
> Learn to merge renders using the Templated API.
Merges multiple renders into a single PDF .
By default, the merged PDF will be returned directly in the response.host parameter, the merged PDF will be uploaded to our servers and you will receive a URL in the response.
ids array REQUIRED
urls array
name stringhost is true, the hosted URL will include this name. When downloading directly, it will be used as the filename. Defaults to merged_renders for downloads.
host booleantrue, the merged PDF will be hosted in our servers and you will receive a URL in the response. Defaults to false.
fetch ( "https://api.templated.io/v1/render/merge" , {
'Content-Type' : 'application/json' ,
'Authorization' : `Bearer ${ API_KEY }`
. then ( response => response. json ())
const link = document. createElement ( 'a' );
link.download = 'merged_renders.pdf' ;
document.body. appendChild (link);
fetch ( "https://api.templated.io/v1/render/merge" , {
'Content-Type' : 'application/json' ,
'Authorization' : `Bearer ${ API_KEY }`
"https://example.com/document1.pdf" ,
"https://example.com/document2.pdf"
. then ( response => response. json ())
console. log ( 'Merged PDF URL:' , data.url);
The response format depends on the host parameter:
Returns a JSON object with the URL of the hosted merged PDF:
"url" : "https://assets.templated.io/renders/merged/merged-abc123.pdf"
Returns the merged PDF file directly in the response body with the following headers:
Content-Type: application/pdf
Content-Disposition: attachment; filename="merged_renders.pdf"
The PDF file can be downloaded and saved directly from the response.
The final PDF will contain pages in this order:
Renders : In the order specified by the ids arrayExternal PDFs : In the order specified by the urls array (if provided)
For example, if you provide ids: ["render1", "render2"] and urls: ["doc1.pdf", "doc2.pdf"], the final PDF will contain:
render1 → render2 → doc1.pdf → doc2.pdf
# Retrieve a render
> Learn to retrieve a render using the Templated API.
Retrieves a single Render object referenced by its unique ID.
id string REQUIRED
The render id of the render that will be retrieved.
Here’s a sample request to retrieve a render:
fetch ( `https://api.templated.io/v1/render/${ id }` , {
'Authorization' : `Bearer ${ API_KEY }`
Add tags to an existing template.
The request body should be an array of strings containing the tags you want to add.
Here’s a sample request to add tags to a template:
POST / v1 / template / {templateId} / tags
fetch ( `https://api.templated.io/v1/template/${ template_id }/tags` , {
'Authorization' : `Bearer ${ API_KEY }` ,
'Content-Type' : 'application/json'
. then ( response => response. json ())
. then ( data => console. log (data))
. catch ( error => console. error ( 'Error:' , error));
template_id = ' template_id '
url = f 'https://api.templated.io/v1/template/ { template_id } /tags'
'Authorization' : f 'Bearer { api_key } ' ,
'Content-Type' : 'application/json'
response = requests.post(url, json = tags, headers = headers)
if response.status_code == 200 :
print ( 'Request failed. Response code:' , response.status_code)
import java.net.HttpURLConnection;
import java.io.OutputStream;
import java.io.BufferedReader;
import java.io.InputStreamReader;
public class AddTemplateTags {
public static void main ( String [] args ) {
String apiKey = " API_KEY " ;
String templateId = " template_id " ;
String url = "https://api.templated.io/v1/template/" + templateId + "/tags" ;
["social-media", "instagram", "story"]
URL apiUrl = new URL (url);
HttpURLConnection connection = (HttpURLConnection) apiUrl. openConnection ();
connection. setRequestMethod ( "POST" );
connection. setRequestProperty ( "Authorization" , "Bearer " + apiKey);
connection. setRequestProperty ( "Content-Type" , "application/json" );
connection. setDoOutput ( true );
try (OutputStream os = connection. getOutputStream ()) {
byte [] input = jsonTags. getBytes ( "utf-8" );
os. write (input, 0 , input.length);
int responseCode = connection. getResponseCode ();
if (responseCode == HttpURLConnection.HTTP_OK) {
BufferedReader in = new BufferedReader (
new InputStreamReader (connection. getInputStream ()));
StringBuilder response = new StringBuilder ();
while ((inputLine = in. readLine ()) != null ) {
response. append (inputLine);
System.out. println (response. toString ());
System.out. println ( "Request failed. Response Code: " + responseCode);
$templateId = ' template_id ' ;
$url = "https://api.templated.io/v1/template/{ $templateId }/tags" ;
'header' => "Authorization: Bearer { $apiKey } \r\n " .
"Content-Type: application/json \r\n " ,
'content' => json_encode ($tags)
$context = stream_context_create ($options);
$result = file_get_contents ($url, false , $context);
echo "Error adding tags" ;
$data = json_decode ($result, true );
# Clone a template
> Learn how to clone a template using the Templated API.
A clone template is a copy of a template that maintains a link to the source template through the sourceTemplateId field.
Key points about clone templates:
• They maintain a link to the source template through the sourceTemplateId field
• Changes to the clone don’t affect the original template
• Clone templates can be tracked and retrieved using the List template clones endpoint
• They are useful for creating variations of templates while maintaining the source relationship
• Unlike duplicates, clones preserve the relationship to the original template for tracking purposes
Clone templates are not visible in your dashboard.
Creates a clone of an existing template.sourceTemplateId field.
id string REQUIRED
Here’s a sample request to clone a template:
POST / v1 / template / :id / clone
fetch ( `https://api.templated.io/v1/template/${ id }/clone` , {
'Authorization' : `Bearer ${ API_KEY }`
The API returns a JSON object with the cloned template details.
"id" : "new-template-id-123" ,
"sourceTemplateId" : "original-template-id-456" ,
"createdAt" : "2024-01-15T10:30:00Z" ,
"updatedAt" : "2024-01-15T10:30:00Z" ,
A clone template is a copy of a template that was created using the Embed Editor with the &clone=true
They are created automatically when a user edits a template through the embedded editor with cloning enabled
They maintain a link to the source template through the sourceTemplateId field
Changes to the clone don’t affect the original template
Clone templates are not visible in your Templated dashboard
They are only accessible through the API
They are useful for tracking user-specific template variations in your application
sourceTemplateId string
externalId string
page integer
limit integer
Here’s a sample request to list clone templates:
fetch ( 'https://api.templated.io/v1/templates/clones?sourceTemplateId= 123 &page= 0 &limit= 25 ' , {
'Authorization' : `Bearer ${ API_KEY }`
You can also get a count of all clone templates for a given source template ID.
Here’s a sample request to count clone templates:
GET / v1 / templates / clones / count
fetch ( 'https://api.templated.io/v1/templates/clones/count?sourceTemplateId= 123 ' , {
'Authorization' : `Bearer ${ API_KEY }`
The response will be a JSON object with the count of clone templates.
# Create a template
> Learn to create a template using the Templated API.
This endpoint is used for more complex integrations where you need to create templates programmatically.
This endpoint allows you to:
Build complex designs by stacking multiple layers Create multi-page templates (e.g., brochures, presentations, multi-page PDFs) Position elements precisely using x and y coordinates Style text with custom fonts, colors, and auto-fitting options Add images with specific dimensions and positioning Create shapes using SVG markup for backgrounds, overlays, or decorative elements Control the visual hierarchy through layer ordering After creating the template, you can open and modify the template in our Editor or use it to generate renders with the render endpoint.
name string REQUIRED
width number REQUIRED
height number REQUIRED
layers arraylayer property, which will be the name identifier of the layer in the template and the layer type (image, text, shape).
pages arraylayers when you need multiple pages. Multi-Page Templates below for details.
duration number5000 for 5 seconds). When rendering a video without specifying a duration, this value is used as the default.
For all the available layer properties, see the Layer Parameters section.
You can group layers together by setting the same group property on multiple layers. Grouped layers are treated as a single unit in the Editor and can be identified programmatically via the API.
group stringgroup value will be wrapped in a group container. The group’s position and dimensions are automatically calculated from the bounding box of its child layers.
"image_url" : "https://example.com/logo.png" ,
"text" : "This layer is not grouped" ,
In this example, title and logo are grouped under "header", while footer remains independent.
You can create templates with multiple pages by using the pages field instead of layers. Each page is an object with its own set of layers and optional dimension overrides.
page string REQUIRED"page-1", "cover", "back").
layers object REQUIREDtype, text, x, y, etc.).
width numberwidth is used.
height numberheight is used.
"name" : "Product Brochure" ,
"image_url" : "https://example.com/cover-bg.jpg"
"text" : "Product Brochure" ,
"text" : "Feature descriptions go here..." ,
After creating a multi-page template, you can retrieve its pages using the List Template Pages endpoint.
Here’s a sample request to create a single-page template:
fetch ( 'https://api.templated.io/v1/template' , {
'Authorization' : `Bearer ${ API_KEY }` ,
'Content-Type' : 'application/json'
"name" : "Summer Music Festival Post" ,
"layer" : "background-image" ,
"image_url" : "https://images.unsplash.com/photo-1533174072545-7a4b6ad7a6c3"
"text" : "SUMMER BEATS \n FESTIVAL 2024" ,
"font_family" : "ArchivoBlack-Regularttf" ,
"html" : "<rect width='100%' height='100%' rx='12' fill='#4B56D2' opacity='0.85'/>"
Delete a specific template by its ID.
Here’s a sample request to delete a template:
fetch ( `https://api.templated.io/v1/template/${ TEMPLATE_ID }` , {
'Authorization' : `Bearer ${ API_KEY }`
if (response.status === 204 ) {
console. log ( 'Template deleted successfully' );
. catch ( error => console. error ( 'Error:' , error));
template_id = ' TEMPLATE_ID '
url = f 'https://api.templated.io/v1/template/ { template_id } '
headers = { 'Authorization' : f 'Bearer { api_key } ' }
response = requests.delete(url, headers = headers)
if response.status_code == 204 :
print ( 'Template deleted successfully' )
print ( 'Request failed. Response code:' , response.status_code)
import java.net.HttpURLConnection;
public class DeleteRender {
public static void main ( String [] args ) {
String apiKey = " API_KEY " ;
String templateId = " TEMPLATE_ID " ;
URL url = new URL ( "https://api.templated.io/v1/template/" + templateId);
HttpURLConnection connection = (HttpURLConnection) url. openConnection ();
connection. setRequestMethod ( "DELETE" );
connection. setRequestProperty ( "Authorization" , "Bearer " + apiKey);
int responseCode = connection. getResponseCode ();
if (responseCode == HttpURLConnection.HTTP_NO_CONTENT) {
System.out. println ( "Template deleted successfully" );
System.out. println ( "Request failed. Response Code: " + responseCode);
$templateId = ' TEMPLATE_ID ' ;
$url = "https://api.templated.io/v1/template/{ $templateId }" ;
'header' => "Authorization: Bearer { $apiKey } \r\n " ,
$context = stream_context_create ($options);
$result = @ file_get_contents ($url, false , $context);
if ($http_response_header[ 0 ] == 'HTTP/1.1 204 No Content' ) {
echo "Template deleted successfully" ;
echo "Error deleting template" ;
A successful deletion will return a 204 No Content response with no body.
Status Code Description 401 Not authorized - Invalid or missing API key 403 Forbidden - You don’t have permission to delete this template 404 Not Found - Template or user not found 500 Internal Server Error - An unexpected error occurred
# Duplicate a template
> Learn how to duplicate a template using the Templated API.
Creates a duplicate of an existing template.
id string REQUIRED
name string OPTIONAL{original_template_name} ”.
Here’s a sample request to duplicate a template:
POST / v1 / template / :id / duplicate
fetch ( `https://api.templated.io/v1/template/${ id }/duplicate? name =My Custom Template` , {
'Authorization' : `Bearer ${ API_KEY }`
fetch ( `https://api.templated.io/v1/template/${ id }/duplicate` , {
'Authorization' : `Bearer ${ API_KEY }`
The API returns a JSON object with the duplicated template details.
"id" : "new-template-id-123" ,
"name" : "My Custom Template" ,
"createdAt" : "2024-01-15T10:30:00Z" ,
"updatedAt" : "2024-01-15T10:30:00Z" ,
Lists all templates available in the public Template Gallery .
Parameter Type Default Description querystring - Filter templates by name or description categorystring - Filter templates by category name tagsstring - Filter templates by tags (comma-separated) pageinteger 0 Page number for pagination limitinteger 25 Number of results per page widthinteger - Filter templates by exact width heightinteger - Filter templates by exact height includeLayersboolean false Include template layers in response
Returns an array of template objects. Each template includes the following notable fields:
Field Type Description idstring Unique identifier of the template namestring Name of the template descriptionstring Description of the template widthinteger Width of the template in pixels heightinteger Height of the template in pixels thumbnailstring URL of the template thumbnail image categoryobject Category information (name, description) tagsarray List of tags associated with the template backgroundstring The background color of the template layersarray List of template layers (only when includeLayers=true)
Here’s a sample request to list all gallery templates:
GET / v1 / templates / gallery
fetch ( 'https://api.templated.io/v1/templates/gallery' , {
'Authorization' : `Bearer ${ API_KEY }`
. then ( response => response. json ())
. then ( data => console. log (data))
. catch ( error => console. error ( 'Error:' , error));
url = 'https://api.templated.io/v1/templates/gallery'
headers = { 'Authorization' : f 'Bearer { api_key } ' }
response = requests.get(url, headers = headers)
if response.status_code == 200 :
print ( 'Request failed. Response code:' , response.status_code)
$url = "https://api.templated.io/v1/templates/gallery" ;
'header' => "Authorization: Bearer { $apiKey } \r\n " ,
$context = stream_context_create ($options);
$result = file_get_contents ($url, false , $context);
echo "Error fetching data" ;
$data = json_decode ($result, true );
fetch ( 'https://api.templated.io/v1/templates/gallery?category=Certificate' , {
'Authorization' : `Bearer ${ API_KEY }`
// Get Instagram post templates (1080x1080)
fetch ( 'https://api.templated.io/v1/templates/gallery?width=1080&height=1080' , {
'Authorization' : `Bearer ${ API_KEY }`
fetch ( 'https://api.templated.io/v1/templates/gallery?query=certificate' , {
'Authorization' : `Bearer ${ API_KEY }`
You can launch the Templated editor with a gallery template pre-loaded using the gallery URL parameter:
https://app.templated.io/editor?gallery={galleryTemplateId}
This will automatically create a copy of the gallery template in the user’s account and open it for editing.
For embedded editor integrations, you can use:
https://app.templated.io/editor?embed={embedConfigId}&gallery={galleryTemplateId}
These attributes define the properties of a template.
id string
name string
description string
width integer
height integer
thumbnail string
layersCount integer
user User object
folderId string
Here’s a sample object of a template:
"id" : "306c724a-d138-486a-a601-0b2a9ced52be" ,
"name" : "Twitter Bubble Square Template" ,
"description" : "This is a sample template for demonstration." ,
"thumbnail" : "https://templated-assets.s3.us-east-1.amazonaws.com/public/thumbnail/306c724a-d138-486a-a601-0b2a9ced52be.webp" ,
"id" : "872s0atn-l4o5-09g9-gth2-oy7f79df6tuw" ,
Lists all layers of a template.includeLockedLayers=true to include them.
id string REQUIRED
includeLockedLayers booleanfalse. When true, returns layers even if they are marked as locked in the template.
Here’s a sample request to list all layers of a template:
GET / v1 / template / :id / layers
GET / v1 / template / :id / layers ? includeLockedLayers = true
fetch ( `https://api.templated.io/v1/template/${ id }/layers` , {
'Authorization' : `Bearer ${ API_KEY }`
The API returns an array of JSON objects with the layer details.
"description" : "Profile image layer" ,
Each layer object contains the following properties:
layer string
type string
description string
group stringgroup value are grouped together in the Editor.
Lists all templates of an user.
Parameter Type Default Description querystring - Filter templates by name pageinteger 0 Page number for pagination limitinteger 25 Number of results per page widthinteger - Filter templates by width heightinteger - Filter templates by height tagsstring - Filter templates by tags (comma-separated) externalIdstring - Filter templates by external ID includeLayersboolean false Include template layers in response includePagesboolean false Include template pages and layers in response
Each template in the response includes the following notable fields:
Field Type Description backgroundstring The background color of the template (e.g., #ffffff or rgb(255, 255, 255)) layersarray List of template layers (only included when includeLayers=true) pagesarray List of template pages with their layers (only included when includePages=true)
Here’s a sample request to list all user’s templates:
fetch ( `https://api.templated.io/v1/templates` , {
'Authorization' : `Bearer ${ API_KEY }`
// Example with all query parameters
externalId: 'my-external-id' ,
. then ( response => response. json ())
. then ( data => console. log (data))
. catch ( error => console. error ( 'Error:' , error));
url = 'https://api.templated.io/v1/templates'
# Example with all query parameters
'query' : 'Template Name' ,
'externalId' : 'my-external-id' ,
headers = { 'Authorization' : f 'Bearer { api_key } ' }
response = requests.get(url, params = params, headers = headers)
if response.status_code == 200 :
print ( 'Request failed. Response code:' , response.status_code)
import java.net.HttpURLConnection;
import java.io.BufferedReader;
import java.io.InputStreamReader;
import java.net.URLEncoder;
public class ListTemplates {
public static void main ( String [] args ) {
String apiKey = " API_KEY " ;
// Example with all query parameters
String queryParams = String. format ( "?query=%s&page=%d&limit=%d&width=%d&height=%d&externalId=%s&includeLayers=%b" ,
URLEncoder. encode ( "Template Name" , "UTF-8" ),
URLEncoder. encode ( "my-external-id" , "UTF-8" ),
URL url = new URL ( "https://api.templated.io/v1/templates" + queryParams);
HttpURLConnection connection = (HttpURLConnection) url. openConnection ();
connection. setRequestMethod ( "GET" );
connection. setRequestProperty ( "Authorization" , "Bearer " + apiKey);
int responseCode = connection. getResponseCode ();
if (responseCode == HttpURLConnection.HTTP_OK) {
BufferedReader in = new BufferedReader ( new InputStreamReader (connection. getInputStream ()));
StringBuilder response = new StringBuilder ();
while ((inputLine = in. readLine ()) != null ) {
response. append (inputLine);
System.out. println (response. toString ());
System.out. println ( "Request failed. Response Code: " + responseCode);
// Example with all query parameters
'query' => 'Template Name' ,
'externalId' => 'my-external-id' ,
'includeLayers' => 'true'
$url = "https://api.templated.io/v1/templates?" . http_build_query ($params);
'header' => "Authorization: Bearer { $apiKey } \r\n " ,
$context = stream_context_create ($options);
$result = file_get_contents ($url, false , $context);
echo "Error fetching data" ;
$data = json_decode ($result, true );
# List template pages
> Learn to list all pages of a template using the Templated API.
Lists all pages of a template.
id string REQUIRED
Here’s a sample request to list all pages of a template:
GET / v1 / template / :id / pages
fetch ( `https://api.templated.io/v1/template/${ id }/pages` , {
'Authorization' : `Bearer ${ API_KEY }`
The API returns an array of JSON objects with the page details.
"description" : "Title text" ,
"description" : "Cover image" ,
"description" : "Footer text"
"description" : "Body text"
Each page object contains the following properties:
page string
layers object
Remove tags from an existing template.
The request body should be an array of strings containing the tags you want to remove.
Here’s a sample request to remove tags from a template:
DELETE /v1/template/{templateId}/tags
fetch ( `https://api.templated.io/v1/template/${ template_id }/tags` , {
'Authorization' : `Bearer ${ API_KEY }` ,
'Content-Type' : 'application/json'
. then ( response => response. json ())
. then ( data => console. log (data))
. catch ( error => console. error ( 'Error:' , error));
template_id = ' template_id '
url = f 'https://api.templated.io/v1/template/ { template_id } /tags'
'Authorization' : f 'Bearer { api_key } ' ,
'Content-Type' : 'application/json'
response = requests.delete(url, json = tags, headers = headers)
if response.status_code == 200 :
print ( 'Request failed. Response code:' , response.status_code)
import java.net.HttpURLConnection;
import java.io.OutputStream;
import java.io.BufferedReader;
import java.io.InputStreamReader;
public class RemoveTemplateTags {
public static void main ( String [] args ) {
String apiKey = " API_KEY " ;
String templateId = " template_id " ;
String url = "https://api.templated.io/v1/template/" + templateId + "/tags" ;
["social-media", "instagram"]
URL apiUrl = new URL (url);
HttpURLConnection connection = (HttpURLConnection) apiUrl. openConnection ();
connection. setRequestMethod ( "DELETE" );
connection. setRequestProperty ( "Authorization" , "Bearer " + apiKey);
connection. setRequestProperty ( "Content-Type" , "application/json" );
connection. setDoOutput ( true );
try (OutputStream os = connection. getOutputStream ()) {
byte [] input = jsonTags. getBytes ( "utf-8" );
os. write (input, 0 , input.length);
int responseCode = connection. getResponseCode ();
if (responseCode == HttpURLConnection.HTTP_OK) {
BufferedReader in = new BufferedReader (
new InputStreamReader (connection. getInputStream ()));
StringBuilder response = new StringBuilder ();
while ((inputLine = in. readLine ()) != null ) {
response. append (inputLine);
System.out. println (response. toString ());
System.out. println ( "Request failed. Response Code: " + responseCode);
$templateId = ' template_id ' ;
$url = "https://api.templated.io/v1/template/{ $templateId }/tags" ;
'header' => "Authorization: Bearer { $apiKey } \r\n " .
"Content-Type: application/json \r\n " ,
'content' => json_encode ($tags)
$context = stream_context_create ($options);
$result = file_get_contents ($url, false , $context);
echo "Error removing tags" ;
$data = json_decode ($result, true );
# List template renders
> Learn the list all renders of a template using the Templated API.
Lists all renders of a template.
id string REQUIRED
page integer
limit integer
externalId string
Here’s a sample request to list all renders of a template:
GET / v1 / template / :id / renders
fetch ( `https://api.templated.io/v1/template/${ id }/renders?page=2&limit=50&externalId=my-external- id ` , {
'Authorization' : `Bearer ${ API_KEY }`
Retrieves a single Template object referenced by its unique ID.
id string REQUIRED
Parameter Type Default Description includeLayersboolean false Include template layers in response includePagesboolean false Include template pages and layers in response
Here’s a sample request to retrieve a template:
fetch ( `https://api.templated.io/v1/template/${ id }?includeLayers=true` , {
'Authorization' : `Bearer ${ API_KEY }`
. then ( response => response. json ())
. then ( data => console. log (data))
. catch ( error => console. error ( 'Error:' , error));
template_id = ' template_id '
url = f 'https://api.templated.io/v1/template/ { template_id } '
headers = { 'Authorization' : f 'Bearer { api_key } ' }
response = requests.get(url, params = params, headers = headers)
if response.status_code == 200 :
print ( 'Request failed. Response code:' , response.status_code)
$templateId = 'template_id' ;
'includeLayers' => 'true'
$url = "https://api.templated.io/v1/template/{ $templateId }?" . http_build_query ($params);
'header' => "Authorization: Bearer { $apiKey } \r\n " ,
$context = stream_context_create ($options);
$result = file_get_contents ($url, false , $context);
echo "Error fetching data" ;
$data = json_decode ($result, true );
# Update tags for template
> Learn how to update tags for an existing template using the Templated API.
Update tags for an existing template.
The request body should be an array of strings containing the new tags you want to set.
Here’s a sample request to update tags for a template:
PUT /v1/template/{templateId}/tags
fetch ( `https://api.templated.io/v1/template/${ template_id }/tags` , {
'Authorization' : `Bearer ${ API_KEY }` ,
'Content-Type' : 'application/json'
. then ( response => response. json ())
. then ( data => console. log (data))
. catch ( error => console. error ( 'Error:' , error));
template_id = ' template_id '
url = f 'https://api.templated.io/v1/template/ { template_id } /tags'
'Authorization' : f 'Bearer { api_key } ' ,
'Content-Type' : 'application/json'
response = requests.put(url, json = tags, headers = headers)
if response.status_code == 200 :
print ( 'Request failed. Response code:' , response.status_code)
import java.net.HttpURLConnection;
import java.io.OutputStream;
import java.io.BufferedReader;
import java.io.InputStreamReader;
public class UpdateTemplateTags {
public static void main ( String [] args ) {
String apiKey = " API_KEY " ;
String templateId = " template_id " ;
String url = "https://api.templated.io/v1/template/" + templateId + "/tags" ;
["new-tag1", "new-tag2", "new-tag3"]
URL apiUrl = new URL (url);
HttpURLConnection connection = (HttpURLConnection) apiUrl. openConnection ();
connection. setRequestMethod ( "PUT" );
connection. setRequestProperty ( "Authorization" , "Bearer " + apiKey);
connection. setRequestProperty ( "Content-Type" , "application/json" );
connection. setDoOutput ( true );
try (OutputStream os = connection. getOutputStream ()) {
byte [] input = jsonTags. getBytes ( "utf-8" );
os. write (input, 0 , input.length);
int responseCode = connection. getResponseCode ();
if (responseCode == HttpURLConnection.HTTP_OK) {
BufferedReader in = new BufferedReader (
new InputStreamReader (connection. getInputStream ()));
StringBuilder response = new StringBuilder ();
while ((inputLine = in. readLine ()) != null ) {
response. append (inputLine);
System.out. println (response. toString ());
System.out. println ( "Request failed. Response Code: " + responseCode);
$templateId = ' template_id ' ;
$url = "https://api.templated.io/v1/template/{ $templateId }/tags" ;
'header' => "Authorization: Bearer { $apiKey } \r\n " .
"Content-Type: application/json \r\n " ,
'content' => json_encode ($tags)
$context = stream_context_create ($options);
$result = file_get_contents ($url, false , $context);
echo "Error updating tags" ;
$data = json_decode ($result, true );
# Update a template
> Learn to update a template using the Templated API.
This endpoint allows you to update an existing template by modifying its layers, properties, or content.
Key features:
Update only the layers/pages you need to change Modify template properties like name, dimensions, and descriptions Add new layers to existing pages Update text, images, shapes, and other layer properties Unchanged layers and pages remain intact After updating the template, the changes will be reflected in the Editor and any future renders created from this template.
id string REQUIRED
replaceLayers boolean OPTIONALtrue, layers not included in the request will be removed from the template. false (partial update mode - existing layers not in the request remain unchanged).
name string OPTIONAL
width number OPTIONAL
height number OPTIONAL
description string OPTIONAL
externalId string OPTIONALList templates endpoint using the externalId query parameter.
layers array OPTIONALlayer property (layer name identifier) and the layer type (image, text, shape).
pages array OPTIONAL
For all the available layer properties, see the Layer Parameters section.
You can group layers by setting the same group property on multiple layers. See Create a template - Grouping Layers for details.
When adding new grouped layers to an existing template:
If a group with that name already exists, the new layers are added to it.
If the group doesn’t exist, it is created automatically with its position and dimensions calculated from the bounding box of the layers.
Here’s a sample request to update only specific layers:
fetch ( `https://api.templated.io/v1/template/${ template_id }` , {
'Authorization' : `Bearer ${ API_KEY }` ,
'Content-Type' : 'application/json'
"text" : "UPDATED EVENT NAME" ,
"layer" : "background-image" ,
"image_url" : "https://images.unsplash.com/photo-new-image-id"
. then ( response => response. json ())
. then ( data => console. log (data))
. catch ( error => console. error ( 'Error:' , error));
template_id = ' template_id '
url = f 'https://api.templated.io/v1/template/ { template_id } '
'Authorization' : f 'Bearer { api_key } ' ,
'Content-Type' : 'application/json'
"text" : "UPDATED EVENT NAME" ,
"layer" : "background-image" ,
"image_url" : "https://images.unsplash.com/photo-new-image-id"
response = requests.put(url, json = data, headers = headers)
if response.status_code == 200 :
print ( 'Request failed. Response code:' , response.status_code)
import java.net.HttpURLConnection;
import java.io.OutputStream;
import java.io.BufferedReader;
import java.io.InputStreamReader;
public class UpdateTemplate {
public static void main ( String [] args ) {
String apiKey = " API_KEY " ;
String templateId = " template_id " ;
String url = "https://api.templated.io/v1/template/" + templateId;
"text": "UPDATED EVENT NAME",
"layer": "background-image",
"image_url": "https://images.unsplash.com/photo-new-image-id"
URL apiUrl = new URL (url);
HttpURLConnection connection = (HttpURLConnection) apiUrl. openConnection ();
connection. setRequestMethod ( "PUT" );
connection. setRequestProperty ( "Authorization" , "Bearer " + apiKey);
connection. setRequestProperty ( "Content-Type" , "application/json" );
connection. setDoOutput ( true );
try (OutputStream os = connection. getOutputStream ()) {
byte [] input = jsonData. getBytes ( "utf-8" );
os. write (input, 0 , input.length);
int responseCode = connection. getResponseCode ();
if (responseCode == HttpURLConnection.HTTP_OK) {
BufferedReader in = new BufferedReader (
new InputStreamReader (connection. getInputStream ()));
StringBuilder response = new StringBuilder ();
while ((inputLine = in. readLine ()) != null ) {
response. append (inputLine);
System.out. println (response. toString ());
System.out. println ( "Request failed. Response Code: " + responseCode);
$templateId = ' template_id ' ;
"text" => "UPDATED EVENT NAME" ,
"layer" => "background-image" ,
"image_url" => "https://images.unsplash.com/photo-new-image-id"
$url = "https://api.templated.io/v1/template/{ $templateId }" ;
'header' => "Authorization: Bearer { $apiKey } \r\n " .
"Content-Type: application/json \r\n " ,
'content' => json_encode ($data)
$context = stream_context_create ($options);
$result = file_get_contents ($url, false , $context);
echo "Error updating template" ;
$data = json_decode ($result, true );
You can also update template metadata along with layers:
fetch ( `https://api.templated.io/v1/template/${ template_id }` , {
'Authorization' : `Bearer ${ API_KEY }` ,
'Content-Type' : 'application/json'
"name" : "Updated Template Name" ,
"description" : "This template has been updated" ,
"text" : "New Title Text" ,
. then ( response => response. json ())
. then ( data => console. log (data))
. catch ( error => console. error ( 'Error:' , error));
template_id = ' template_id '
url = f 'https://api.templated.io/v1/template/ { template_id } '
'Authorization' : f 'Bearer { api_key } ' ,
'Content-Type' : 'application/json'
"name" : "Updated Template Name" ,
"description" : "This template has been updated" ,
"text" : "New Title Text" ,
response = requests.put(url, json = data, headers = headers)
if response.status_code == 200 :
print ( 'Request failed. Response code:' , response.status_code)
For multi-page templates, use the pages array:
fetch ( `https://api.templated.io/v1/template/${ template_id }` , {
'Authorization' : `Bearer ${ API_KEY }` ,
'Content-Type' : 'application/json'
"text" : "Updated Page 1 Title"
"text" : "Updated Page 2 Subtitle"
. then ( response => response. json ())
. then ( data => console. log (data))
. catch ( error => console. error ( 'Error:' , error));
template_id = ' template_id '
url = f 'https://api.templated.io/v1/template/ { template_id } '
'Authorization' : f 'Bearer { api_key } ' ,
'Content-Type' : 'application/json'
"text" : "Updated Page 1 Title"
"text" : "Updated Page 2 Subtitle"
response = requests.put(url, json = data, headers = headers)
if response.status_code == 200 :
print ( 'Request failed. Response code:' , response.status_code)
If you’re building a service on top of Templated and want to associate a template (for example, a clone) with one of your own users, set the externalId field. List templates endpoint.
fetch ( `https://api.templated.io/v1/template/${ template_id }` , {
'Authorization' : `Bearer ${ API_KEY }` ,
'Content-Type' : 'application/json'
"externalId" : " your-user-id "
. then ( response => response. json ())
. then ( data => console. log (data))
. catch ( error => console. error ( 'Error:' , error));
template_id = ' template_id '
url = f 'https://api.templated.io/v1/template/ { template_id } '
'Authorization' : f 'Bearer { api_key } ' ,
'Content-Type' : 'application/json'
"externalId" : " your-user-id "
response = requests.put(url, json = data, headers = headers)
if response.status_code == 200 :
print ( 'Request failed. Response code:' , response.status_code)
Use replaceLayers=true when you want to completely replace the template’s layers. Any layers not included in your request will be removed:
PUT / v1 / template / {id} ? replaceLayers = true
// This will replace ALL layers in the template with only the layers specified below
// Any existing layers not in this array will be REMOVED
fetch ( `https://api.templated.io/v1/template/${ template_id }?replaceLayers=true` , {
'Authorization' : `Bearer ${ API_KEY }` ,
'Content-Type' : 'application/json'
"image_url" : "https://images.unsplash.com/photo-example" ,
. then ( response => response. json ())
. then ( data => console. log (data))
. catch ( error => console. error ( 'Error:' , error));
template_id = ' template_id '
# Add ?replaceLayers=true to remove layers not in the request
url = f 'https://api.templated.io/v1/template/ { template_id } ?replaceLayers=true'
'Authorization' : f 'Bearer { api_key } ' ,
'Content-Type' : 'application/json'
# This will replace ALL layers - any existing layers not listed here will be removed
"image_url" : "https://images.unsplash.com/photo-example" ,
response = requests.put(url, json = data, headers = headers)
if response.status_code == 200 :
print ( 'Request failed. Response code:' , response.status_code)
The API returns a JSON object with the updated template details:
"name" : "Updated Template Name" ,
"description" : "This template has been updated" ,
"updatedAt" : "2024-01-15T10:30:00Z" ,
"createdAt" : "2024-01-01T08:00:00Z"
Status Code Description 401 Not authorized - Invalid or missing API key 403 Forbidden - You don’t have permission to update this template or account is blocked 404 Not Found - Template not found 500 Internal Server Error - An unexpected error occurred
By default, this endpoint performs partial updates - only the layers you include in the request are modified, and all other layers remain unchanged.
If you want to replace all layers (removing any layers not in your request), add ?replaceLayers=true to the URL:
PUT /v1/template/{id}?replaceLayers=true
Upload an image to your account.
Here’s a sample request to upload an image:
Content - Type : multipart / form - data
const fileInput = document. getElementById ( 'fileInput' );
const formData = new FormData ();
formData. append ( 'file' , fileInput.files[ 0 ]);
// Optional: add tags to organize your uploads
formData. append ( 'tags' , 'product' );
formData. append ( 'tags' , 'featured' );
// Optional: add an external ID to link with your own system
formData. append ( 'externalId' , 'your-external-reference-id' );
fetch ( 'https://api.templated.io/v1/upload' , {
'Authorization' : `Bearer ${ API_KEY }`
Parameter Type Required Description fileFile Yes The image file to upload (JPG, PNG, WebP, or SVG). Maximum size: 2MB tagsString[] No Optional tags to organize your uploads. Can be provided multiple times externalIdString No Optional external reference ID to link the upload with records in your own system
# Delete uploads
> Learn how to delete one or multiple uploads using the Templated API.
Delete one or multiple uploads by their IDs. All specified uploads must exist and belong to your account for the deletion to proceed.
Here’s a sample request to delete uploads:
DELETE / v1 / uploads ? ids = UPLOAD_ID_1 & ids = UPLOAD_ID_2
fetch ( `https://api.templated.io/v1/uploads?ids=${ UPLOAD_ID_1 }` , {
'Authorization' : `Bearer ${ API_KEY }`
. then ( response => response. json ())
. then ( data => console. log ( 'Response:' , data))
. catch ( error => console. error ( 'Error:' , error));
// Delete multiple uploads
const uploadIds = [ UPLOAD_ID_1 , UPLOAD_ID_2 ];
const params = uploadIds. map ( id => `ids=${ id }` ). join ( '&' );
fetch ( `https://api.templated.io/v1/uploads?${ params }` , {
'Authorization' : `Bearer ${ API_KEY }`
. then ( response => response. json ())
. then ( data => console. log ( 'Response:' , data))
. catch ( error => console. error ( 'Error:' , error));
upload_ids = [ ' UPLOAD_ID_1 ' , ' UPLOAD_ID_2 ' ]
# Prepare query parameters
params = { 'ids' : upload_ids}
url = 'https://api.templated.io/v1/uploads'
headers = { 'Authorization' : f 'Bearer { api_key } ' }
response = requests.delete(url, headers = headers, params = params)
if response.status_code == 200 :
print ( f "Successfully deleted: { result[ 'deleted' ] } " )
print ( 'Request failed. Response code:' , response.status_code)
import java.net.HttpURLConnection;
import java.net.URLEncoder;
import java.io.BufferedReader;
import java.io.InputStreamReader;
public class DeleteUploads {
public static void main ( String [] args ) {
String apiKey = " API_KEY " ;
String [] uploadIds = { " UPLOAD_ID_1 " , " UPLOAD_ID_2 " };
// Build query parameters
StringBuilder params = new StringBuilder ();
for ( int i = 0 ; i < uploadIds.length; i ++ ) {
if (i > 0 ) params. append ( "&" );
params. append ( "ids=" ). append (URLEncoder. encode (uploadIds[i], "UTF-8" ));
URL url = new URL ( "https://api.templated.io/v1/uploads?" + params. toString ());
HttpURLConnection connection = (HttpURLConnection) url. openConnection ();
connection. setRequestMethod ( "DELETE" );
connection. setRequestProperty ( "Authorization" , "Bearer " + apiKey);
int responseCode = connection. getResponseCode ();
if (responseCode == HttpURLConnection.HTTP_OK) {
BufferedReader reader = new BufferedReader ( new InputStreamReader (connection. getInputStream ()));
String response = reader. readLine ();
System.out. println ( "Response: " + response);
System.out. println ( "Request failed. Response Code: " + responseCode);
$uploadIds = [ ' UPLOAD_ID_1 ' , ' UPLOAD_ID_2 ' ];
// Build query parameters
$params = http_build_query ([ 'ids' => $uploadIds]);
$url = "https://api.templated.io/v1/uploads?{ $params }" ;
'header' => "Authorization: Bearer { $apiKey } \r\n " ,
$context = stream_context_create ($options);
$result = file_get_contents ($url, false , $context);
$response = json_decode ($result, true );
echo "Successfully deleted: " . implode ( ', ' , $response[ 'deleted' ]) . " \n " ;
echo $response[ 'message' ] . " \n " ;
echo "Error deleting uploads \n " ;
A successful deletion will return a 200 OK response with details about the deleted uploads:
"deleted" : [ "upload-id-1" , "upload-id-2" ],
"message" : "Successfully deleted 2 upload(s)"
Status Code Description Response Body 400 Bad Request - Invalid upload IDs or permission issues {"not_found": ["id1"], "unauthorized": ["id2"], "error": "Cannot delete uploads: some uploads were not found or you don't have permission to delete them"}400 Bad Request - No upload IDs provided {"error": "At least one upload ID must be provided"}401 Not authorized - Invalid or missing API key {"error": "Not authorized"}404 Not Found - User not found {"error": "User not found"}500 Internal Server Error - An unexpected error occurred {"error": "An unexpected error occurred"}
Atomic Operation : Either all specified uploads are deleted, or none are deleted. If any upload ID is invalid or unauthorized, the entire operation fails.Bulk Support : You can delete multiple uploads in a single request by passing multiple ids parameters.
Parameter Type Required Description idsstring[] Yes One or more upload IDs to delete. Pass multiple ids parameters for bulk deletion.
# The upload object
> Learn the properties of an upload object in the Templated API.
These attributes define the properties of an upload object.
id string
name string
size number
contentType string
createdAt string
Here’s a sample object of an upload:
"id" : "3c435c83-6682-4468-939f-6af175caacex" ,
"contentType" : "image/jpeg" ,
"createdAt" : "2024-01-01T00:00:00Z"
Lists all uploads of an user.
Here’s a sample request to list all user’s uploads:
fetch ( 'https://api.templated.io/v1/uploads?query=banner&tags=social,marketing&page=0&limit=10' , {
'Authorization' : `Bearer ${ API_KEY }`
query string
tags string[]
page integer 0.
limit integer 15.