· Tutorial · 5 min read
How to Automate Employee Offer Letters with Templated
Learn how to automate employee offer letters using Templated. Discover how HR teams can streamline document creation, personalize templates, and save time with automated workflows for faster and error-free onboarding.

Hiring at scale sounds exciting. Until you’re staring at a spreadsheet with 300 names and realizing each one needs a separate offer letter.
If you work in HR at a fast-growing company or a large hiring team, this routine is all too familiar. Small changes stack up fast. You open the template, edit the details, export the file, and repeat. It’s painfully tedious, and after a while, the brain fog sets in.
Here’s the good news. You don’t have to do this anymore.
There’s a simple way to generate hundreds, even thousands, of offer letters in minutes without copying, pasting, or triple-checking PDFs. You can automate the entire process using the Templated Image Generation API, powered by its built-in spreadsheet integration.
In this guide, I’ll show you how to set it up step by step and generate employee offer letters with personalised details. Names, roles, addresses, salaries, and more. What used to be a slow, manual task becomes something you run once and forget.
Let’s get started.
Things you’ll need to set this up
A Templated account
A Google Spreadsheet
An employee offer letter template
That’s all you need to automate the entire process. Let’s get started.
Step 1: Upload The Template on Templated
If you already have an offer letter template, great. If it’s in Canva, you can import it directly using Templated’s Import from Canva option. In my case, I already had a template ready, so I’ll add it manually in the editor.
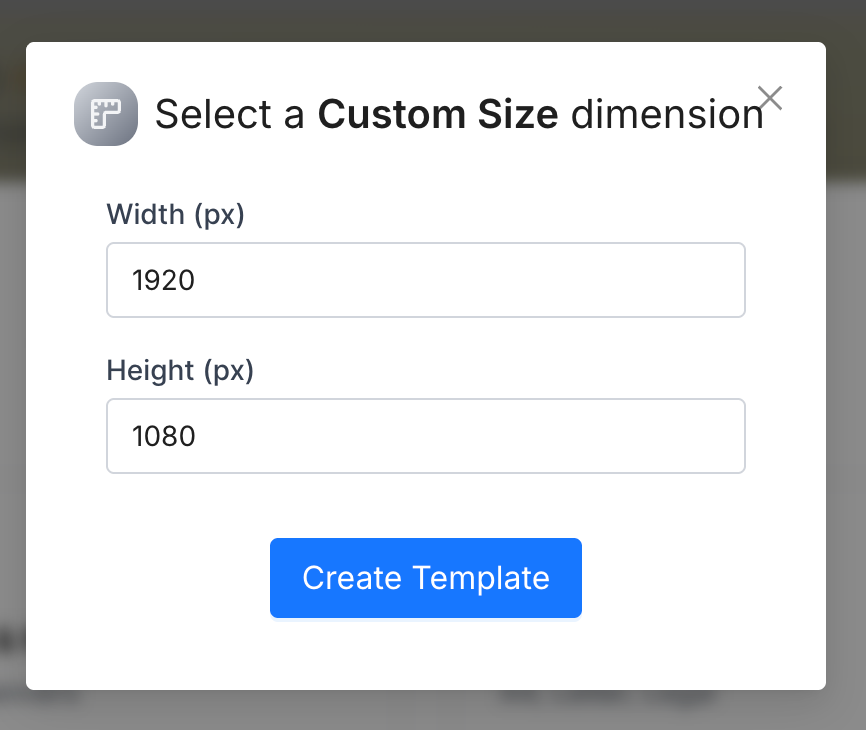
Start by signing up and heading to the dashboard. Go to My Templates and click Create Template. Choose Blank Template, then select Custom size.
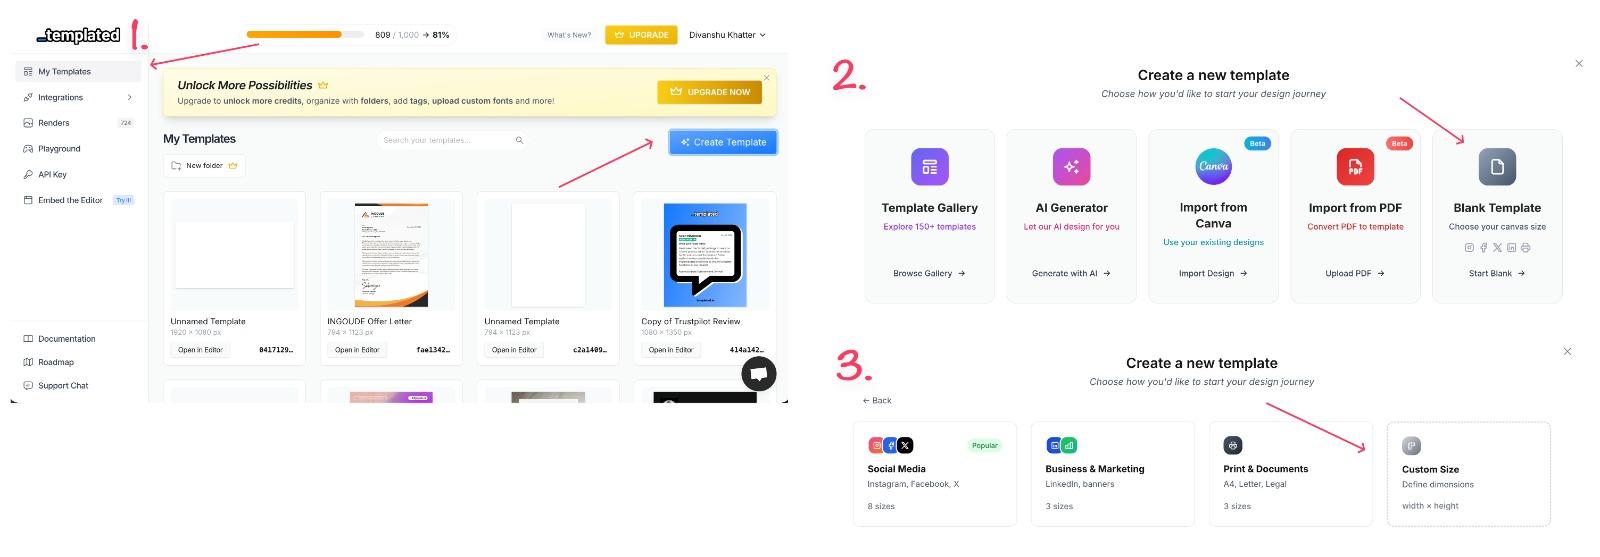
Enter the dimensions that match your offer letter layout. Once that’s done, you’ll land inside the Templated editor.
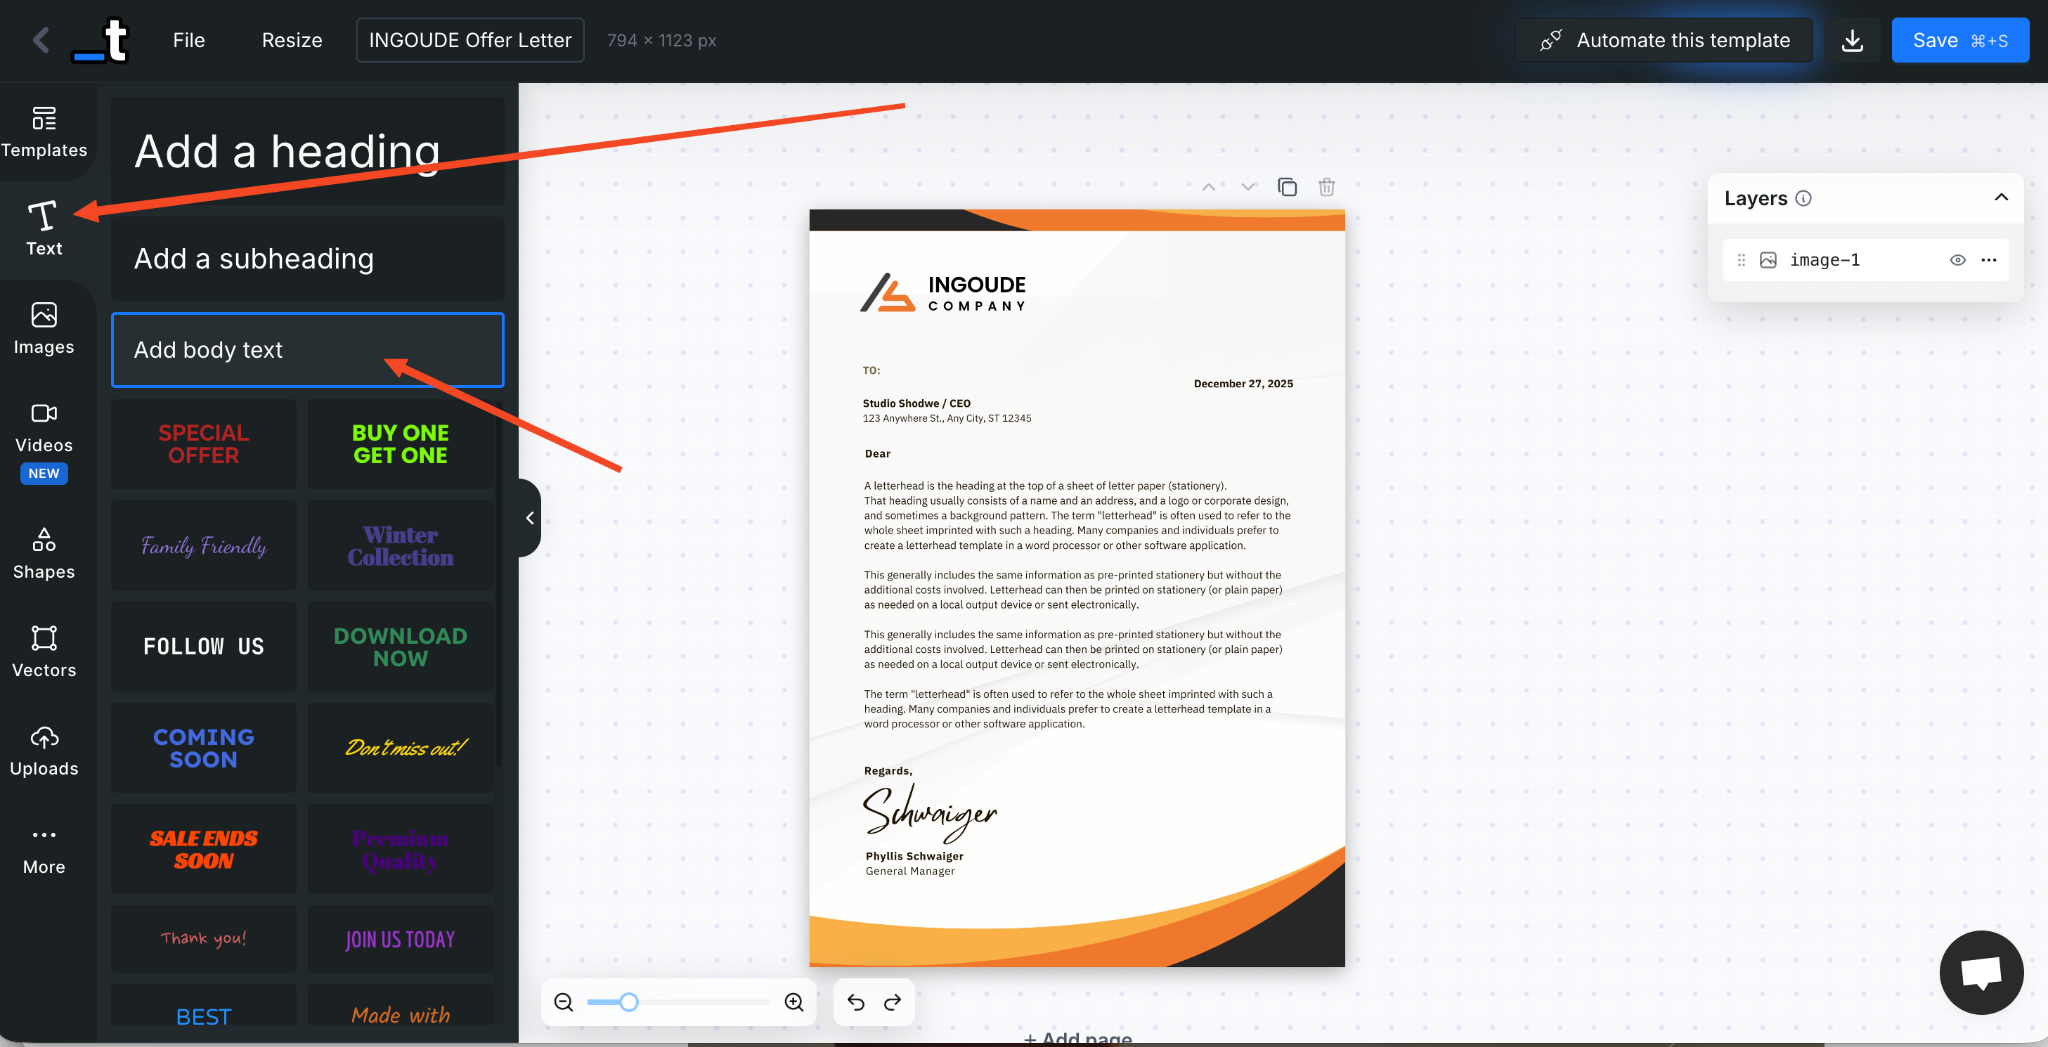
The editor feels familiar. If you’ve used Canva, you’ll feel at home. Click Uploads to add your template to the canvas and make sure everything fits correctly.
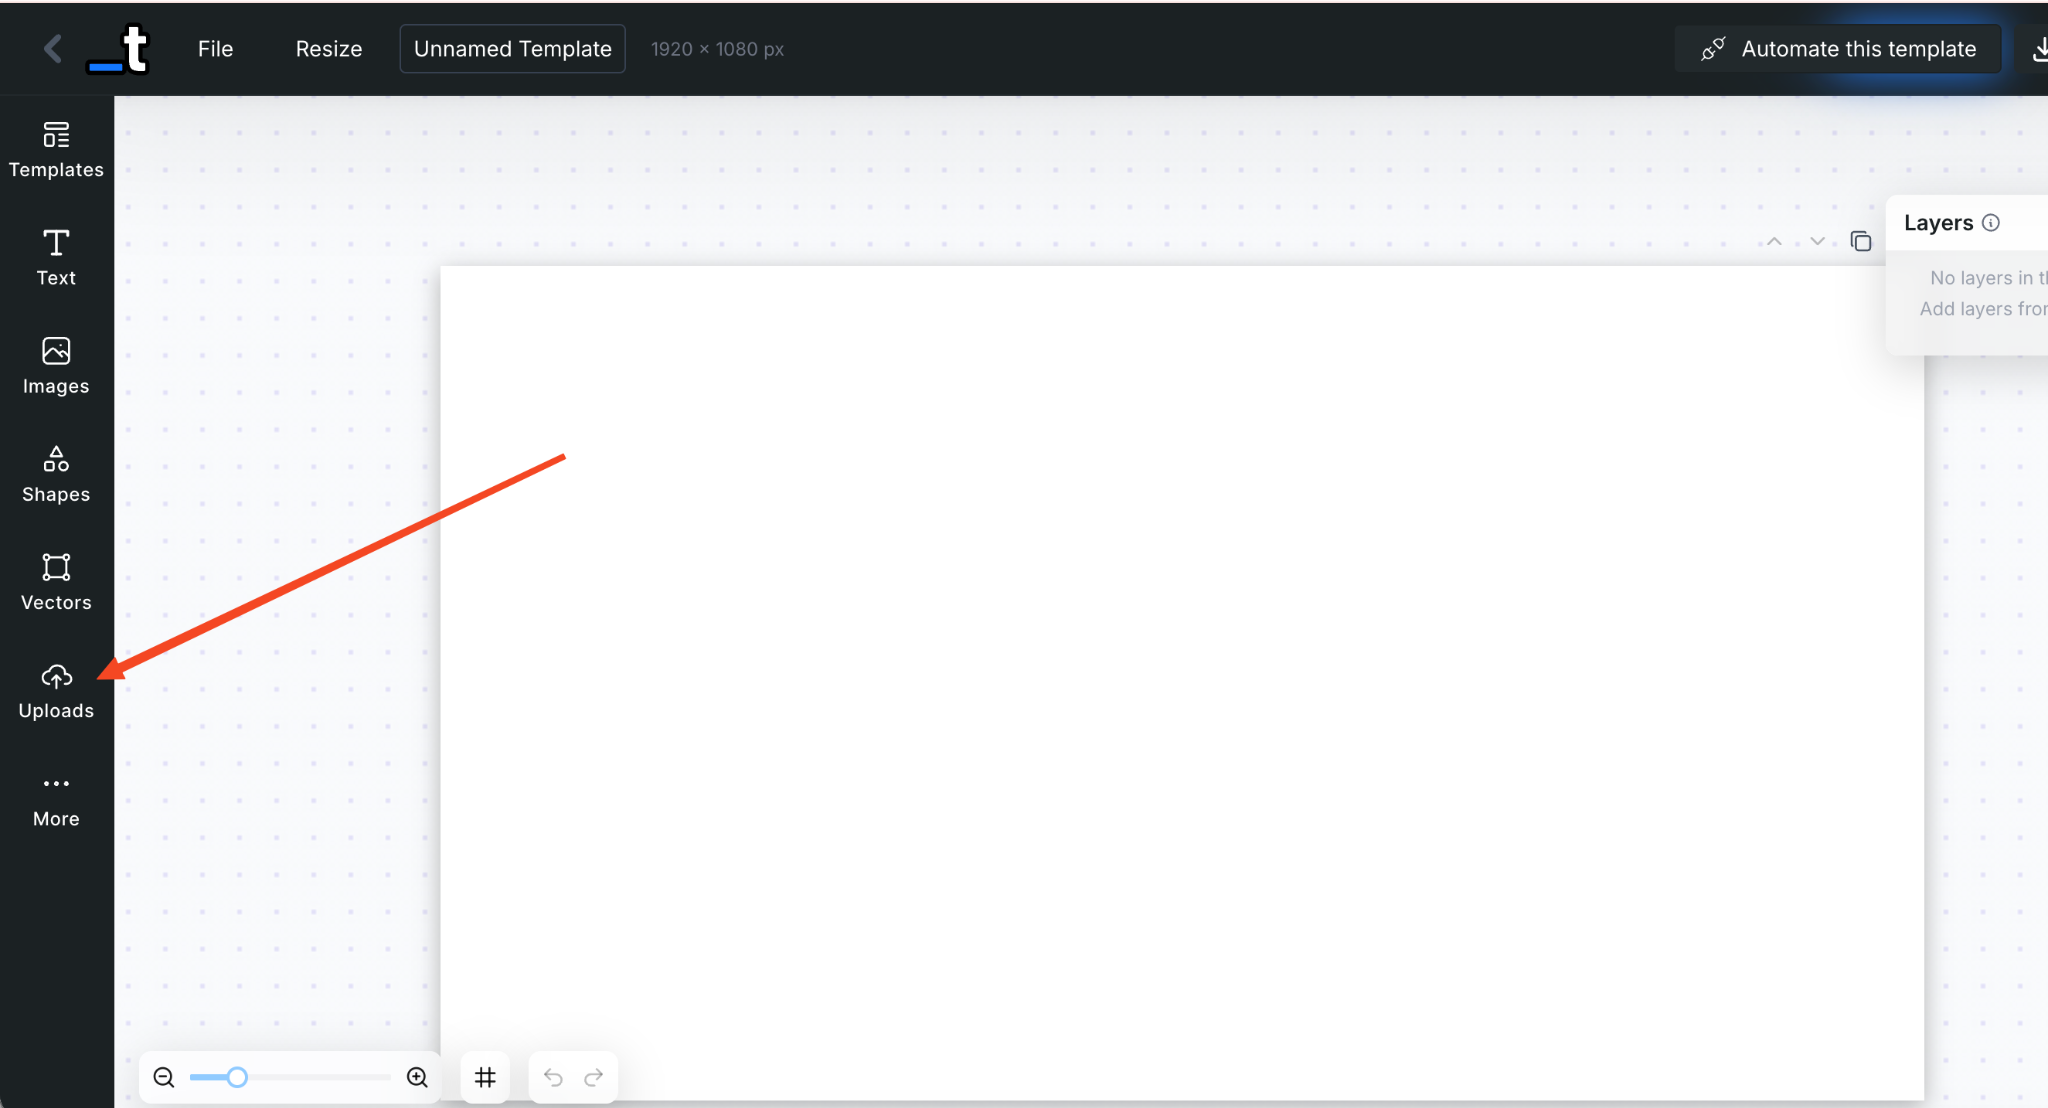
I’ve already uploaded the template. You’ll notice that the fields below “To” and after “Dear,” where personalized names should appear, are currently empty. On the right side, in the Layers panel, there’s only one layer visible, which is the image we just uploaded.

Now we’ll add two text layers for personalized “Employee Name”, one just below “To” and another near “Dear.” To do this, go to Text in the left panel and select Add body text.
Now resize the text layers and place them in the correct positions. You can also change the font, color, and other text settings. Any style you apply to the Personalized text will appear the same way in the final image.
In the Layers panel, you’ll now see two new text layers added. In this example, only the employee name is personalized, but you can also customize other details such as the offer message, job title, salary, and more.
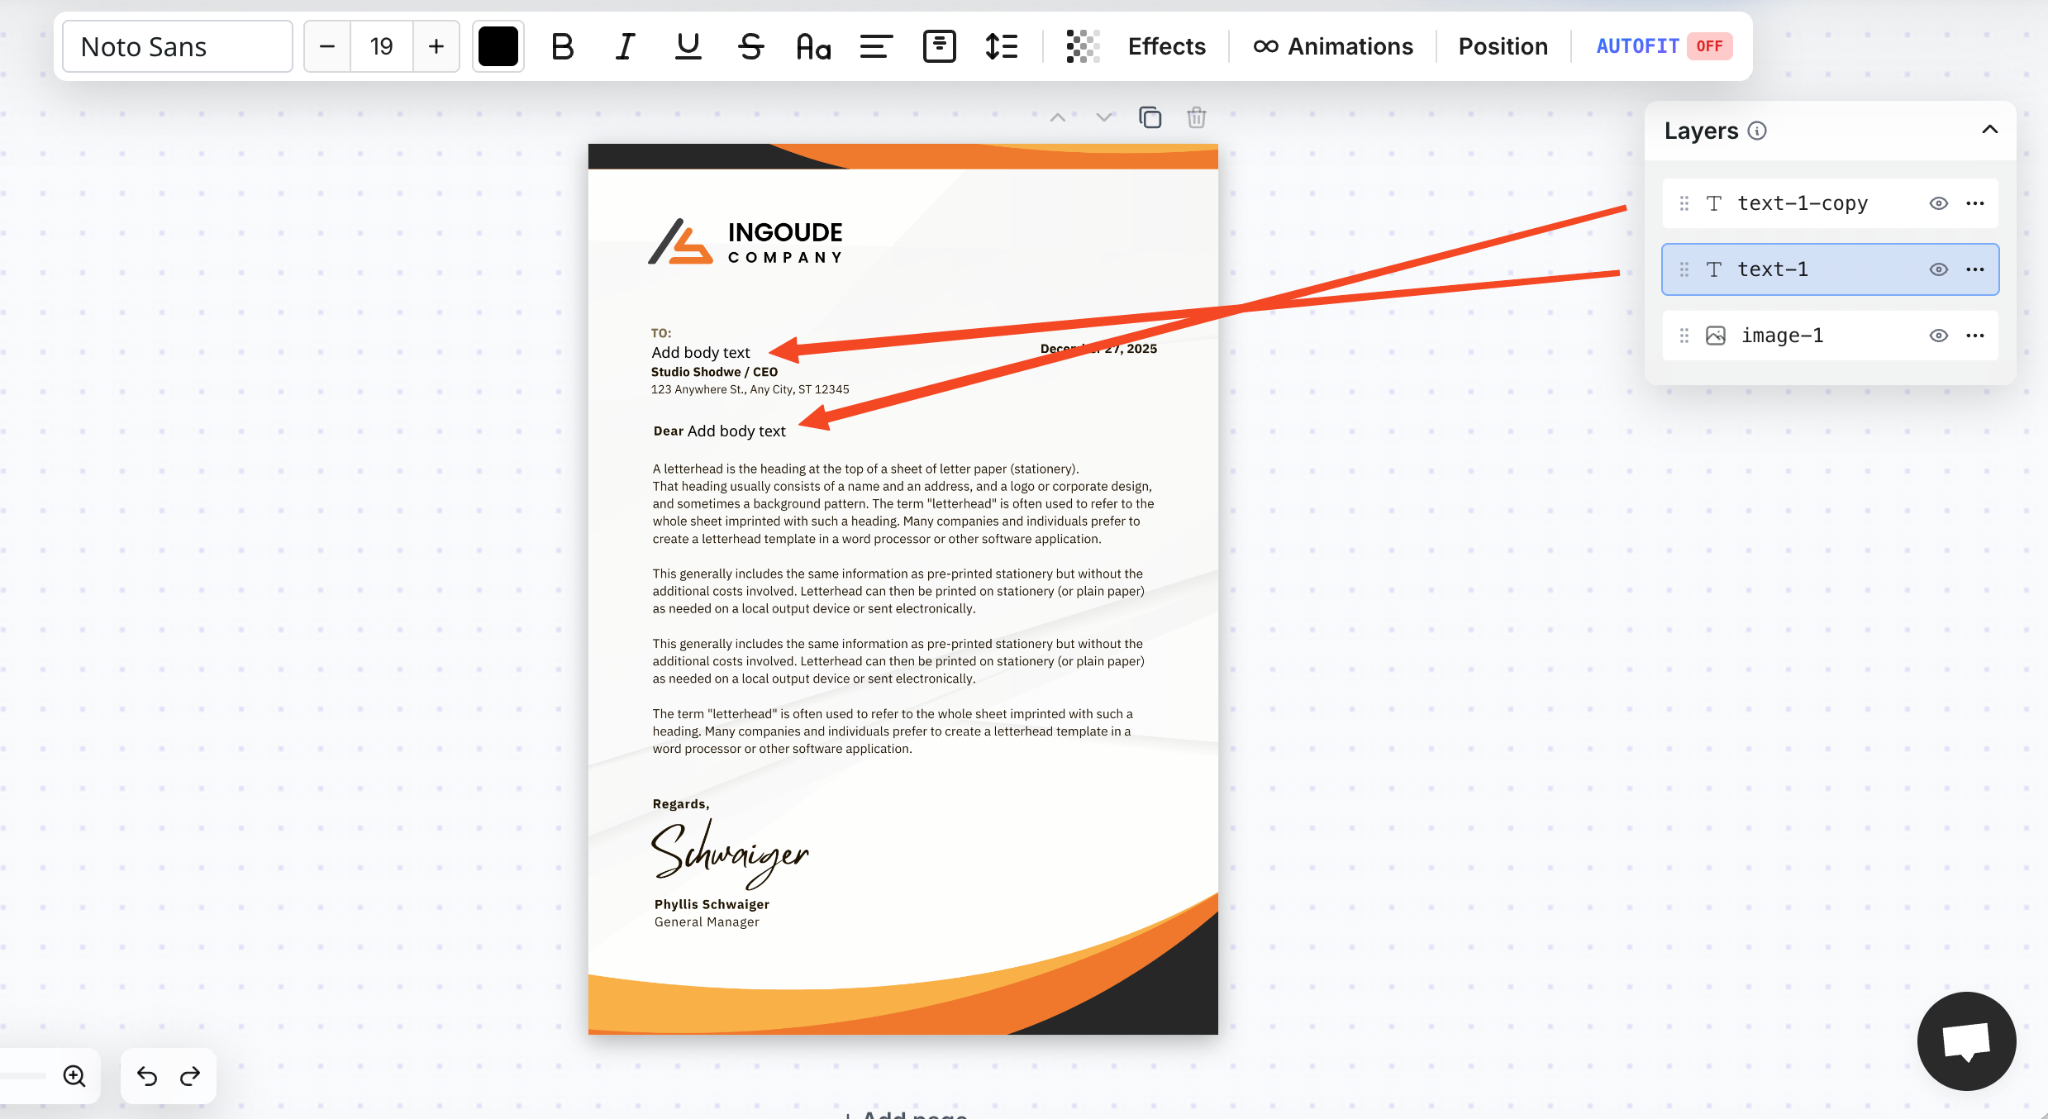
You can also rename your layers to make the automation easier later. Open the Layers panel on the right and rename the text layers. I’ve named them name and name_1, but you can use any names that fit your setup. Clear layer names help when you connect the spreadsheet.
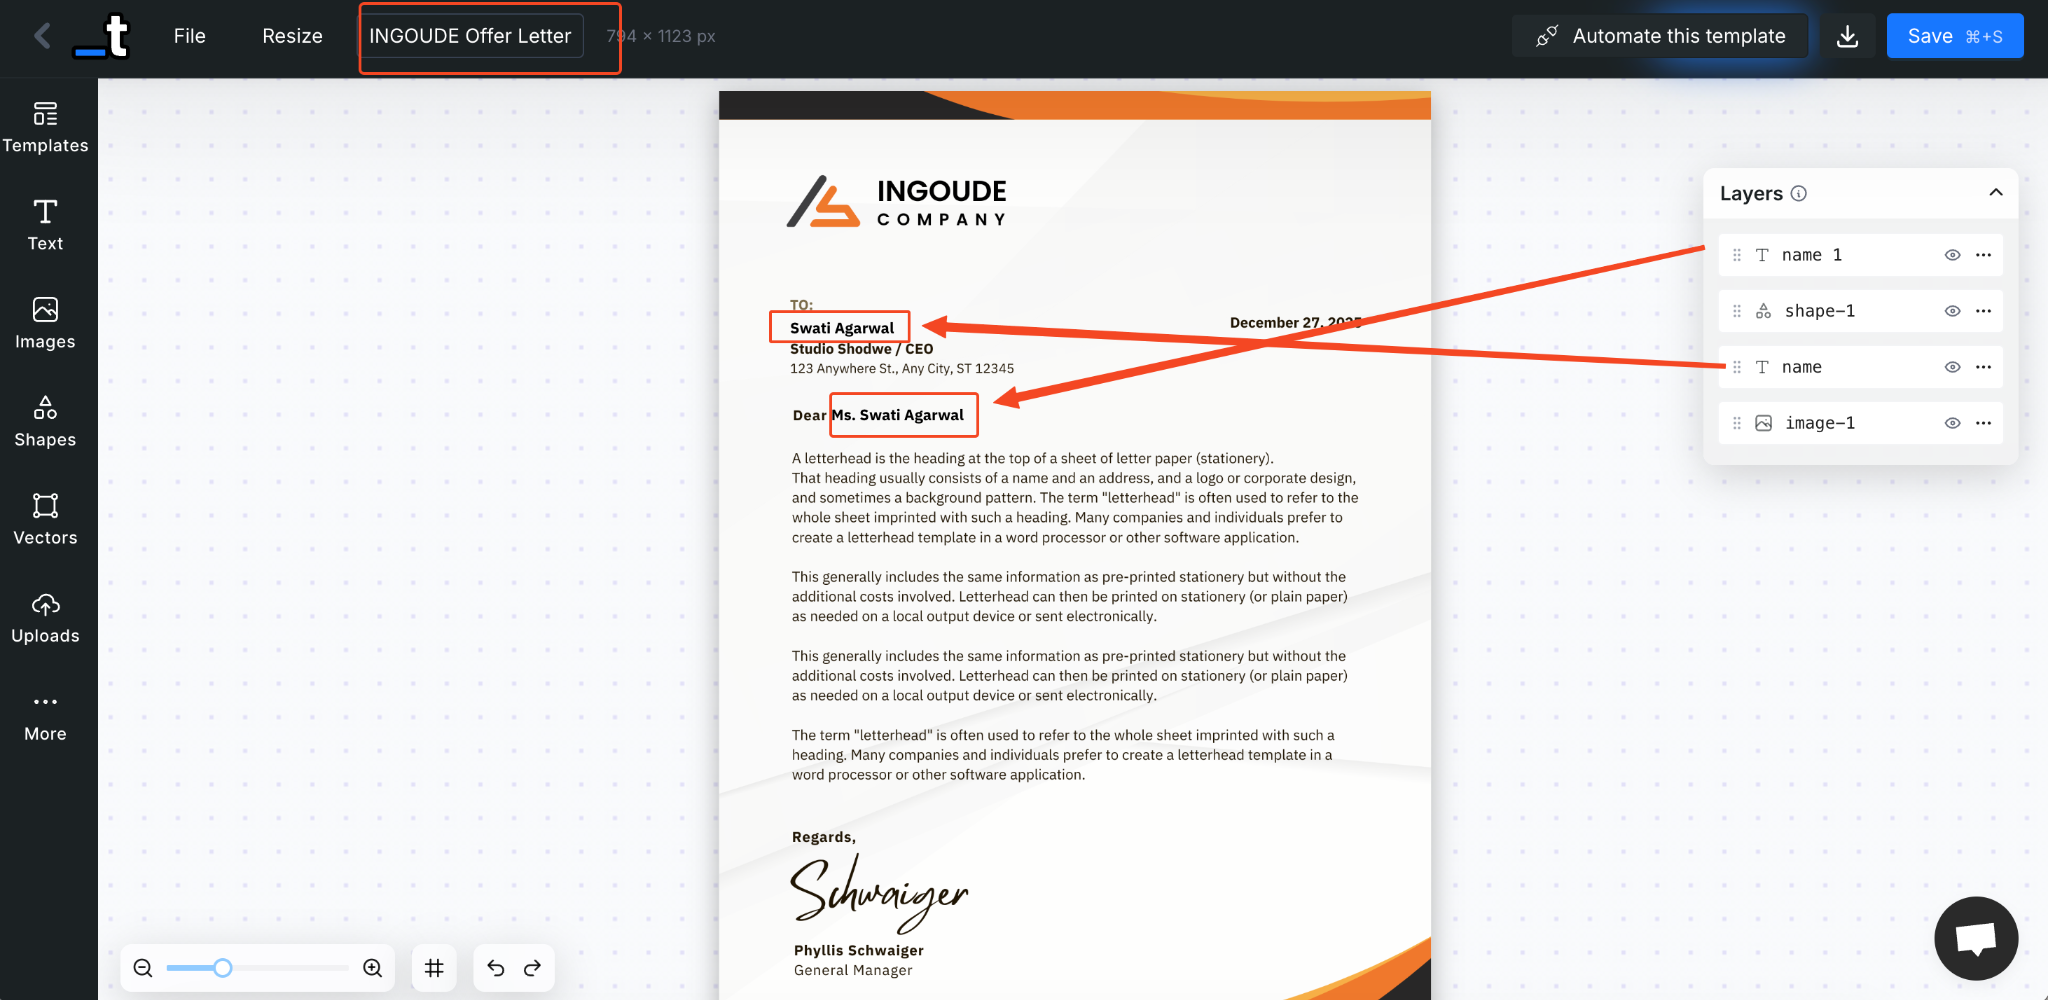
Finally, give the template a name. I’ve called mine INGOUDE Offer Letter. Save it.
That’s it. Now save it. The template is ready for automation.
Step 2: Create your Google Spreadsheet
Templated has a built-in spreadsheet integration, so the sheet needs to be set up in a specific way. Once you understand the structure, the rest is straightforward.
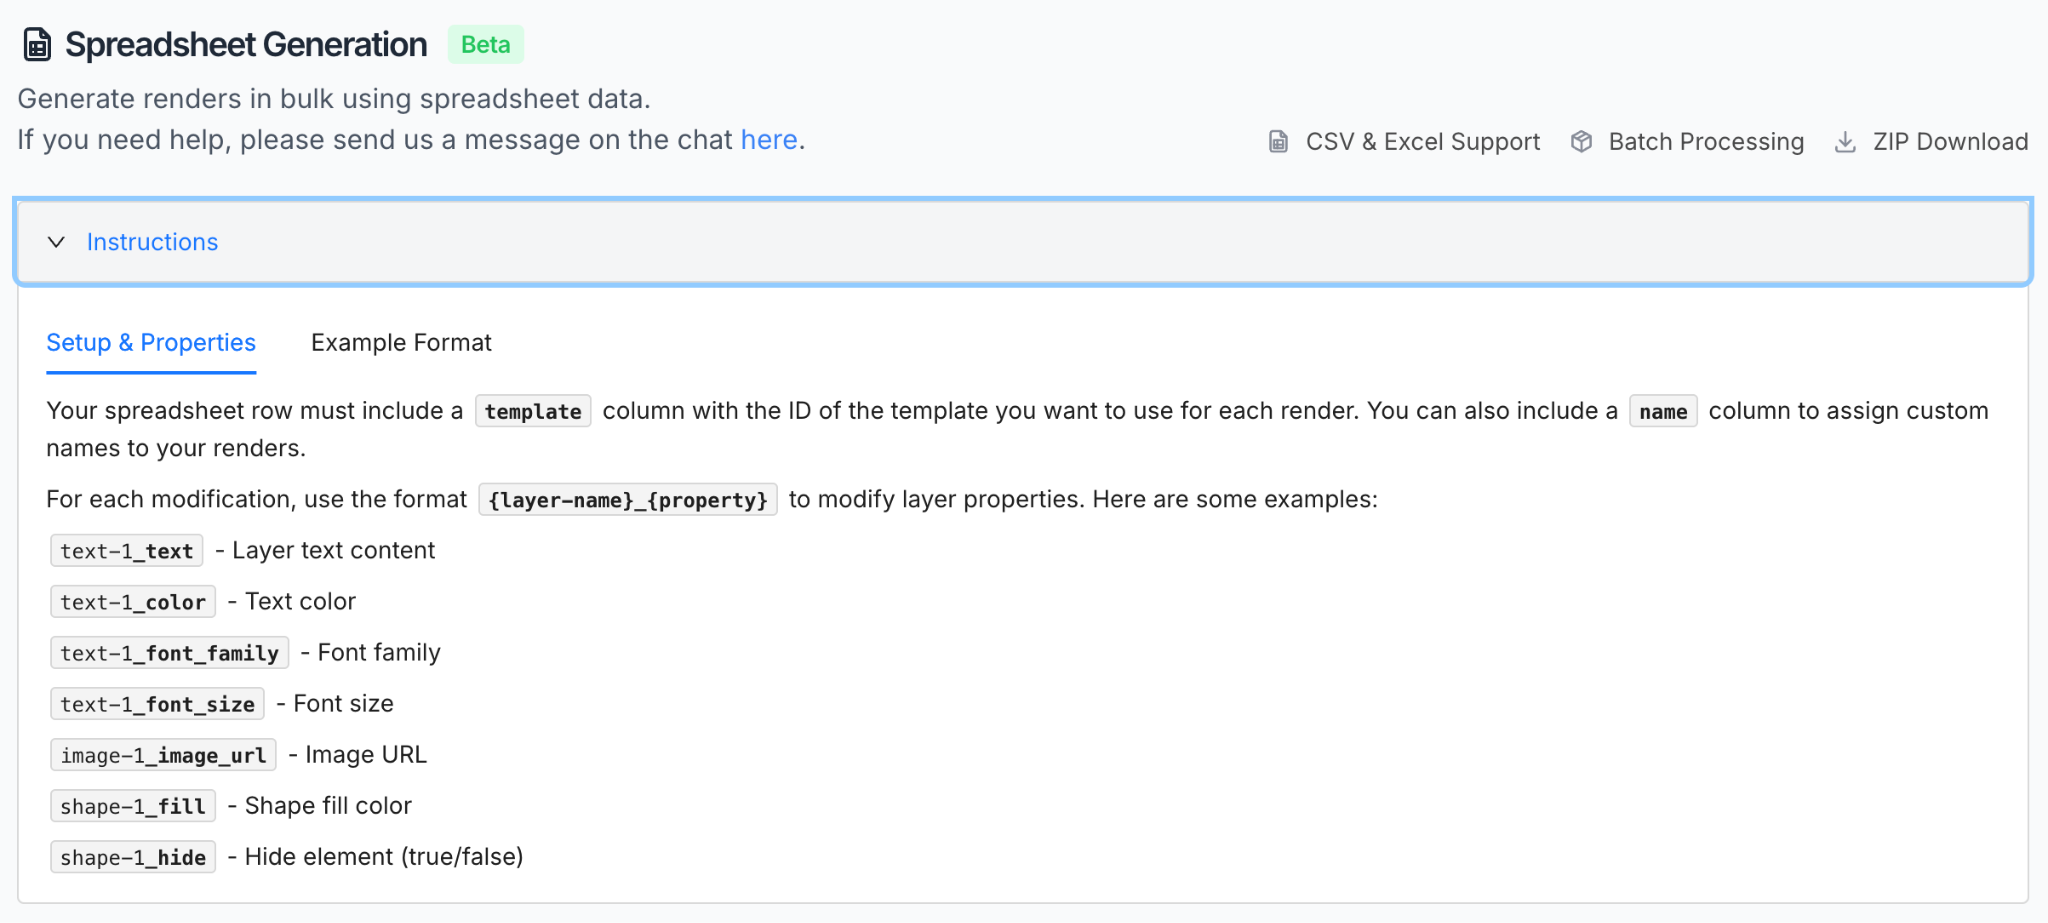
Start with what you plan to personalize. In my case, I’m changing the employee name in two places. That’s why my sheet has these columns: “template_id, name”, and “name_1.” The column names must match the layer names you set in the template. This is how Templated knows where each value goes.
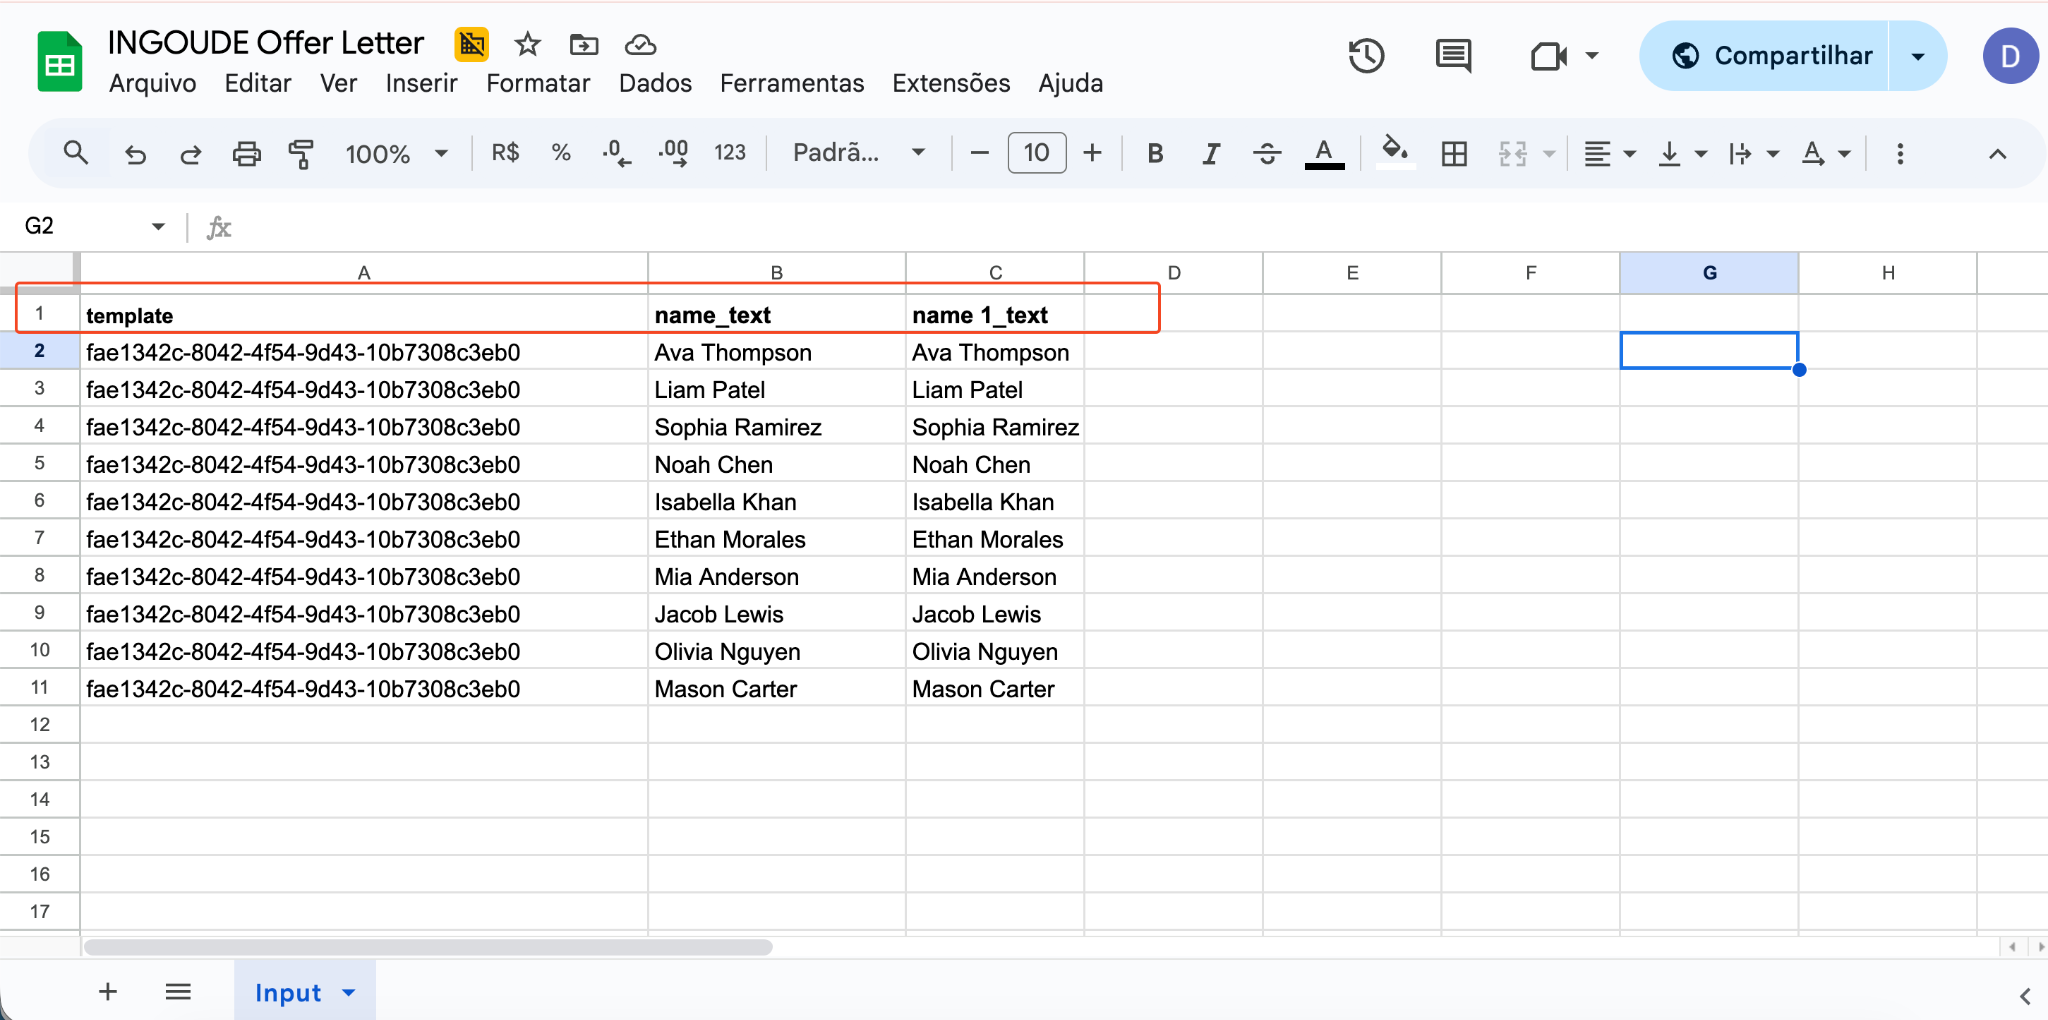
You can add more columns if needed. Salary, address, role, start date. Just make sure every column has a corresponding layer in your template. If it isn't there, you can simply add that in the editor.
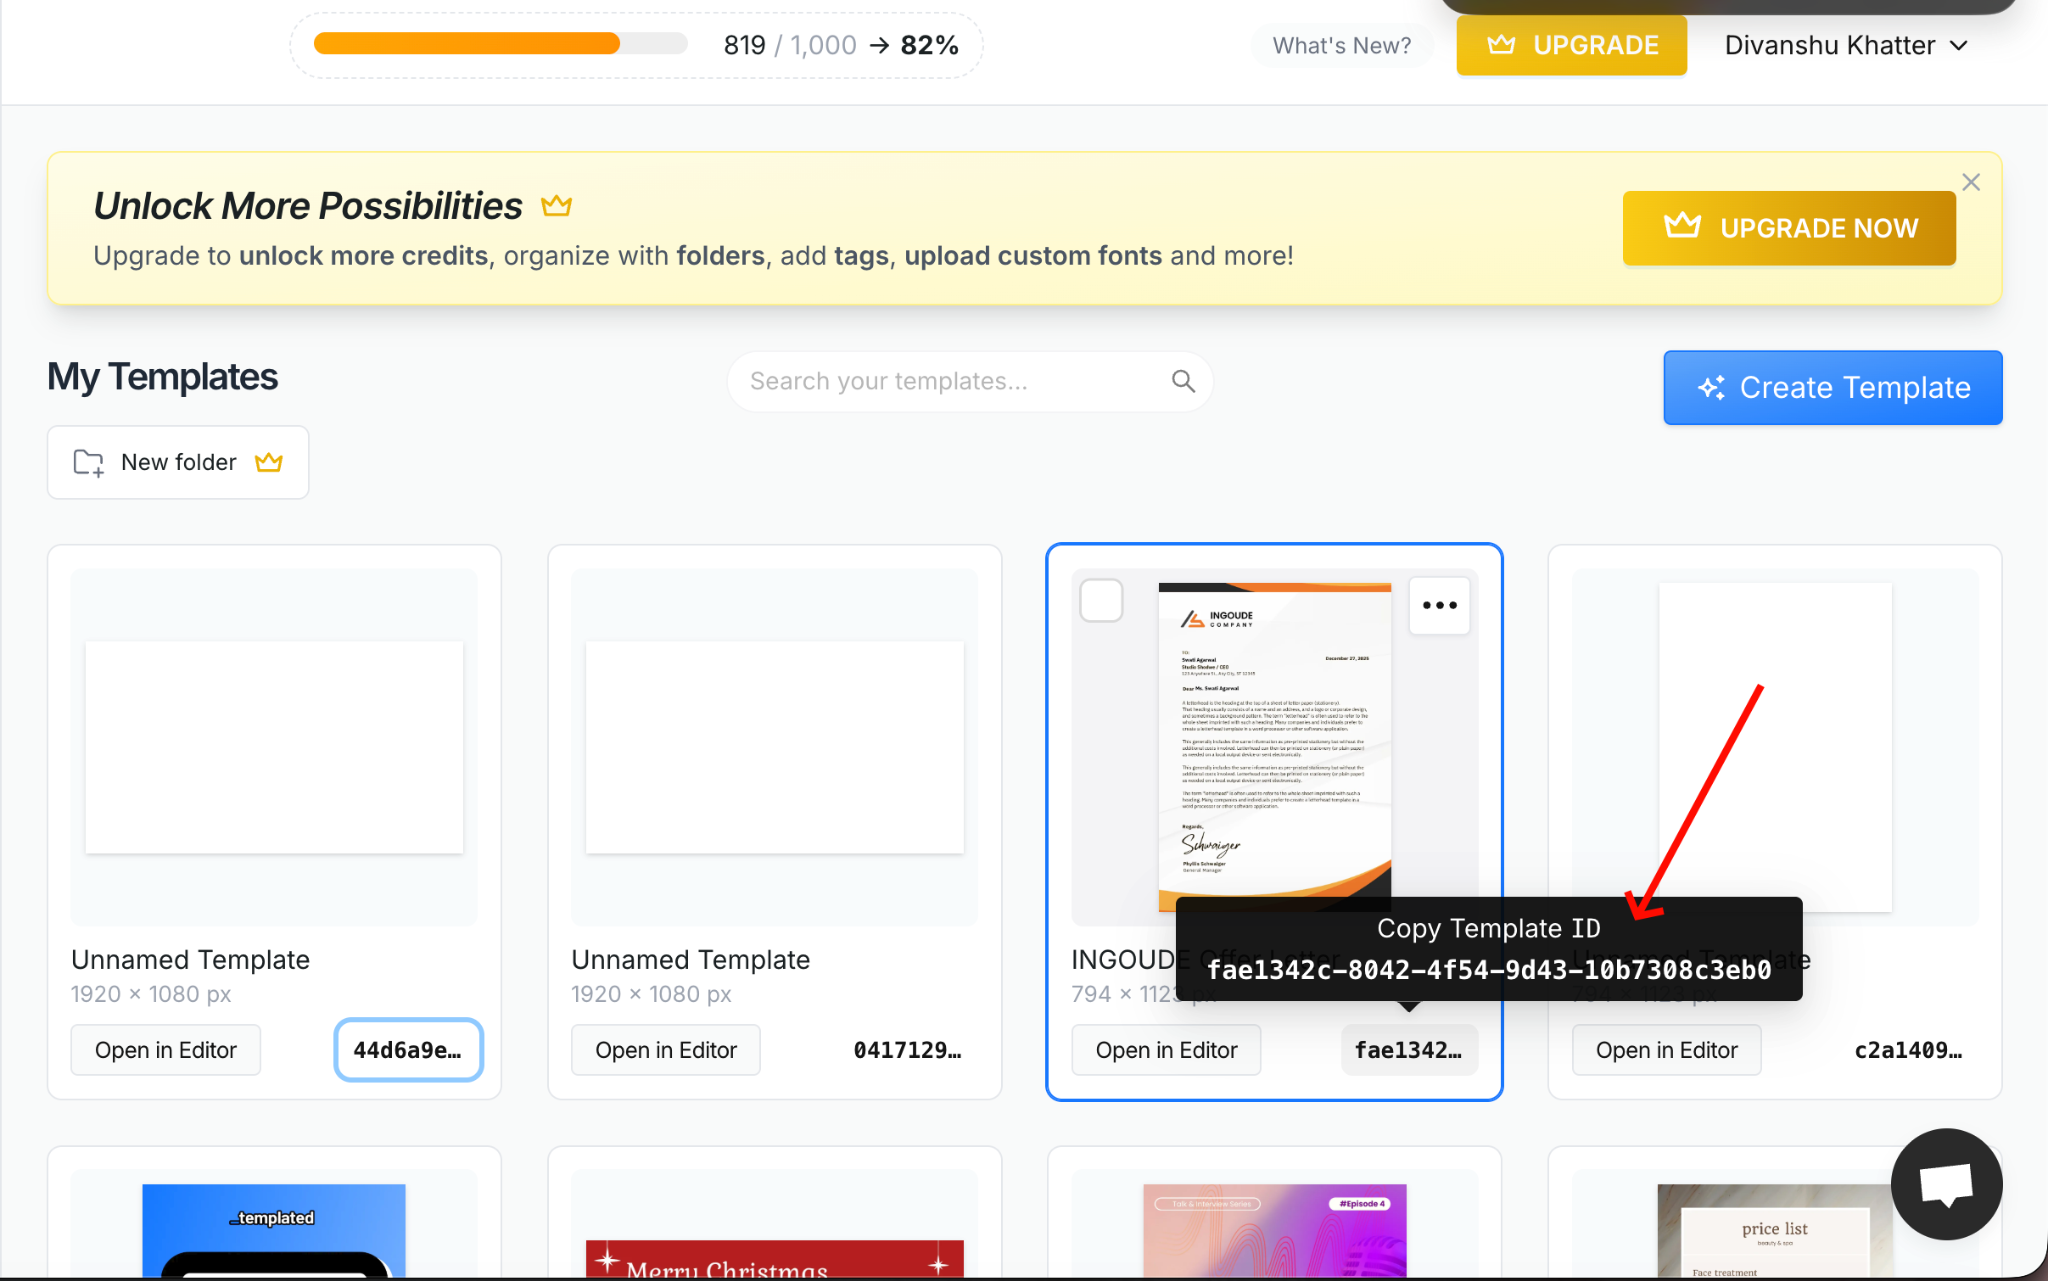
I’ve also added the "template_id" in the sheet. You can use the template name as well, but the ID is more reliable. You’ll find the template ID directly in the particular template as shown in the image below.
Once the spreadsheet is ready, the automation is ready too.
Step 3: Upload your file to the built-in spreadsheet generation tool
Once your spreadsheet is ready, download it as a CSV file. If you’re on a Mac, CSV works best and stays consistent across devices. Other formats can work too, but CSV keeps things clean.
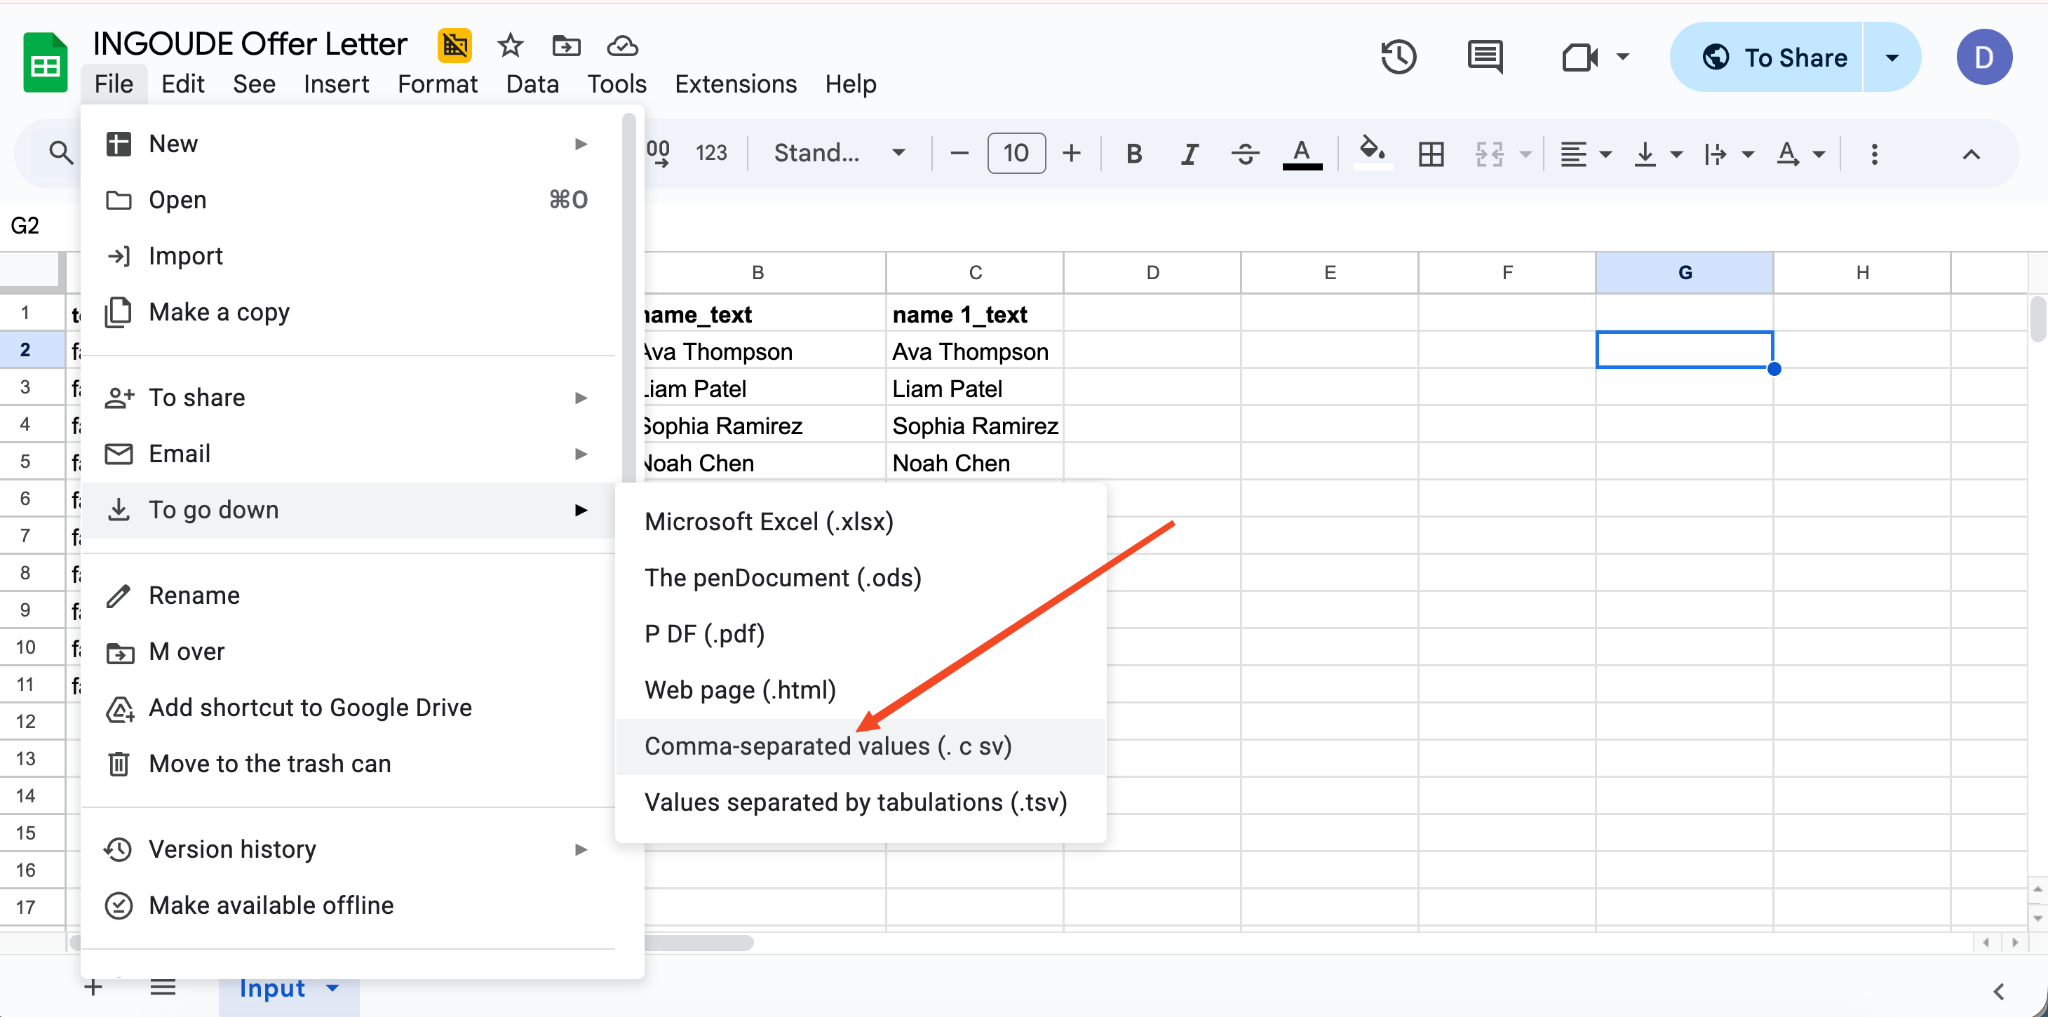
Now upload the CSV file to Templated’s in-built spreadsheet generation tool.

As soon as the file is uploaded, Templated will read the data from the sheet. Click Start generation to begin the process.
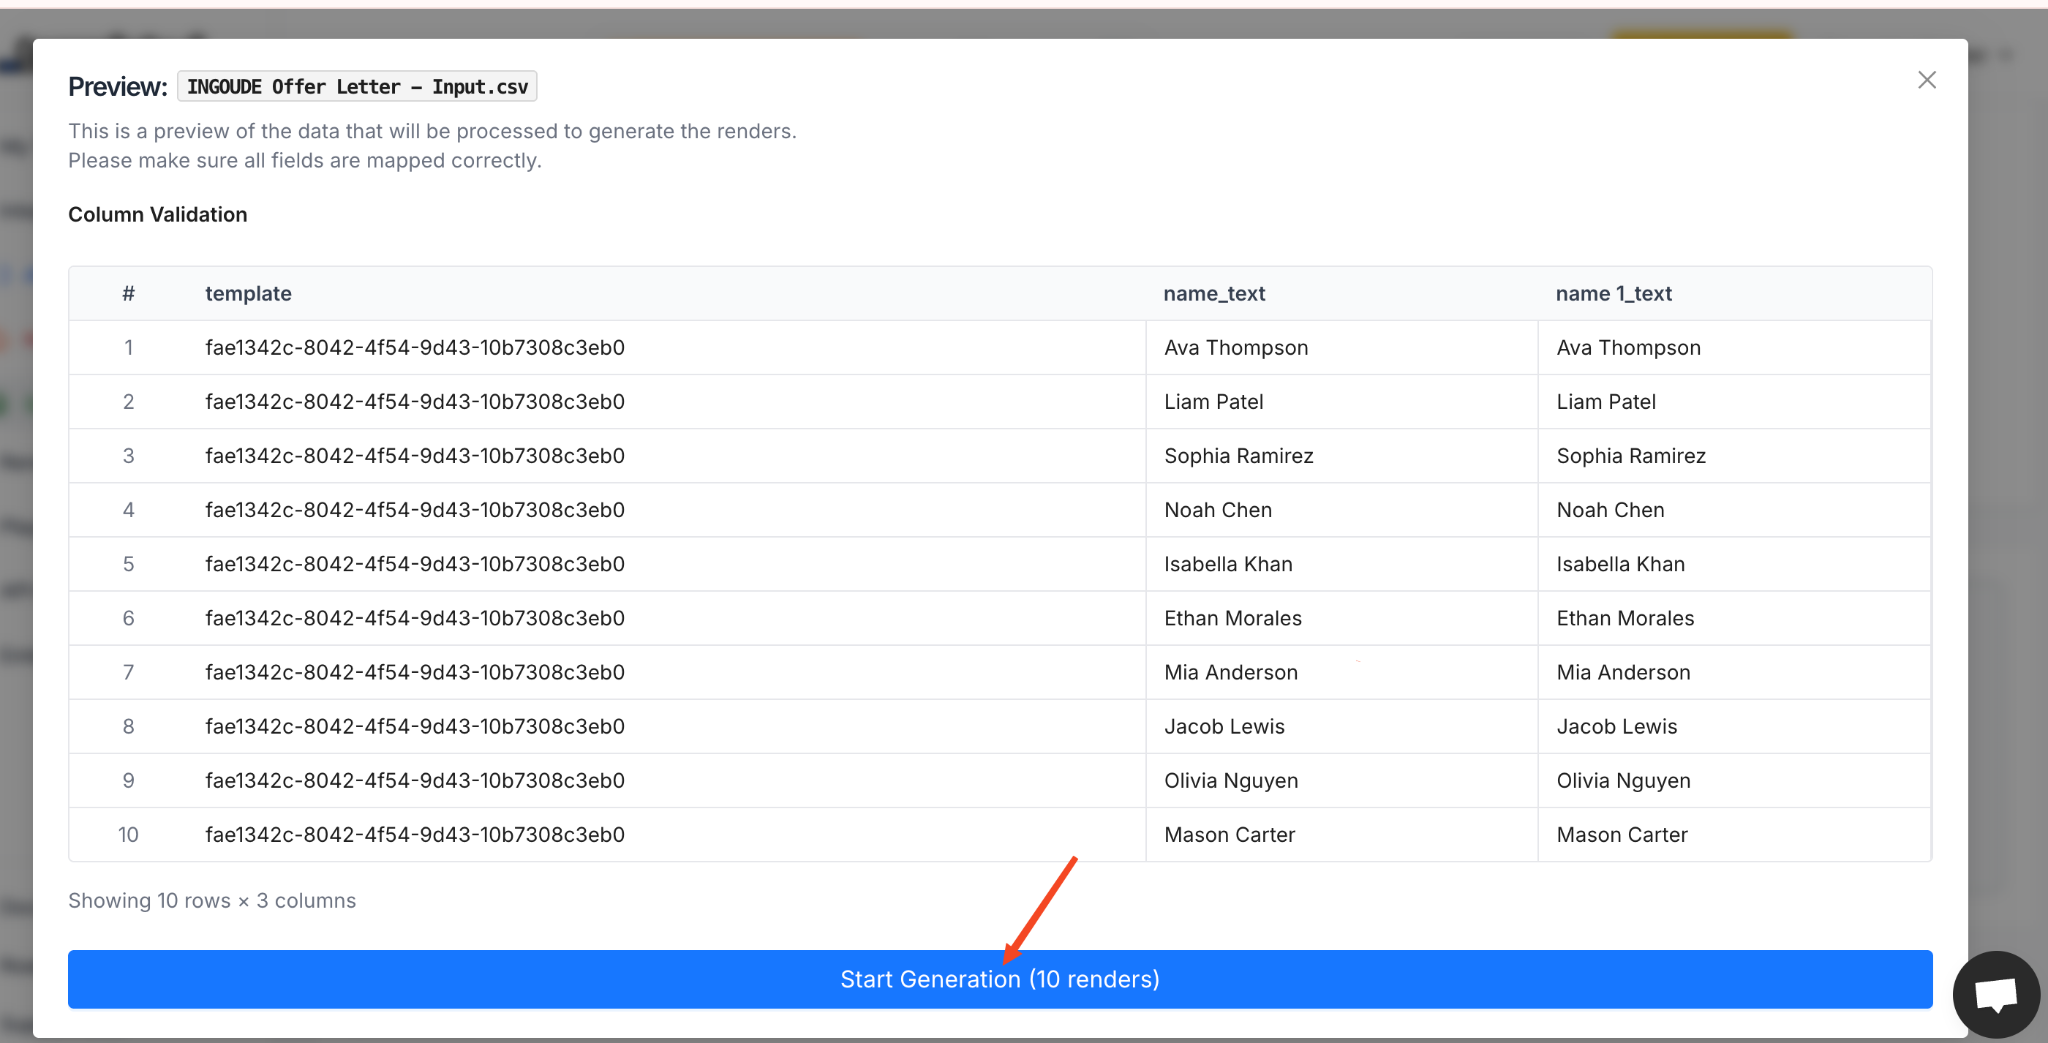
The system will process each row and generate all the offer letters in one go. When it’s done, you’ll get a ZIP file containing every generated offer letter.
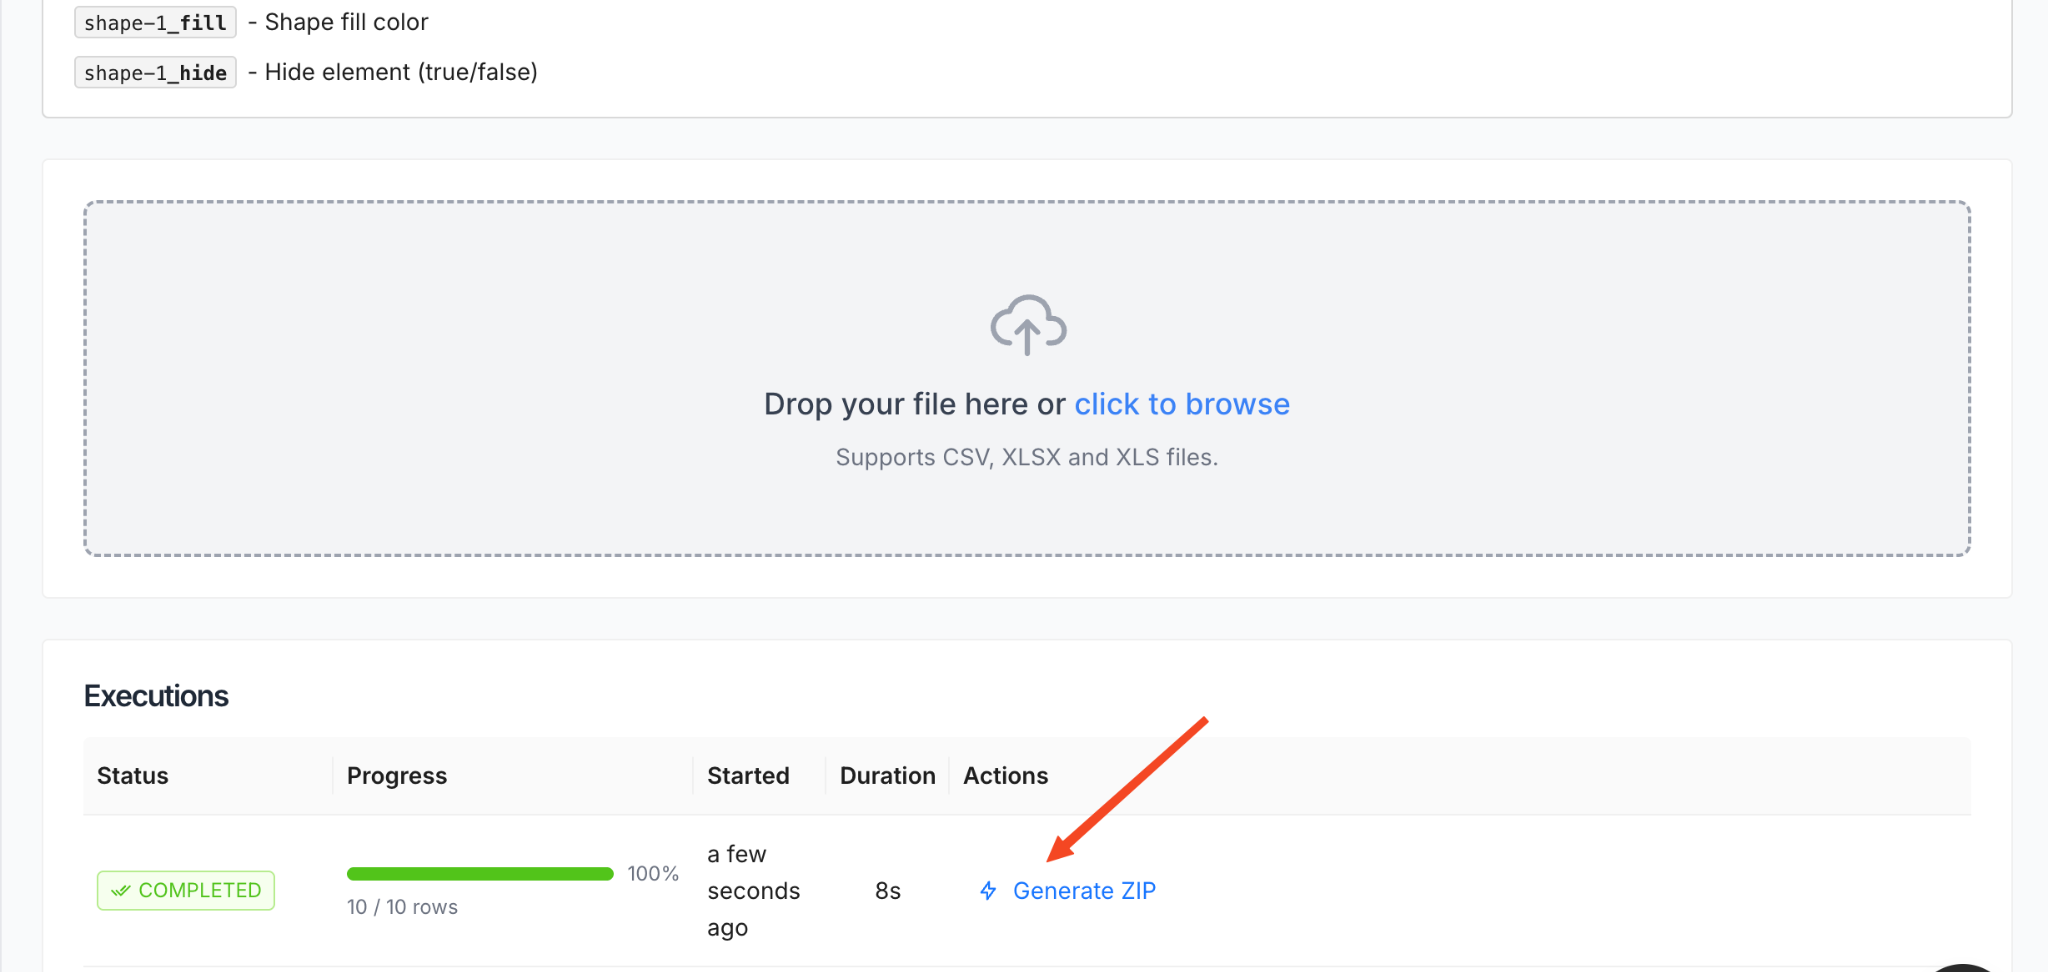
Click Generate ZIP, download the file, and check your desktop.
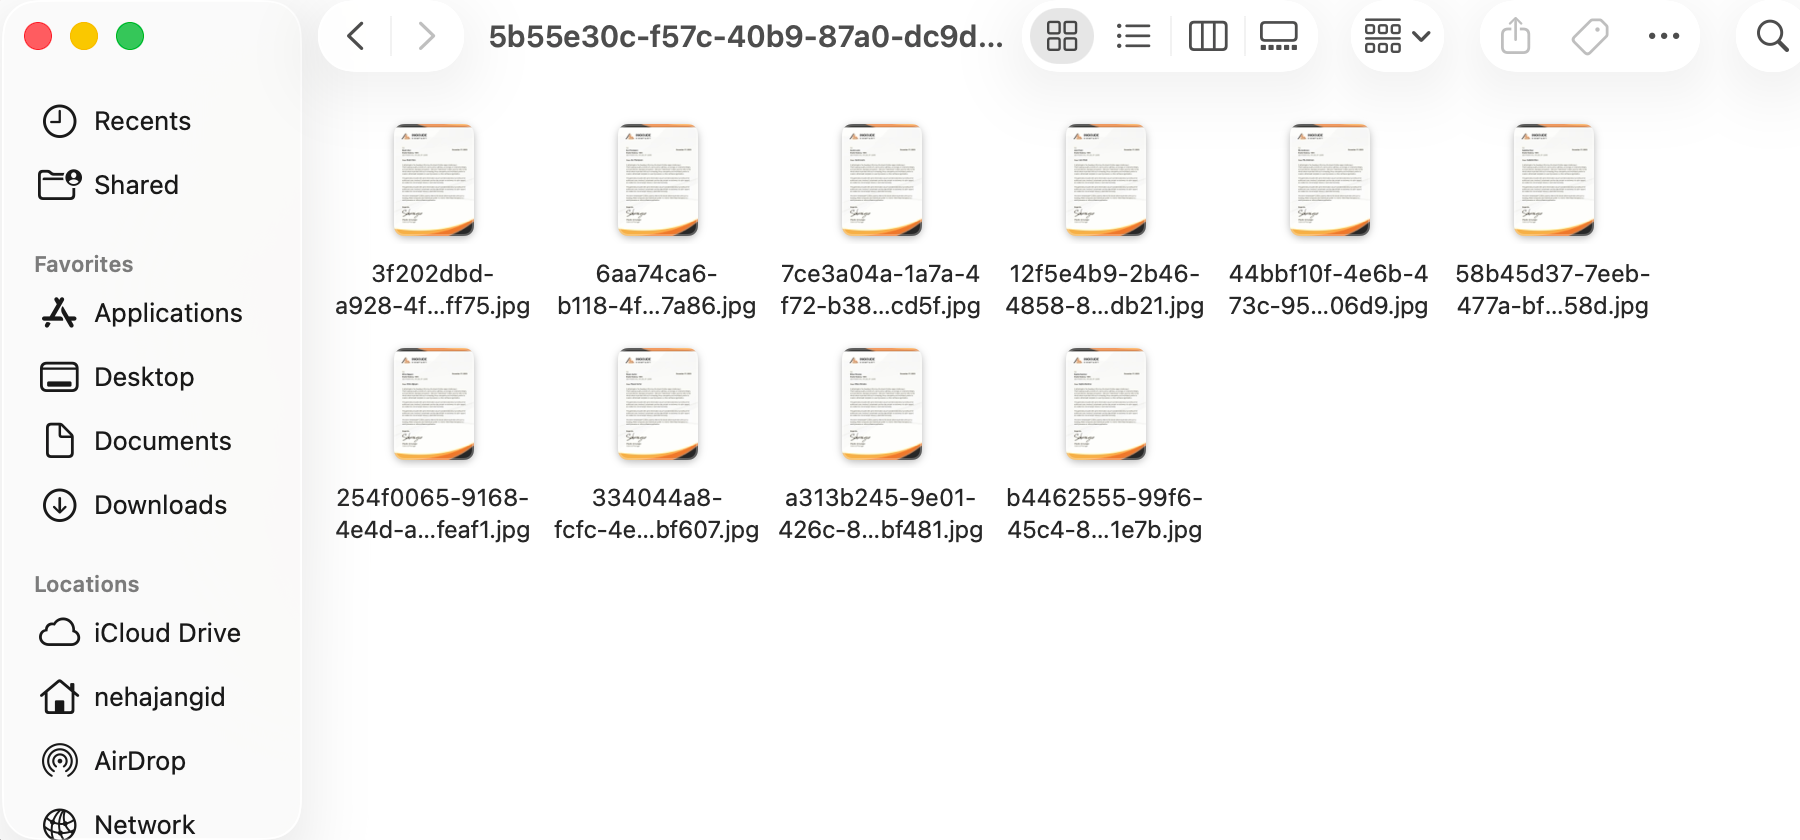
That’s it. Every employee's offer letter is ready. Hundreds or even thousands, generated in just a few minutes.
Final words
If you’re handling hiring at scale, automating offer letters is one of those changes that pays off immediately. Less repetition. Fewer mistakes. More time for work that actually needs human judgment.
If you want to try this yourself, sign up for Templated. You get 50 API calls for free, which is more than enough to test the full workflow and see how it fits into your process before committing.
And offer letters are just the start.
Using the same setup, you can automate a wide range of assets, from emails to social media visuals, all driven by spreadsheets and simple logic. If you want to explore what else is possible, these guides are a good place to begin:
- Automate Your Image Generation Using Spreadsheets
- Automate Certificate Generation via Templated’s Built-In Dashboard
- How to Automate Quotes Images for Posting on Social Platforms
- Automate Instagram Posts Using Google Sheets and Make
- Automate Personalized Welcome Email Images with Templated and Make
Once you see how quickly this replaces manual work, it’s hard to go back.