· Tutorial · 14 min read
Automate Social Media Posting On Multiple Platforms Using Make.com & Templated API
Tired of posting manually? Learn how to automate social media posts across multiple platforms using Make.com and Templated API, from generating quotes to designing images and publishing automatically, all from a single Google Sheet!

Let’s be honest - posting on social media feels like a full-time job nobody actually wants. You spend half your morning picking the right quote, the other half resizing the same image for five different platforms, and by the time you hit “post,” the motivation and energy to do your other important work is gone. Sure, you could hire someone to do it for you, but that’s expensive. And if you’re doing it yourself, it’s a slow, mind-numbing routine that eats into the time you should be building or creating something that actually matters.
What if you can add the keywords to the sheet? And, from there, your quotes, captures, and images will be generated automatically, and all will go live across every platform without you lifting another finger. Isn’t it amazing?
That’s exactly what we’re about to build. In this guide, you’ll learn how to automate your social media posting across multiple platforms using Make.com and Templated.
You’ll see how to create a complete workflow. And, the best thing is, you don’t have to start from scratch. By the end of this tutorial, I’ll even share a ready-to-use blueprint that you can import directly into Make.com, make a few quick tweaks, and your automation will be up and running.
If you prefer watching, here’s a quick video for you.
Let 's get started.
What You’ll Need
- An account on Templated
- An account on Make.com
- OpenRouter API Key (Keep it handy. If you have a ChatGPT API key or use another platform, you can use that instead, just make sure to select the right module when setting it up.)
- A Google Sheet
Step 1: Get Your Templated API Key and Choose a Template
Before we dive into automation, let’s get your visuals ready with Templated, an image automation API that helps you create and update social media visuals automatically. Follow these steps to set everything up.
1. Sign Up and Access Your Dashboard
Go to Templated and sign up. Once you log in, you’ll land on the dashboard. On the left side, you’ll see an “Integrations” section. Click that, and you’ll find your API key. Copy it and keep it handy; we’ll need it soon inside Make.com. 
2. Pick a Template
Next, open the Social Media Templates Gallery. This is where you’ll choose the design you want to automate. Something that fits your quote or brand style. Once you select a template, it’ll open in the editor.
3. Edit the Template
Inside the editor, you’ll see multiple layers. Each layer represents text, background, or an image. 
Click on the text layer that will hold your quote or caption.
If you’d like to tweak the layout or add an image, you can do that here, too. It works exactly like Canva.
Rename the layer you plan to update dynamically. This will help Make.com identify which part of the design to change automatically.
Once you’re happy with the design, give your template a clear name, something simple you can recognize later when setting up your automation (e.g., Motivational Quotes).
2. Prepare the Spreadsheet
👇 Take a look at the screenshot below and create your sheet the same way.  This is where the automation will pick the keywords and generate quotes, captions, and image links automatically. Keep the column names exactly as shown. It’ll make connecting everything in Make.com much easier.
3. Create Automation Scenario
Start by going to Make.com and signing up for a free account. Once you’re in, click “Create a new scenario.” Give it a name that clearly describes what you’re building, like Social Media Automation. This will open a blank canvas where you’ll add all the modules for your workflow in the next steps. 
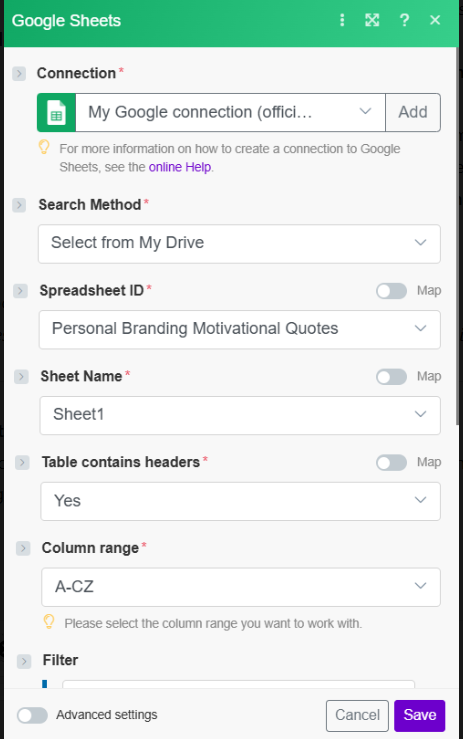
Step 2: Set Up the “Watch Rows” Module in Google Sheets
Now that you’re in the Make.com workshop, the first module you’ll add is Google Sheets → Watch Rows. This module keeps an eye on your Google Sheet and automatically triggers the workflow every time a new keyword is added. That’s how automation knows when to start. It picks up new keywords from your sheet and sends them into the workflow. Here’s how to set it up (just like in the screenshot 👇):  Once you fill this in, click Save. Now, every time you add a new keyword to your sheet, this module will detect it and trigger the automation automatically.
Step 3: Connect and Set Up OpenRouter
👇 Take a look at the screenshots below. First, add the OpenRouter module and click Add to create a new connection. Choose Connection Type → OpenRouter, then paste your API key.  Once your connection is ready, move to the Content box.
  Paste this👇 prompt there -
You are an expert copywriter who crafts short motivational quotes for social media visuals. {{1.0}}
Generate one original motivational quote based on the keyword: Input Keywordstext in bold Guidelines:
- Keep it under 18 words — short enough for Instagram or LinkedIn image posts.
- Make it inspiring, human, and thought-provoking — no clichés or corporate tone.
- Focus on creativity, communication, or personal growth depending on the keyword.
- Output only the quote — no hashtags, no emojis, no extra text.
At the place where it says Input Keywords (A), click and select the keyword field from the previous Watch Rows module — this links the keyword from your sheet directly into the AI prompt. As shown in the screenshot, set the Role to User and choose any module you want to run the prompt from.  Once you’ve done that, click Save. Your OpenRouter module is now ready to generate quotes automatically using the keywords from your sheet.
Step 4: Update the Quote in Google Sheets
👇 Look at the screenshot below.  Add the Google Sheets → Update a Row module. This step updates your sheet with the quote generated by OpenRouter.
Select the same spreadsheet and sheet name you used before.
In the Row number field, choose the Row number from the first Google Sheets module - this makes sure the quote goes to the right row.
Under Values, leave the Input Keywords (A) empty and in Motivational Quotes (B), select the result from OpenRouter (you’ll see it listed under Message Content).
That’s all you need here. Once you’ve mapped it like this, click Save.
Step 5: Create the Image with Templated
Now add the Templated module - this will turn your generated quote into a ready-to-post image. First, connect your Templated account by clicking Add and pasting your API key. Then select your Template ID (select the name you added in the templated editor - motivational quotes).  Scroll down to the Layers section. Under Layer Name, enter the same name you used for your text layer in Templated.
In the Text field, pick the Message Content output from the OpenRouter module - this links your quote directly to the image. Click Save.
Step 6: Add the Image Link to Google Sheets
This step adds the generated image link directly into your Google Sheet
Now add another Google Sheets → Update a Row module — this one saves the image link generated by Templated back into your spreadsheet.  Select the same spreadsheet and sheet name again, then in Row number, choose the Row number from the first Google Sheets module (so it updates the right row). Scroll down to the Values section. You’ll see your column names - leave everything else blank and in Image Link (G), select Render URL from the Templated module (you may need to scroll down in the Templated output to find it).
  Once that’s set, click Save.
Step 7: Add a Router for Multiple Platforms
Now it’s time to connect all your social platforms to automation. Add a Router module right after the Image Link Update step. The router lets you create different paths for each platform, so your automation can post customized captions and images everywhere at once. From this router, you’ll connect separate flows for Facebook, LinkedIn, and Instagram. Each one will have its own OpenRouter module (to generate a platform-specific caption) and a Google Sheets module (to update that caption in the right column).  This router is what makes your workflow multi-platform - one keyword in your sheet, and the system will generate, organize, and prepare posts for every social channel automatically
Step 8 - Connect Social Media Platforms to the Router
After the Router, we’ll set up separate branches for each platform - Facebook, LinkedIn, and Instagram.
Each branch works almost the same way; the only slight difference will be in the Instagram setup (we’ll mention that below). Here’s how to do it step by step:
Step 9: Add OpenRouter for Captions (Common for All Platforms)
After adding the Router, create a new OpenRouter module for each platform branch - Facebook, LinkedIn, and Instagram. The setup will be the same; only the prompt text will slightly differ based on the platform. Here’s what to do:
Connection: Select your OpenRouter connection.
Role: Choose User.
Model: Select OpenAI GPT-4.1 Mini.
Content: Add the prompt provided. You can modify it as per your requirement and the platform.


Example prompt (you can adjust it per platform): Write an Instagram caption using this motivational quote: . {add quote} Start with a strong hook for my target audience (founders, creators, and personal branding professionals). Write in short, skimmable sentences with line breaks, like Instagram captions. After the quote, add 2–3 sentences showing how someone can apply this idea in real life. End with 2–3 relevant hashtags. No emojis. Once done, click Save. 💡 You’ll repeat this exact setup for each platform branch - Facebook, LinkedIn, and Instagram - only the tone of the prompt changes slightly depending on where it will be posted.
Step 10: Update Captions in Google Sheets
👇 Check the screenshots below.
Once your captions are generated through OpenRouter, the next step is to save them in your Google Sheet.  You’ll do this the same way for each platform - Facebook, LinkedIn, and Instagram - but here’s how it looks for one.
 Add a Google Sheets → Update a Row module.
Choose your Google connection and select the same spreadsheet you’ve been using (Personal Branding Motivational Quotes).
Pick Search by Path and select your sheet name (Sheet1).
Under Row Number, map the Row number from your first Google Sheets module so it updates the correct row.
Scroll to Values and leave everything blank except for the caption column.
For Facebook, map the Message. Content output from the OpenRouter module to FB Caption (D).
Once done, click Save. 💡* You’ll repeat the same process for LinkedIn and Instagram — just map the captions to their respective columns (E for LinkedIn, C for Instagram).*
Step 11: Finalizing Facebook and LinkedIn Posting Paths
Once your captions have been updated in Google Sheets, the next step is to publish them automatically.
For Facebook and LinkedIn, the flow will stay the same, only the destination module changes.
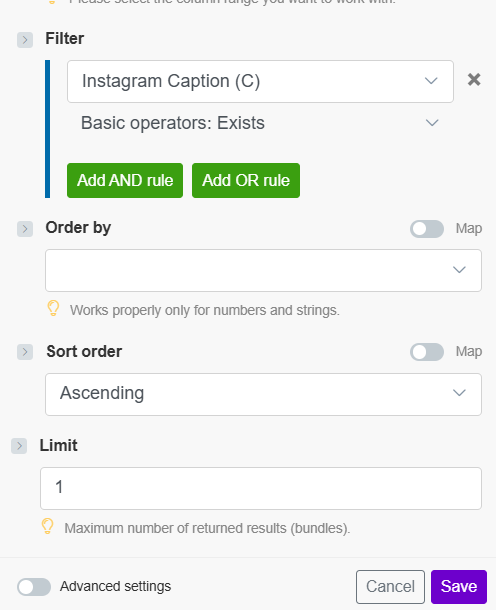
- Add a “Google Sheets – Search Rows” module after the update step.
This module will pull the final version of your post data (caption + image link).
Make sure it’s searching from the same sheet, using the same row number you’ve been updating. Check out the screenshot below to add the details:


- Add a “Download URL” module to fetch the generated image link from Templated.
This step downloads the rendered image automatically so it can be uploaded with your post. Pick render image from Templated module and click on save.  3. Add the Facebook platform module: Now that we’ve pulled the final post data, it’s time to automate publishing on Facebook.
Add the Facebook Pages – Create a Post with Photo module.
Connect your Facebook Page account to Make.com.
Under What do you want to do?, select Upload a photo.
In the File field, map the image you downloaded earlier using the Download URL module.
In the Caption field, map the FB Caption (D) from your Google Sheets search results — this will automatically post the right caption for each image.
4. Add the LinkedIn Platform Module
Connect your LinkedIn account (make sure you have admin access to the organization page).
In the File field, map the image from the Download URL module — this is your rendered image from Templated.
In the Content field, map the LinkedIn Caption (E) column from the Google Sheets Search Rows module.
Set Visibility to Public and leave other fields (like title or alt text) empty if not needed.  Click Save. 💡 This setup will automatically publish your LinkedIn posts with the right caption and image - no manual uploads required.
Step 12: Finalizing the Instagram Post Path
After the Search Rows module, we’ll complete the final steps to make your Instagram automation post-ready. This path handles everything from generating a platform-specific caption to publishing the post automatically. 1. Add OpenRouter for Instagram Caption *Right after the Search Rows module, add an OpenRouter - Create a Chat Completion module. Connect your OpenRouter API key
In the Content field, use this prompt: You format Instagram captions. “Map Quote Generated From Previous Open Router” Rules:
- Keep it short: 2–3 punchy lines (max ~220 characters before hashtags).
- End with 2–3 relevant hashtags on the last line.
- No @mentions. No links. No quote marks around the text.
- Minimal emojis only if they add impact; otherwise none.
- Output ONLY the final caption text.*
 *- Set Role to User and Model to OpenAI GPT-4.1 Mini.
- Click Save.*
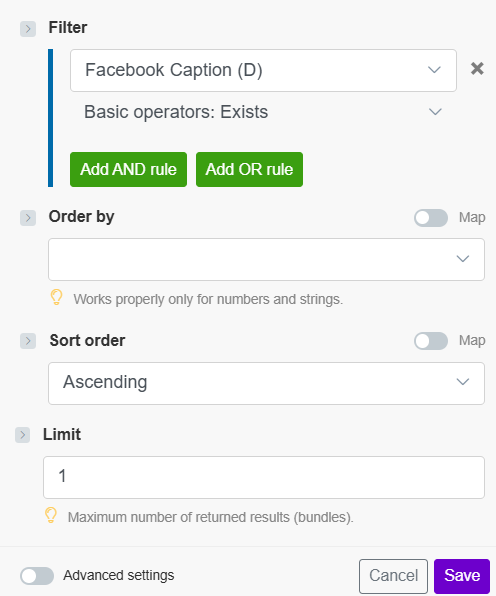
💡 This will create captions specifically formatted for Instagram posts. 2. Search Rows for Instagram Posting *Add a Google Sheets – Search Rows module * 
*Connect your Google account and select your spreadsheet __“Personal Branding Motivational Quotes.” __
Choose Search Method: Select from My Drive → Sheet Name: Sheet1 → Table contains headers: Yes.
Set Column range to A–CZ.
Under Filter, select Instagram Caption (C) and choose Basic operator: Exists.
 *Keep Sort order: Ascending and__ Limit: 1__.
 *Keep Sort order: Ascending and__ Limit: 1__.
💡 This ensures only rows with an Instagram caption are fetched for posting.*
4. Add Instagram Platform Module *Add the Instagram for Business – Create a Photo Post module 📸 Connect your Instagram Business account (must be linked to a Facebook Page).
In the Photo URL, map the Image Link from the Google Sheets Search Rows module.*  In Caption, map the Instagram Caption column.
  *Leave other fields (like User Tags or Location ID) empty.
✅ This will automatically post your motivational image with the generated caption directly to your Instagram page.* 
Start Your Automation
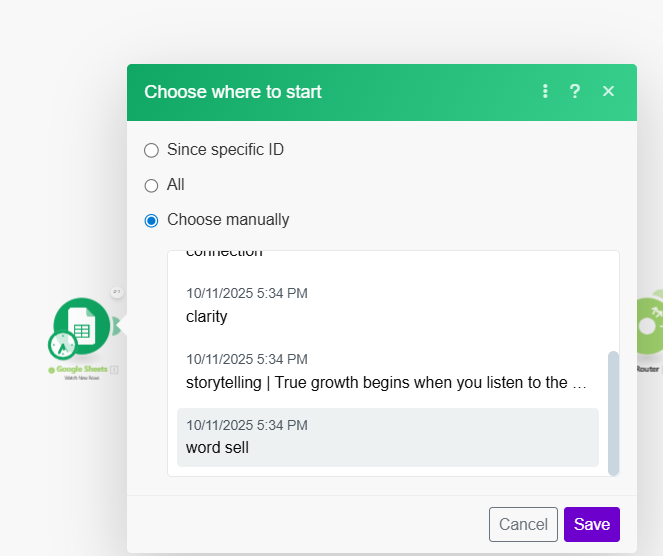
- Go to the first module (Google Sheets → Watch Rows) and click the clock icon . Select “Choose manually”, then pick the latest row from your list - this tells Make.com where to start running your scenario.
- Click Save, then hit Run once ▶️ to test your setup. If everything looks good, turn Scheduling ON from the top-right corner.
- Done! Your automation will now run automatically every time you add a new keyword to your sheet.

We Tested It And The Results Were Wild
 For just a few days, we ran this automation on fresh social media pages. It created and published quotes, images, and captions while we stayed out of the way. The results were shocking: on LinkedIn we got 800+ reactions, 15 comments, 30 reposts, and 32 followers. If this is the warm-up, imagine scaling it across more keywords and platforms. You will compounding reach without lifting a finger.
Download the Blueprints
To make things easier, you don’t have to start from scratch - just use these ready-to-go blueprints: 👉 Download Make.com Blueprint – Import this into your Make.com dashboard. Then:
Connect your own Google Sheets, Templated, and OpenRouter accounts.
Add your API keys wherever required.
Update your template ID (the one you created earlier in Templated).
👉 Download Google Sheet Template – Make a copy of this sheet and:
Add your keywords in the first column.
Keep the column headers the same for smooth mapping inside Make.com.
Once done, hit Run once ▶ ️ in Make.com to test everything. That’s it - your social media automation will be live and posting for you in minutes. 🚀
Conclusion:
In this tutorial, you have learnt how to build a complete, hands-off social media automation from adding a simple keyword in your sheet to posting fully designed content across platforms. This setup saves hours every week and keeps your brand active without any extra effort.
If you want to explore more ways to extend your social media automation or experiment with different workflows, these tutorials are worth checking out:
Automate Instagram Posts Using Google Sheets and Make
Automate Creating Facebook Posts Using Templated and n8n
Automate Your Image Generation Using Spreadsheets
Automate Quote Images for Social Media Using Templated and n8n
Each of these tutorials shows how to use Templated with different tools to build smart, creative workflows. All without coding.
Ready to try it for yourself?👉 Sign up Templated for free and start automating your next post today.