· Tutorial · 7 min read
Automate Personalized Welcome Email Images with Templated and Make
Automate personalized welcome email images in minutes using Templated and Make. Create a template, pull names from Google Sheets, and send unique visuals that boost engagement, stand out in inboxes, and make every “welcome” feel one-of-a-kind.

If you’re in charge of marketing or running a business, here’s the reality: 71% of your buyers want more than a first name in the subject line. They expect real personalisation every time you show up in their inbox.
And fair enough, people process images faster than words; they’re more eye-catching and much more memorable. The right image can turn a boring welcome email into something that feels like a one-on-one introduction.
If you’re serious about boosting engagement, it’s time to start sending emails that feature personalised visuals. You’ll stand out, you’ll get more replies, and you’ll turn your welcome emails into something customers remember.
I’m Pedro, founder of Templated. In this blog, I’ll show you how you can effortlessly automate personalized welcome email images in minutes. Just use Templated, and I am using Make. You can use any no-code solution of your choice.
Let’s get started.
What You'll Need
A free Make.com account (comes with 1,000 credits)
A Templated account (includes 50 free credits)
Google Sheets
Step 1: Create and Upload Your Email Template
First, you need a well-designed email template.
We do have some templates in our gallery that you can use, but if you already have a base template in any 3rd party tool like Canva or Photoshop, you can use that.
Just download it from there, come to Templated dashboard (sign up if you haven’t yet)  Enter your template’s dimensions and click create template.
  You’ll now be in the Templated design editor. Go to__ Uploads__ and upload your email template image.
  Drag and resize your design to fit the canvas perfectly.
To add a personal touch, select Text from the sidebar. Style it however you like. Drag it to where the name should appear.  Tip: If your template already includes a sample name (like “Neha” in mine), click on that text layer in Templated and rename it to something clear, such as “Name Text.” This way, when you automate with Make.com, it’ll be easy to identify and personalise the right layer.
Don’t forget to give your template a clear name (e.g. “Welcome Email”).
Once everything looks good, click Save.
Step 2: Set Up Your Google Sheet for Personalization
To automate personalized emails, you’ll need a Google Sheet with the names you want to use. Since most email templates just personalize the recipient’s name, you only need one column.
Create two sheets:
Input: Add a “Name” column and list all the names you want to personalize.  Output: Add “Name” and “Email Templates” as column headers. This is where your personalized email images or links will be saved.
  Give your Google Sheet a clear name, like “Welcome Email Templates.” This makes it easy to recognize and select when you set up your automation in Make.com. That’s it. Now you’re ready for automation!
Step 3: Create Make.com Automation Scenario
1. Login to Make.com
Signup to the make.com. You’ll land on the dashboard. 
2. Create a New Scenario
Click on Create a scenario. Then click the + icon to add your first module, and select Google Sheets - Watch New Rows. 
3. Fill Out the Watch New Rows Module
 Connection: Choose your Google account, or click "Add" to connect it if you haven't already. Search Method: Select “Search by path” to easily find your Google Sheet by its name.
Drive: Pick “My Drive” if your sheet is saved in your main Google Drive.
Spreadsheet ID: Enter the name of your Google Sheet exactly as it appears in your case, type Welcome Email Templates.
Sheet Name: Type the name of the tab where your data is listed here, use Input.
Table contains headers: Select “Yes,” since your first row contains the column name “Name.”
Row with headers: Set this to cover the first row where your headers are. For most setups, just leave the suggested range as it is.
Limit: Leave this blank if you want to use all the rows in your sheet, or set a limit if you only want to process a certain number.
Save: Click the Save button at the bottom to complete this step.
Step 4: Get Your API Key from Templated
 Go to your Templated dashboard. On the left, click Integrations > API.
Copy your API Key by clicking the copy icon. (Keep this key safe! You’ll need it in the next step.)
Step 5: Add the Templated Module
 In your Make.com scenario, click the + icon to add another module.
Search for and select Templated - Create a Render.
Set Up Your Templated Connection:
 When prompted for a connection, click Add. Paste your API Key into the field provided.
Give your connection a name if you like, then click Save.
Configure the Render Module
Template ID: Type the name of your template exactly as it appears in Templated (e.g., “Welcome Email”).
Format: Choose the image format you want (PNG is usually best for emails).
Layers:
For “Layer Name,” enter the layer name you set in the Templated editor (e.g., “Name Text”).
For “Text,” select the Name value coming from your Google Sheet. This will personalize each image.
Save the Module: Once everything is set, click Save.
Step 6: Run the Module to Get the Render URL
Before moving forward, you need to test the module to make sure it’s working and return the render URL (the link to your generated image).  Click the Run once button in Make.com.
The scenario will process a row from your Google Sheet and generate an image using your template.
Check the output of the Templated module. You should see a render URL. This is the direct link to your personalized image.
Make sure the render URL appears correctly. You’ll use this link in the next step to add it to your Google Sheet or send it in your emails.
Step 7: Add a New Row to Your Output Sheet
Now it’s time to save the personalized image link to your sheet. Here’s how:
Add a New Google Sheets Module
 Click the + icon in your scenario after the Templated module.
Select Google Sheets - Add a Row.
Fill Out the Module Settings: Connection: Select your Google account.
Search Method: Choose “Search by path.”
Drive: Pick “My Drive.”
Spreadsheet ID: Enter the name of your Google Sheet (Welcome Email Templates).
Sheet Name: Enter Output (this is your tab for storing results).
Table contains headers: Select Yes.
Map Your Data: 
Name (A): Click and select the Name field coming from your Input sheet (shown on the right panel).
Email Templates (B): Click and select Render URL from the Templated module output (this is your generated image link).
Save: Click Save to finish.
Step 8: Test with Manual Data Selection
Before you check your results, it’s important to tell Make.com where to start in your Google Sheet.
Why is this important? Manually selecting the starting row lets you test your automation with a specific entry, so you don’t waste credits or accidentally process the entire list. It’s a safe way to make sure everything’s working exactly as you want before going live.
How to Do It: Right-click directly on the “Watch New Rows” Google Sheets module to open the settings menu.
In the pop-up, select Choose manually.  To start your test from the very beginning, scroll all the way down in the selection window and choose the name in the first row of your sheet.
  Click Save.
Run the Scenario and Check the Output  Checking the Output sheet helps you confirm that everything is working as expected before running the full automation for your entire list.
  Wondering what the end result looks like?
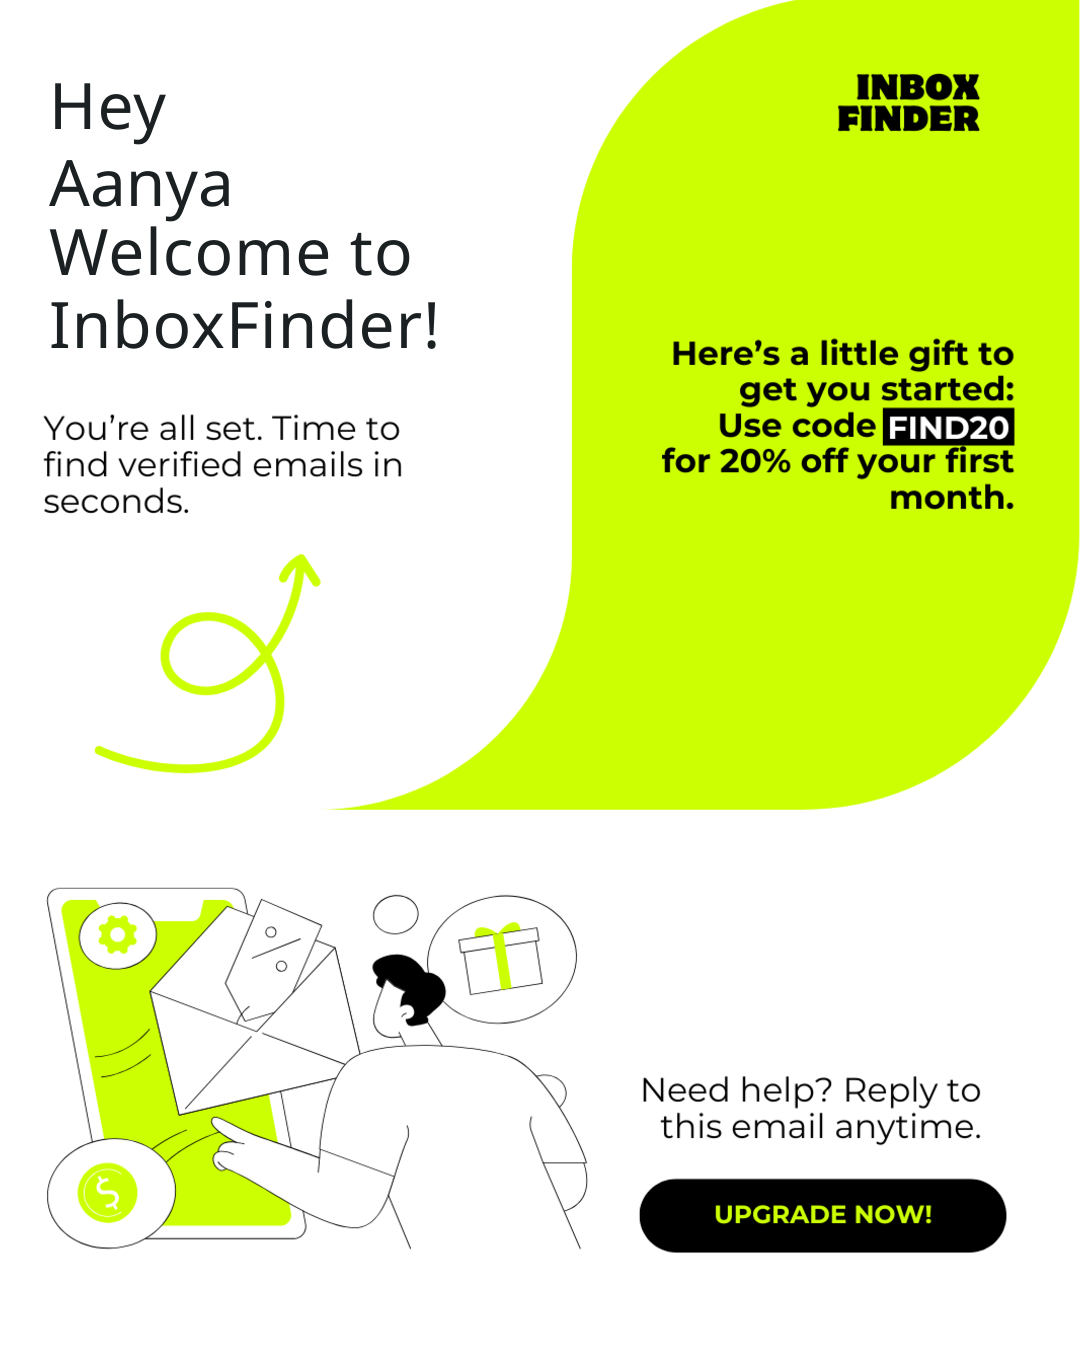
Check out this real example, made with the exact steps you just followed: 👉 View the Sample Template  Notice how the name fits perfectly into the design. This is not just another email, it actually feels made for the person receiving it.
That’s the power of real personalization. Pretty cool, isn’t it?
Want to Make This Even Easier? Download the Blueprint!
Don’t want to build the whole automation yourself? No problem. I’ve made a ready-to-use blueprint for you. Just download it, import it to Make.com scenario.  You’ll only need to make a few quick changes: Update the Google Sheet connection to use your own sheet.
Paste your Templated API key when you connect.
Check that your template and layer names match what you set up in your Templated account.
That’s it! You’ll have personalized welcome emails running in no time. 👉 Download the Blueprint Now
Wrapping Up
There you have it. You’re now just a few clicks away from sending emails that actually make people look twice in their inbox.
Stop settling for plain, boring messages. Bring your welcome emails to life with images that feel one-of-a-kind (because, honestly, they are).
Why wait? Sign up for Templated today and see how easy it is to stand out, connect, and turn every “welcome” into a wow.
Want to take your automation superpowers even further? Check out these step-by-step guides:
Your next “wow” project is just one click away. See you on the inside!


